搜索到
155
篇与
朱治龙
的结果
-
 推荐一款统计代码行数的VSCode插件 基本介绍在撰写软著文档或做项目结项时我们一般都需要统计工程的代码行数,如果逐个文件进行统计的话,不仅费时费力,还不一定能得到准确的数据,所以我就在做这工作的时候找了下相关的工具,发现 VSCode 有一款好用的插件:Lines of Code(LOC)插件市场链接:https://marketplace.visualstudio.com/items?itemName=lyzerk.linecounterGithub 链接:https://github.com/alimozdemir/vscode-linecounter该插件当前的介绍信息见截图:基本使用安装后,可使用 Ctrl+Shift+P 打开 命令面板,然后输入 LineCount,显示如下选项:相关选项对应的是:LineCount:Count Workspace files:统计当前工作区所有文件的代码行数LineCount:Count current file:统计当前文件的代码行数选择 LineCount:Count Workspace files 后,系统将进行相关统计操作,统计完后会在当前工程的out目录生成 linecounter.txt 和 linecounter.json 文件,其中 linecounter.txt 文件内容如下:=============================================================================== EXTENSION NAME : linecounter EXTENSION VERSION : 0.2.7 ------------------------------------------------------------------------------- count time : 2023-12-27 09:21:44 count workspace : d:\GitRoot\SE\console\console-ui total files : 563 total code lines : 72734 total comment lines : 3925 total blank lines : 3554 statistics | extension| total code| total comment| total blank|percent| ------------------------------------------------------------------------- | .devIstio| 44| 2| 7| 0.060| | .stage| 34| 0| 0| 0.047| | .production| 41| 0| 0| 0.056| | | 193| 74| 42| 0.27| | .development| 36| 0| 0| 0.049| | .js| 13156| 1998| 752| 18| | .html| 2347| 6| 333| 3.2| | .md| 1660| 243| 419| 2.3| | .svg| 1743| 0| 107| 2.4| | .json| 3403| 7| 5| 4.7| | .yaml| 4153| 17| 626| 5.7| | .stg| 9| 2| 5| 0.012| | .blsc| 10| 2| 7| 0.014| | .conf| 103| 5| 27| 0.14| | .key| 30| 0| 0| 0.041| | .yml| 71| 0| 4| 0.098| | .crt| 28| 0| 0| 0.038| | .scss| 1778| 83| 312| 2.4| | .vue| 43126| 1467| 715| 59| | .css| 769| 19| 193| 1.1| ------------------------------------------------------------------------- .browserslistrc, code is 3, comment is 0, blank is 0. .editorconfig, code is 9, comment is 0, blank is 1. .env, code is 19, comment is 0, blank is 0. .env.blsc.development, code is 20, comment is 0, blank is 0. .env.blsc.devIstio, code is 20, comment is 0, blank is 0. .env.blsc.production, code is 23, comment is 0, blank is 0. .env.blsc.stage, code is 21, comment is 0, blank is 0. .env.development, code is 16, comment is 0, blank is 0. .env.devIstio, code is 14, comment is 0, blank is 0. .env.production, code is 18, comment is 0, blank is 0. .env.stage, code is 13, comment is 0, blank is 0. .eslintignore, code is 1, comment is 4, blank is 0. .eslintrc.js, code is 196, comment is 129, blank is 0. .gitignore, code is 20, comment is 0, blank is 2. .prettierrc, code is 6, comment is 0, blank is 0. admin.html, code is 21, comment is 2, blank is 0. cspell.json, code is 96, comment is 7, blank is 2. default.conf, code is 14, comment is 0, blank is 2. ... 统计的文件列表 src\views\userCenter\modals\WarningCcLimitModal.vue, code is 218, comment is 5, blank is 1. vite.config.js, code is 183, comment is 30, blank is 5. ===============================================================================从上面的信息不难看出当前工程内的文件总数及总代码行数, 包括注释行数及空行数。其中该插件有不少配置信息,可以在统计前根据实际情况进行文件排除等场景,配置信息示例数据如下(相关配置信息保存到 VS Code 的 settings.json 文件):{ "LineCount.showStatusBarItem": true, "LineCount.statistics": true, "LineCount.includes": [ "**/*" ], "LineCount.excludes": [ "**/.vscode/**", "**/node_modules/**" ], "LineCount.output": { "txt": true, "json": true, "csv": true, "md": true, "outdir":"out" }, "LineCount.sort": "filename", "LineCount.order": "asc", "LineCount.comment":[ { "ext": ["c","cpp","java"], "separator": { "linecomment": "//", "linetol":false, "blockstart": "/*", "blockend": "*/", "blocktol": false, "string":{ "doublequotes": true, "singlequotes": true } } }, { "ext": ["html"], "separator": { "blockstart": "<!--", "blockend": "-->", } } ] }
 -
Jeepay开源版使用过程中踩过的坑 1、商户系统登录问题添加商户的时候有设置登录名,但是没有设置账号密码的位置,好不容易找到对商户重置密码的地方,但是那个勾选重置密码的复选框又超级容易被理解为用户下次登录需重置密码的配置项。勾选后有提示重置为默认密码,但是又没有说明默认密码是什么,然后非得要查看源码才知道是通过常量设置的默认密码为:jeepay6662、证书文件不存在问题好不容易登录商户系统了,进行支付测试的功能验证,提示证书文件不存在:整个应用部署过程完全是基于官方提供的 docker-compose.yml 文件,最后发现默认配置的 /home/jeepay/upload 目录根本就没有挂载到宿主机,修改 docker-compose.yml ,payment、manager、merchant 应用的 volumes 应用均挂载 /home/jeepay 目录,如: volumes: - ./jeepayData:/home/jeepay3、支付测试不显示二维码的问题支付测试时不显示支付二维码,发现HTTP请求中有个 404 请求:检查代码,确定应用存在对应的接口路径:查看docker 日志复现如下 error 信息:基于该信息可得知,nginx在接收到二维码图片请求时根本就没有请求到 jeepay-payment 这个后端服务,而是直接请求了root 目录中的文件,由此我们调整一下 代理的api接口的优先级,修改 jeepay-ui 根目录下的 default.conf.template 文件,在/api/ 前添加 ^~ ,nginx的路径匹配规则如下:/:通用匹配,任何请求都可以匹配=:用于不含正则表达式的uri前,要求请求字符串与uri严格匹配,如果匹配成功,就停止继续向下搜索并立即处理该请求。~:用于表示uri包含正则表达式,并且区分大小写。~*:用于表示uri包含正则表达式,并且不区分大小写。^~:用于不包含正则表达式的uri前,要求nginx服务器找到标识uri和请求字符串匹配度最高的location后,立即使用此location处理请求,而不再使用location块中的正则uri与请求字符串做匹配。!~和!~*:分别表示区分大小写不匹配和不区分大小写不匹配的正则优先级:= --> ^~ --> /* #当有多个包含/进行正则匹配时,选择正则表达式最长的location配置执行。多个location配置的情况下匹配顺序为: 首先匹配 =,其次匹配^~, 其次是按文件中顺序的正则匹配,最后是交给 /通用匹配。当有匹配成功时候,停止匹配,按当前匹配规则处理请求。注意:如果uri包含正则表达式,则必须要有 ~ 或者 ~ 标识。修改后的 default.conf.template 文件如下所示:server { listen 80; listen [::]:80; server_name localhost; root /workspace/; try_files $uri $uri/ /index.html; location ^~ /api/ { proxy_next_upstream http_502 http_504 error timeout invalid_header; proxy_pass http://$BACKEND_HOST; proxy_set_header Host $host; proxy_set_header X-Real-IP $remote_addr; proxy_set_header X-Forwarded-For $proxy_add_x_forwarded_for; proxy_set_header Upgrade $http_upgrade; proxy_set_header Connection "upgrade"; } # favicon.ico location = /favicon.ico { log_not_found off; access_log off; } # robots.txt location = /robots.txt { log_not_found off; access_log off; } # assets, media location ~* \.(?:css(\.map)?|js(\.map)?|jpe?g|png|gif|ico|cur|heic|webp|tiff?|mp3|m4a|aac|ogg|midi?|wav|mp4|mov|webm|mpe?g|avi|ogv|flv|wmv)$ { expires 7d; access_log off; } # svg, fonts location ~* \.(?:svgz?|ttf|ttc|otf|eot|woff2?)$ { add_header Access-Control-Allow-Origin "*"; expires 7d; access_log off; } # gzip gzip on; gzip_vary on; gzip_proxied any; gzip_comp_level 6; gzip_types text/plain text/css text/xml application/json application/javascript application/rss+xml application/atom+xml image/svg+xml; } 4、公众号/小程序支付的URL多了一级/cashier应用部署完毕,进行支付测试时,采用「微信支付二维码」的方式已支付成功,但是采用「公众号/小程序」的支付方式,在扫码后,发现扫码后的页面显示空白,进一步排查,发现是由于页面的css和js资源文件404导致的,进一步排查,是由于请求的资源多了一级path,一下是问题排查过程:系统配置中的支付网关地址填写的是 https://jeepay-cashier.work.zhuzhilong.com:但是在使用支付测试功能,支付方式采用「公众号/小程序」进行支付测试时,生成的二维码如下:二维码识别后的地址为:https://jeepay-cashier.work.zhuzhilong.com/cashier/index.html#/hub/78d439f3140fe4047c7f8f6cda1048313636890021b83c0c167270dbce4fc2ff根据应用部署情况,比预期的访问路径多了 /cashier,查看源代码后,发现这个路径是写死在 com.jeequan.jeepay.core.model.DBApplicationConfig.java中的:去掉相关方法中的 /cashier 后,根据 docker-compose.yml 重新构建镜像及重启服务后,可正常支付。
-
magic-boot/magic-api 使用随记 magic-api 是一款非常优秀的快速开发框架,在做大屏的过程中找到的宝贝应用,可以用类JS 语法快速开发接口,能非常方便的操作数据库及处理一些复杂的业务逻辑,而 magic-boot 是基于 magic-api 开发的一款快速开发平台,提供了基本的用户鉴权、后台管理等功能。在实际项目过程中我基于 magic-boot 做了如下事项:1、通过Matomo的API定时同步数据至数仓做大数据分析2、采集coolshell.cn整站数据3、每周五定时推送企业微信消息,提醒同事写周报更多功能待进一步挖掘……下面是我在项目中有用到的技术点的一个记录,会在项目过程中不断更新,便于后续有其他项目用到的话,能快速查找运用。获取 系统设置/配置中心 模块设置的配置项import '@/configure/getBykey' as configure; var baseURL = configure('matomo.base-url'); var authToken = configure('matomo.auth-token');http请求数据示例import cn.hutool.json.JSONUtil import org.springframework.util.StringUtils import http; import log; import '@/configure/getBykey' as configure; // 从配置中心获取接口所需数据 var baseURL = configure('matomo.base-url'); var authToken = configure('matomo.auth-token'); // 组转请求URL var reqURL = `${baseURL}?module=API&method=${method}&format=JSON&token_auth=${authToken}`; if (!StringUtils.isEmpty(params)) { reqURL += `&${params}`; } log.info(`reqURL:${reqURL}`); // 请求数据 var resData = http.connect(reqURL).contentType('application/json').get().getBody(); return resData;在原基础上增加http请求出错重试机制import cn.hutool.json.JSONUtil import org.springframework.util.StringUtils import cn.hutool.core.date.DateUtil import cn.hutool.core.thread.ThreadUtil import http import log import '@/configure/getBykey' as configure; // 从配置中心获取接口所需数据 var baseURL = configure('matomo.base-url'); var authToken = configure('matomo.auth-token'); // 组转请求URL var reqURL = `${baseURL}?module=API&method=${method}&format=JSON&token_auth=${authToken}`; if (!StringUtils.isEmpty(params)) { reqURL += `&${params}`; } // log.info(`reqURL:${reqURL}`); var requestStartTime = DateUtil.now(); var successFlag = '' var exceptionContent = '' // 请求数据 var resData = '' // 最大重试次数 var MAX_RETRY_COUNT = 5 // 当前重试次数 var retryCount = 0; while(retryCount < MAX_RETRY_COUNT && successFlag !== 'Y') { try { resData = http.connect(reqURL).contentType('application/json').get().getBody(); successFlag = 'Y' } catch(e) { successFlag = 'N' ThreadUtil.sleep(1000); retryCount++ exceptionContent = e.getMessage(); } } var requestEndTime = DateUtil.now(); db.table('matomo_sync_log').insert({ 'apiMethod' : method, 'requestParams' : params, 'responseContent': resData.asString(), 'exceptionContent': exceptionContent, 'requestTime':requestStartTime, 'responseTime': requestEndTime, 'retryCount':retryCount, 'successFlag': successFlag}); return resData;分页获取数据在获取一些详情数据的时候,存在数据量超大的情况,一次性获取所有数据极有可能会导致数据库及应用挂掉,即便不挂掉的情况下,也会超长事件才会响应结果,所以采用分页获取还是很有必要的。下面的代码是在实际项目中分页调用Matomo的接口获取输入然后将接口返回的数据,结构化处理后,保存到本地数据库。 import cn.hutool.json.JSONUtil import log; import '@/dmcfns/sendMatomoRequest' as getMatomoData; var PAGE_SIZE=10 // 每页获取记录数,获取后批量入库 var currentPage = 0// 当前页 var needLoad = true // 继续加载数据标识,当当前页加载的内容小于PAGE_SIZE时则不再加载 while(needLoad) { var resData = getMatomoData('Live.getLastVisitsDetails', `period=day&date=${date}&idSite=${siteId}&doNotFetchActions=1&filter_offset=${PAGE_SIZE * currentPage}&filter_limit=${PAGE_SIZE}`) if (resData.asString().startsWith("[")) { var siteDatas = JSONUtil.parseArray(resData); var siteData = []; for (index, site in siteDatas) { var siteObj = siteDatas.getJSONObject(index); var visitId = siteObj.getStr("idVisit"); var visitorId = siteObj.getStr("visitorId"); var visitIp = siteObj.getStr("visitIp"); var longitude = siteObj.getStr("longitude"); var latitude = siteObj.getStr("latitude"); var userId = siteObj.getStr("userId"); var country = siteObj.getStr("country"); var referrerName = siteObj.getStr("referrerName"); var visitProps = JSONUtil.toJsonStr(siteObj); db.table('matomo_daily_visit').insert({ date, siteId, visitId, visitorId, visitIp, longitude, latitude, userId, country, referrerName, visitProps }) } if (siteDatas.size() === PAGE_SIZE) { currentPage++ } else { needLoad = false } } }使用多数据源操作数据库db['ZR'].table('crawler_list').insert({ pageURL: linkURL, articleTitle:linkTitle })根据主键更新部分字段内容var updateMap = { id: visitItem.id, ipCountry: country, ipProvince: province, ipCity: city } db.table('matomo_daily_visit').primary('id').update(updateMap)修改某个字段的值db.table("sys_user").column("isLogin", isLogin).where().eq("id",id).update()推送消息至企业微信机器人import http import log // 测试机器人 // var ROBOT_URL = 'https://qyapi.weixin.qq.com/cgi-bin/webhook/send?key=xxx' // 超算云研发部2023 微信群的eHour 机器人 var ROBOT_URL = 'https://qyapi.weixin.qq.com/cgi-bin/webhook/send?key=xxxx' var msg = { "msgtype": "text", "text": { "content": """为便于公司开展项目成本核算相关工作,请各位同事及时登录eHour系统录入本周工作工时,如有系统使用相关问题可联系 XXX,感谢配合[抱拳][抱拳]\neHour系统链接如下:http://172.18.3.xxx/""", "mentioned_list":["@all"] } } http.connect(ROBOT_URL).body(msg).post(); log.info('eHour消息推送成功') // 以下cron表达式为每周五16:30分执行 00 30 16 * * 05读取Excel文件并转换为jsonimport cn.hutool.poi.excel.ExcelUtil import request import log var datas = ExcelUtil.getReader(new ByteArrayInputStream(request.getFile('file').getBytes())).readAll() var sourceDatas = datas::stringify::json导出Excelimport cn.hutool.poi.excel.ExcelWriter; import cn.hutool.poi.excel.ExcelUtil; import cn.hutool.json.JSONUtil; import log; import response import java.io.*; var list = db['MDC'].select("select * from crawler_resource limit 10") //通过hutool工具创建的excel的writer,默认为xls格式 ExcelWriter writer= ExcelUtil.getWriter(); var bos = new ByteArrayOutputStream(); log.info("List:\n" + JSONUtil.toJsonPrettyStr(list)) try { //一次性写出内容,使用默认样式,强制输出标题 writer.write(list,true); writer.flush(bos,true); } finally { bos.flush(); writer.close(); } return response.download(bos.toByteArray(), "crawler_resource_list.xlsx");导出Excel时自定义头部import cn.hutool.poi.excel.ExcelWriter; import cn.hutool.poi.excel.ExcelUtil; import cn.hutool.json.JSONUtil; import cn.hutool.core.date.DateUtil import log; import response import java.io.*; var currentDb = db['MS'] var taskObj = currentDb.table('ai_resource_task').where().eq("id",taskId).selectOne() if (taskObj == null) { return "分析任务Id不存在,请修改请求接口后重试" } var pageList = currentDb.select('select * from ai_resource_cost where task_id = #{taskId}') const res = [] pageList.forEach(item => { var userObj = { "用户ID": item.userId, "集群ID":item.clusterId, "资源ID": item.resourceUuid, "资源状态": item.recordType, "开始时间": DateUtil.formatDateTime(DateUtil.date(item.startTime)), "结束时间": DateUtil.formatDateTime(DateUtil.date(item.endTime)), "耗时(单位:秒)": item.costSeconds, "耗时": item.costTimeShow, "计费类型": item.billingType, "资源规格": item.resourceScale, } res.push(userObj) }) ExcelWriter writer= ExcelUtil.getWriter(); writer.setColumnWidth(-1, 18); var bos = new ByteArrayOutputStream(); try { //一次性写出内容,使用默认样式,强制输出标题 writer.write(res,true); writer.flush(bos,true); } finally { bos.flush(); writer.close(); } return response.download(bos.toByteArray(), taskObj.taskName + "_分析结果.xlsx");数据库事务处理db.transaction(() => { if (archived_at == null) { //项目取消归档 //推送取消归档的通知 db.table("project_tasks").primary("project_id").primary("archived_follow").update({ project_id: project_id, archived_follow: 1, archived_at: null, archived_follow: 0, }) } else { //项目归档 db.table("project_tasks").primary("project_id").primary("archived_at").update({ project_id: project_id, archived_at: null, archived_at: archived_at, archived_follow: 1, }) } db.table("projects").primary("id").update({ id: project_id, archived_at: archived_at, archived_userid: userid }) })
-
docker compose 部署Umami 很长一段时间是用的cnzz做的网站访问统计,功能强大,分析结果对于小白用户也超级友好,自从被阿里收购后,整合成Umeng的一部分勉强还能用,但是自从开启收费(收割用户)模式后,高昂的价格,无疑把我们这种小白个人用户完全隔离在外了。然后用了一段时间的百度统计,感觉也是不尽如人意,然后就只好另辟蹊径,调研了市面主流的流量统计工具(也就调研了Matomo 和Umami)后,选择了Umami 作为个人流量统计工具,主要是Matomo不少明细数据是存储的Binary数据,不便于通过SQL直观的查看,相对于Matomo而言,Umami 算是轻量级别的,UI 界面也更现代化。Umami 支持 PostgreSQL 和 MySQL 两种数据库,分别对应不同的Docker 镜像。ProstgreSQL:docker pull ghcr.io/umami-software/umami:postgresql-latestMySQL:docker pull ghcr.io/umami-software/umami:mysql-latest由于我的服务器上面已安装 MySQL 客户端,就直接采用 MySQL 的镜像。ghcr.io 是 GitHub 的 Docker 镜像仓库,国内环境可能在pull 时会碰到些网络方面的问题,我是通过一台境外的服务器pull 后,然后 push 到本人的 Docker 私服进行下载的,也可以采用导出备份后在导入的方式。如果你在pull过程中也存在这方面网络的问题的话,也推荐使用这个方式。docker-compose.ymlversion: "3.8" services: umami: image: ghcr.io/umami-software/umami:mysql-latest # image: hub.work.zhuzhilong.com/apps/umami:mysql container_name: umami restart: unless-stopped volumes: - ../hosts:/etc/hosts environment: - DATABASE_URL=mysql://DB_USERNAME:DB_PASSWORD@DB_HOST:DB_PORT/umami - DATABASE_TYPE=mysql - APP_SECRET=umami2023 - TZ=Asia/Shanghai networks: - net-zzl ports: - 8202:3000 networks: net-zzl: name: bridge_zzl external: true 使用 docker compose up -d 启动后,可使用默认的管理员账号登录:用户名:admin密码:umami登录后即可修改密码及添加站点了。以下是整合后的部分界面截图:顺便说下,umami的表结构比较简单,访问用户的IP信息都没有存表,如果有复杂运营场景的话,还是推荐使用 Matomo 之类的功能更强大的工具。当前版本(2.8.0)只有11张表:{mtitle title="2023-12-18更新"/}应用升级近日登录umami时提示最新发布了2.9.0 版本,而根据更新日志中的内容有提到可以查看访客的城市信息了,便及时更新了下,使用docker compose 的方式更新超级简单,主要执行如下命令:docker compose pull docker compose up --force-recreate提示数据库更新成功:然后重启应用即可
-
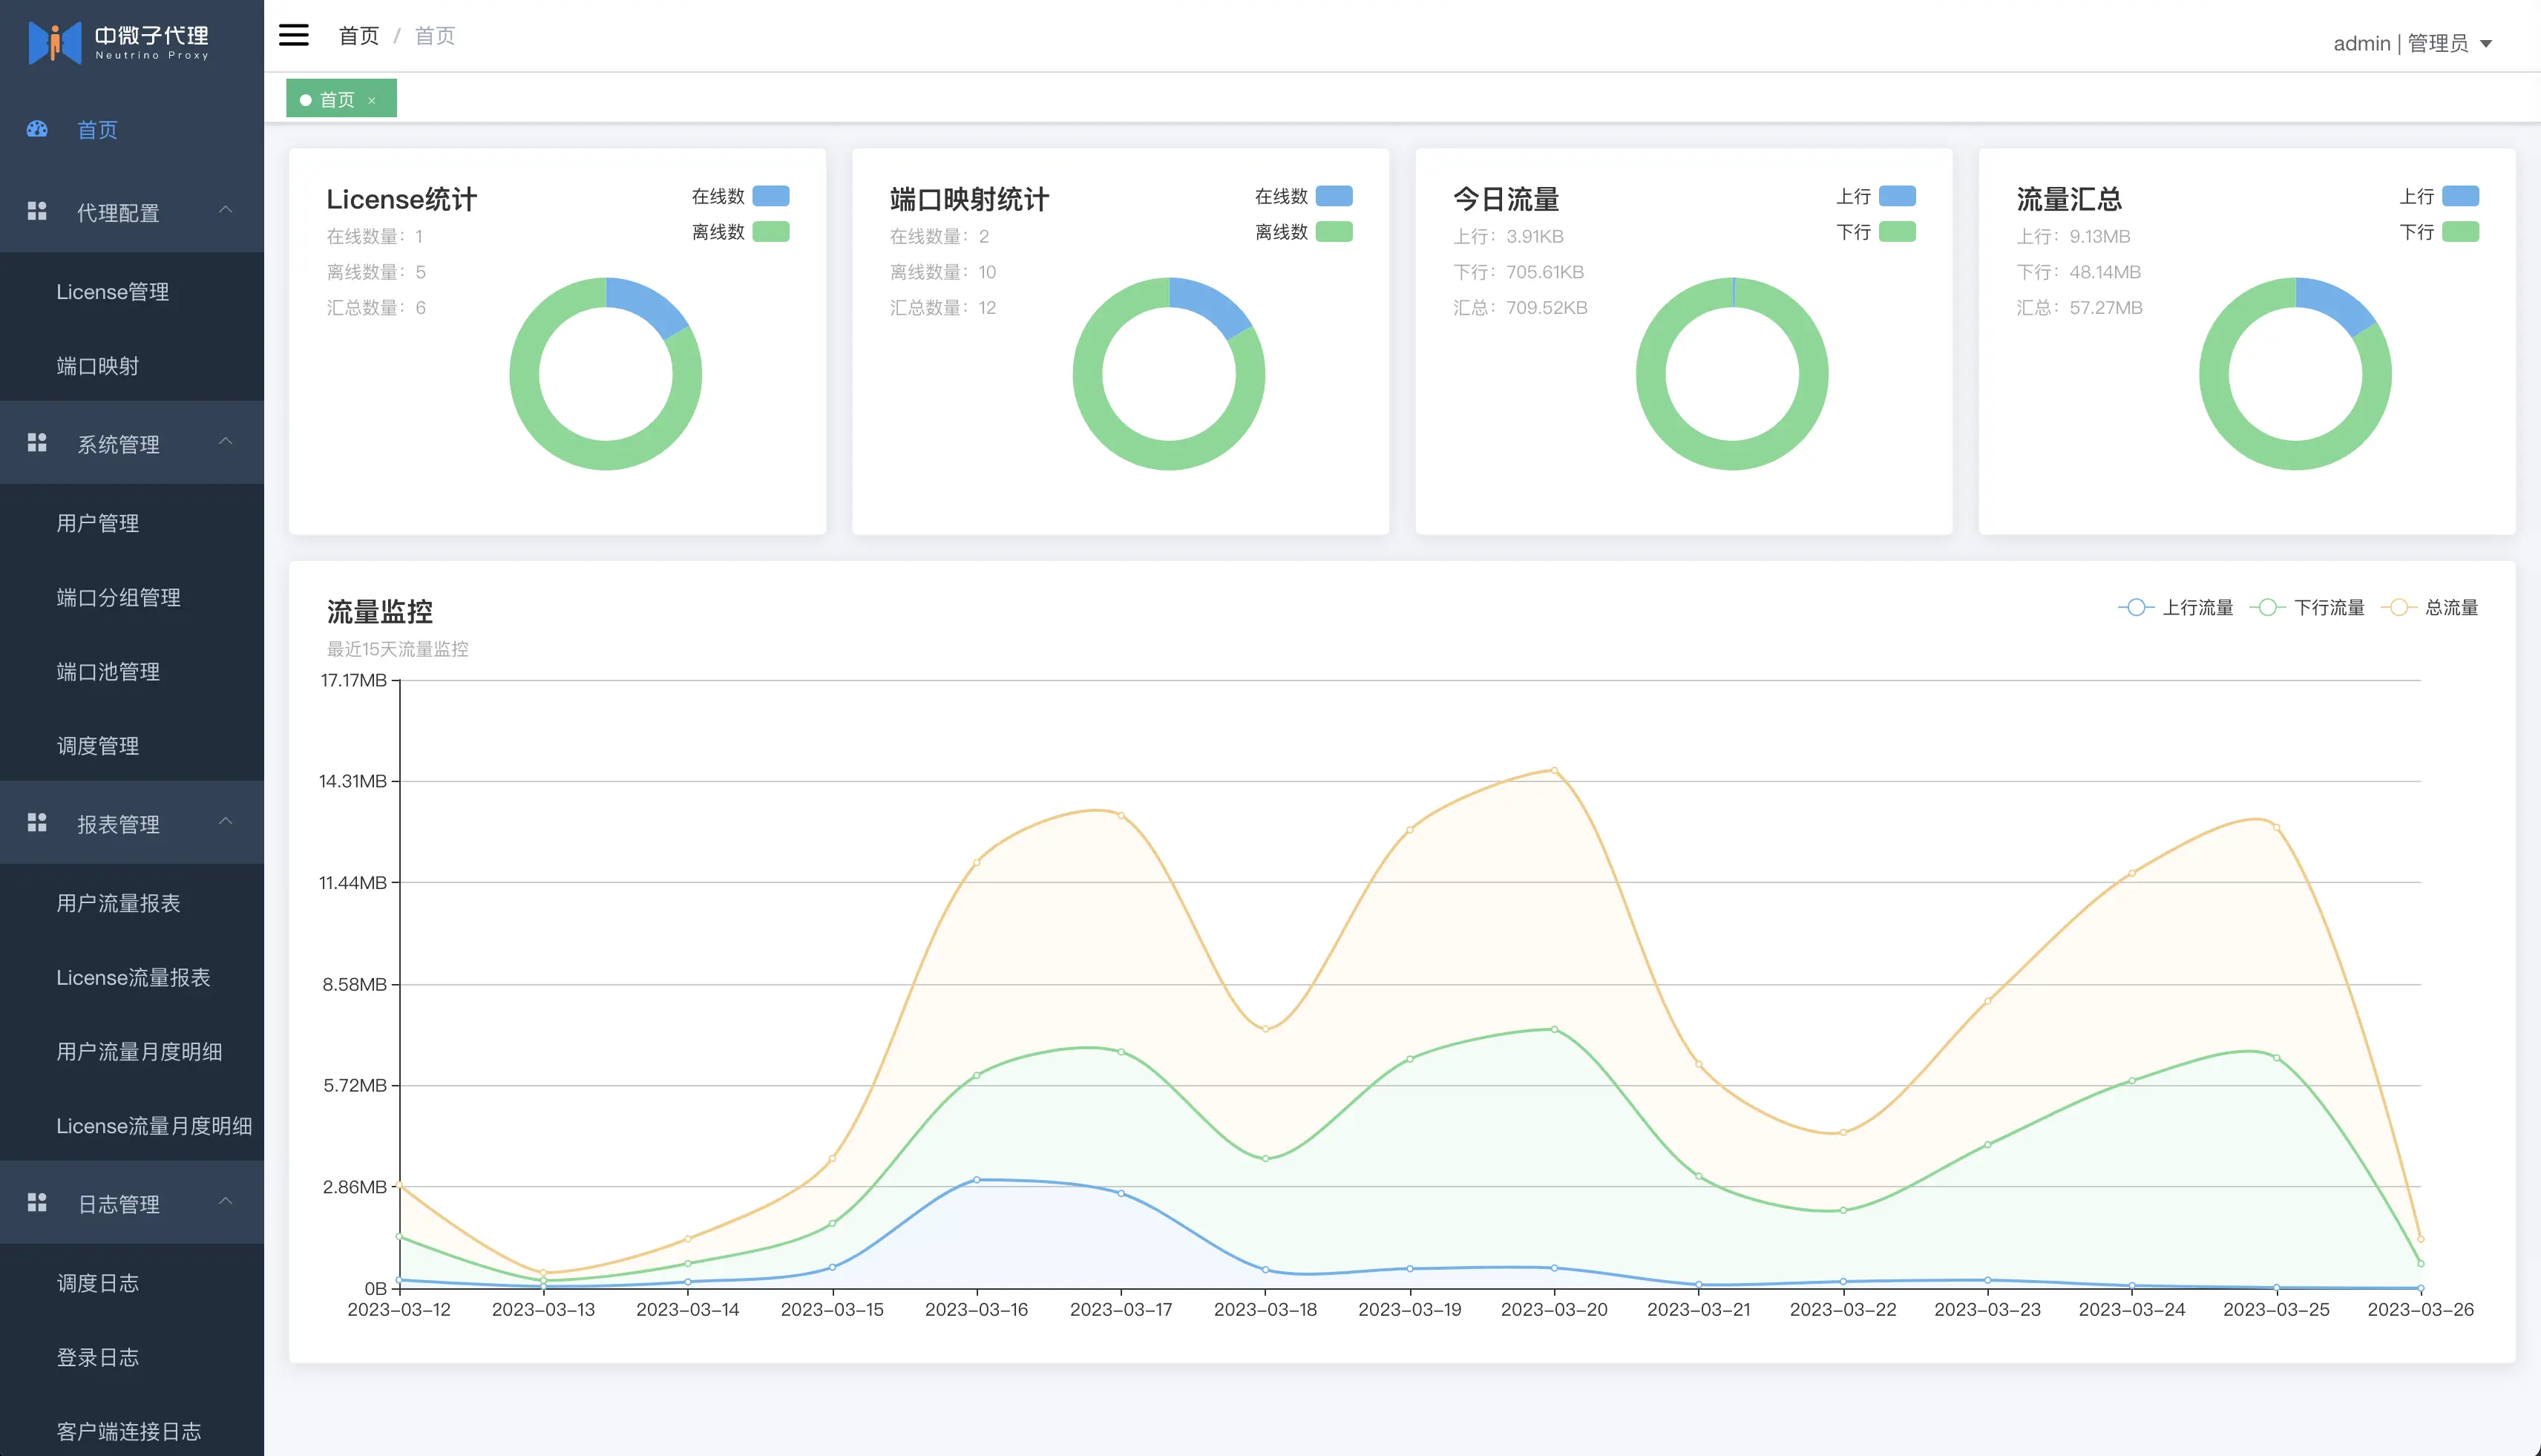
docker compose 部署 中微子代理(NeutrinoProxy) 近期在开源中国有看到 Neutrino-proxy 的一些介绍,了解到 NeutrinoProxy 是一款基于 Netty 的内网穿透工具,官方的介绍信息如下:基本介绍中微子代理 (neutrino-proxy) 是一款基于 netty 的内网穿透神器。该项目采用最为宽松的 MIT 协议,因此您可以对它进行复制、修改、传播并用于任何个人或商业行为。Gitee 地址:https://gitee.com/dromara/neutrino-proxy官网地址:http://neutrino-proxy.dromara.org服务端管理后台截图:主要特点:1、流量监控:首页图表、报表管理多维度流量监控。全方位掌握实时、历史代理数据。2、用户 / License:支持多用户、多客户端使用。后台禁用实时生效。3、端口池:对外端口统一管理,支持用户、License 独占端口。4、端口映射:新增、编辑、删除、禁用实时生效。5、Docker:服务端支持 Docker 一键部署。6、SSL 证书:支持 SSL,保护您的信息安全。7、域名映射:支持绑定子域名,方便本地调试三方回调8、采用最为宽松的 MIT 协议,免去你的后顾之忧之前一直有在用 FRP 作为内网穿透工具,用了很多年也确实非常好用,不过 FRP 在可视化管理方面比较欠缺,虽然提供了dashboard,但是只提供了代理端口查看及浏览统计方面的功能,不能提供多用户方面的管控。而 Neutrino 正好弥补了这方面的不足。以下是使用 docker compose 部署相关的代码,仅作为记录。服务端:docker-compose.ymlversion: '3.8' services: app: image: registry.cn-hangzhou.aliyuncs.com/asgc/neutrino-proxy:latest container_name: neutrino-proxy restart: always networks: - net-zzl ports: - 9000-9200:9000-9200/tcp - 9201:8888 volumes: - ./config:/root/neutrino-proxy/config networks: net-zzl: name: bridge_zzl external: true ./config/app.ymlneutrino: data: db: type: mysql # 自己的数据库实例,创建一个空的名为'neutrino-proxy'的数据库即可,首次启动服务端会自动初始化 url: jdbc:mysql://DB_HOST:3306/neutrino-proxy?useUnicode=true&characterEncoding=UTF-8&allowMultiQueries=true&useAffectedRows=true&useSSL=false driver-class: com.mysql.jdbc.Driver # 数据库帐号 username: DB_USERNAME # 数据库密码 password: DB_PASSWORD客户端官网文档不推荐使用docker的方式部署,但是考虑到要部署Java 环境之类的,对宿主机而言是挺麻烦的,还是试着通过docker 的方式部署的客户端,经过验证也是 OK 的。docker-composeversion: '3.8' services: app: image: aoshiguchen/neutrino-proxy-client:latest container_name: neutrino-proxy-client restart: always network_mode: host volumes: - ./config:/root/neutrino-proxy/config./config/app.ymlneutrino: proxy: logger: # 日志级别 level: ${LOG_LEVEL:info} tunnel: # 线程池相关配置,用于技术调优,可忽略 thread-count: 50 # 隧道SSL证书配置 key-store-password: ${STORE_PASS:123456} jks-path: ${JKS_PATH:classpath:/test.jks} # 服务端IP,这里替换成主机IP或域名 server-ip: ${SERVER_IP:proxy.xxx.com} # 服务端端口(对应服务端app.yml中的tunnel.port、tunnel.ssl-port) server-port: ${SERVER_PORT:9002} # 是否启用SSL(注意:该配置必须和server-port对应上) ssl-enable: ${SSL_ENABLE:true} # 客户端连接唯一凭证,这里替换成key license-key: ${LICENSE_KEY:ec7e9906cXXXXXX6430895c37fec75cd4e11} # 客户端唯一身份标识(可忽略,若不设置首次启动会自动生成) client-id: ${CLIENT_ID:workServer} # 是否开启隧道传输报文日志(日志级别为debug时开启才有效) transfer-log-enable: ${CLIENT_LOG:false} # 重连设置 reconnection: # 重连间隔(秒) interval-seconds: 10 # 是否开启无限重连(未开启时,客户端license不合法会自动停止应用,开启了则不会,请谨慎开启) unlimited: false client: udp: # 线程池相关配置,用于技术调优,可忽略 boss-thread-count: 5 work-thread-count: 20 # udp傀儡端口范围 puppet-port-range: 10000-10500 # 是否开启隧道传输报文日志(日志级别为debug时开启才有效) transfer-log-enable: ${CLIENT_LOG:false}实现后的效果截图:
-
Mybatis-Plus 分页功能实现流程 Mybatis 自带分页功能,但是该分页功能是基于内存的分页,也就是会讲所有符合条件的数据查询出来,然后在从内存中获取当前页的信息,这种方式在数据量大的情况下会存在严重的性能问题。我们通过 Mybatis-Plus 自带的分页插件可以很好的解决这个问题,实现步骤记录如下:1、 添加配置类,示例内容如下:package com.paratera.protect.config; import com.baomidou.mybatisplus.annotation.DbType; import com.baomidou.mybatisplus.extension.plugins.MybatisPlusInterceptor; import com.baomidou.mybatisplus.extension.plugins.inner.PaginationInnerInterceptor; import org.springframework.context.annotation.Bean; import org.springframework.context.annotation.Configuration; /** * Mybatis Plus 配置类,主要用于继承分页插件 * @author 朱治龙 * @date 2023-10-19 23:14:00 */ @Configuration public class MyBatisPlusConfig { @Bean public MybatisPlusInterceptor mybatisPlusInterceptor() { MybatisPlusInterceptor interceptor = new MybatisPlusInterceptor(); // 分页插件 interceptor.addInnerInterceptor(new PaginationInnerInterceptor(DbType.MYSQL)); return interceptor; } } 2、使用分页方法查询2.1、selectPage2.1.1 示例代码 @Test void testSelectPage() { QueryWrapper<Staff> qw = Wrappers.query(); qw.ge("age", 30); Page<Staff> page = new Page<Staff>(1, 2); // 不查记录数 // page.setSearchCount(false); Page<Staff> pageData = staffMapper.selectPage(page, qw); System.out.println("总页数:" + pageData.getPages()); System.out.println("总记录数:" + pageData.getTotal()); pageData.getRecords().forEach(System.out::println); }2.1.2 查询结果DEBUG==> Preparing: SELECT COUNT(*) AS total FROM staff WHERE (age >= ?) DEBUG==> Parameters: 30(Integer) TRACE<== Columns: total TRACE<== Row: 4 DEBUG<== Total: 1 DEBUG==> Preparing: SELECT id,name,age,email,mobile,manager_id,create_time FROM staff WHERE (age >= ?) LIMIT ? DEBUG==> Parameters: 30(Integer), 2(Long) TRACE<== Columns: id, name, age, email, mobile, manager_id, create_time TRACE<== Row: 1087982257332887553, 大boss, 40, 001@paratera.com, 13888886666, null, 2019-01-11 14:20:20 TRACE<== Row: 1094590409767661570, 张雨琪, 31, zjq@blsc.com, 18684700070, 1088248166370832385, 2019-01-14 09:15:15 DEBUG<== Total: 2 总页数:2 总记录数:4 Staff(id=1087982257332887553, name=大boss, age=40, email=001@paratera.com, mobile=13888886666, managerId=null, createTime=2019-01-11T14:20:20) Staff(id=1094590409767661570, name=张雨琪, age=31, email=zjq@blsc.com, mobile=18684700070, managerId=1088248166370832385, createTime=2019-01-14T09:15:15) 2.2、selectMapsPage2.2.1 示例代码 @Test void testSelectMapsPage() { QueryWrapper<Staff> qw = Wrappers.query(); qw.ge("age", 30); Page<Map<String, Object>> page2 = new Page<>(1, 2); Page<Map<String, Object>> pageData2 = staffMapper.selectMapsPage(page2, qw); System.out.println("总页数:" + pageData2.getPages()); System.out.println("总记录数:" + pageData2.getTotal()); pageData2.getRecords().forEach(System.out::println); }2.2.2 查询结果DEBUG==> Preparing: SELECT COUNT(*) AS total FROM staff WHERE (age >= ?) DEBUG==> Parameters: 30(Integer) TRACE<== Columns: total TRACE<== Row: 4 DEBUG<== Total: 1 DEBUG==> Preparing: SELECT id,name,age,email,mobile,manager_id,create_time FROM staff WHERE (age >= ?) LIMIT ? DEBUG==> Parameters: 30(Integer), 2(Long) TRACE<== Columns: id, name, age, email, mobile, manager_id, create_time TRACE<== Row: 1087982257332887553, 大boss, 40, 001@paratera.com, 13888886666, null, 2019-01-11 14:20:20 TRACE<== Row: 1094590409767661570, 张雨琪, 31, zjq@blsc.com, 18684700070, 1088248166370832385, 2019-01-14 09:15:15 DEBUG<== Total: 2 总页数:2 总记录数:4 {create_time=2019-01-11T14:20:20, name=大boss, mobile=13888886666, id=1087982257332887553, age=40, email=001@paratera.com} {create_time=2019-01-14T09:15:15, manager_id=1088248166370832385, name=张雨琪, mobile=18684700070, id=1094590409767661570, age=31, email=zjq@blsc.com} 3、附加说明使用分页插件查询时默认是会执行两条 SQL,一条获取当前页的数据,一条获取总记录数。在某些场景下(如瀑布流模式),只需要获取当前页的内容即可,不需要总记录数相关分页数值,此时可在创建 Page 时,第三个参数给值为 false:Page(long current, long size, boolean searchCount)。也可使用 page.setSearchCount(false);
-
Mybatis-Plus 自定义SQL 有的时候使用条件构造器自定义SQL满足不了我们的需求,我们既想使用 Wrapper,又想使用SQL,MP 对这种方式也提供了支持,MP 版本号应≥3.0.7。下面是该方案的实现记录:实现方案一:Mapper接口中使用@Select注解1、Mapper 示例代码如下:import com.baomidou.mybatisplus.core.conditions.Wrapper; import com.baomidou.mybatisplus.core.mapper.BaseMapper; import com.baomidou.mybatisplus.core.toolkit.Constants; import com.paratera.protect.entity.Staff; import org.apache.ibatis.annotations.Param; import org.apache.ibatis.annotations.Select; import java.util.List; /** * @author 朱治龙 * @date 2023-10-17 11:46:00 */ public interface StaffMapper extends BaseMapper<Staff> { @Select("select * from staff ${ew.customSqlSegment}") List<Staff> selectAll(@Param(Constants.WRAPPER)Wrapper<Staff> wrapper); }2、调用示例代码: @Test void testSelfSQL() { LambdaQueryWrapper<Staff> lqw = Wrappers.lambdaQuery(Staff.class); lqw.eq(Staff::getName, "朱治龙").and(wq2 -> wq2.lt(Staff::getAge, 40).or().isNotNull(Staff::getEmail)); List<Staff> staffList = staffMapper.selectAll(lqw); staffList.forEach(System.out::println); }3、输出结果DEBUG==> Preparing: select * from staff WHERE (name = ? AND (age < ? OR email IS NOT NULL)) DEBUG==> Parameters: 朱治龙(String), 40(Integer) TRACE<== Columns: id, name, age, email, mobile, manager_id, create_time TRACE<== Row: 1714166763984199681, 朱治龙, 36, zhuzl@blsc.cn, 15084978453, 1088248166370832385, 2023-10-17 14:29:38 DEBUG<== Total: 1 Staff(id=1714166763984199681, name=朱治龙, age=36, email=zhuzl@blsc.cn, mobile=15084978453, managerId=1088248166370832385, createTime=2023-10-17T14:29:38)实现方案二:使用xml1、配置xml文件的存放路径。再application.yml中添加 xml 文件的引用路径配置mybatis-plus: mapper-locations: - classpath:/mapper/*Mapper.xml2、在resources目录下添加 mapper 目录,并新建 mapper 文件,如文件名为 StaffMapper.xml,示例内容为:<?xml version="1.0" encoding="UTF-8" ?> <!DOCTYPE mapper PUBLIC "-//mybatis.org//DTD Mapper 3.0//EN" "http://mybatis.org/dtd/mybatis-3-mapper.dtd"> <mapper namespace="com.paratera.protect.dao.StaffMapper"> <select id="selectByXml" resultType="com.paratera.protect.entity.Staff"> select * from staff ${ew.customSqlSegment} </select> </mapper>3、Mapper 接口中添加方法,示例代码如下:package com.paratera.protect.dao; import com.baomidou.mybatisplus.core.conditions.Wrapper; import com.baomidou.mybatisplus.core.mapper.BaseMapper; import com.baomidou.mybatisplus.core.toolkit.Constants; import com.paratera.protect.entity.Staff; import org.apache.ibatis.annotations.Param; import java.util.List; /** * @author 朱治龙 * @date 2023-10-17 11:46:00 */ public interface StaffMapper extends BaseMapper<Staff> { List<Staff> selectByXml(@Param(Constants.WRAPPER)Wrapper<Staff> wrapper); }4、调用示例代码: @Test void testSelfSQL2() { LambdaQueryWrapper<Staff> lqw = Wrappers.lambdaQuery(Staff.class); lqw.eq(Staff::getName, "朱治龙").and(wq2 -> wq2.lt(Staff::getAge, 50).or().isNotNull(Staff::getEmail)); List<Staff> staffList = staffMapper.selectByXml(lqw); staffList.forEach(System.out::println); }5、输出结果DEBUG==> Preparing: select * from staff WHERE (name = ? AND (age < ? OR email IS NOT NULL)) DEBUG==> Parameters: 朱治龙(String), 50(Integer) TRACE<== Columns: id, name, age, email, mobile, manager_id, create_time TRACE<== Row: 1714166763984199681, 朱治龙, 36, zhuzl@blsc.cn, 15084978453, 1088248166370832385, 2023-10-17 14:29:38 DEBUG<== Total: 1 Staff(id=1714166763984199681, name=朱治龙, age=36, email=zhuzl@blsc.cn, mobile=15084978453, managerId=1088248166370832385, createTime=2023-10-17T14:29:38)
-
超全的正则表达式速查手册 一、校验数字的表达式数字:^[0-9]*$n位的数字:^\d{n}$至少n位的数字:^\d{n,}$m-n位的数字:^\d{m,n}$零和非零开头的数字:^(0|[1-9][0-9]*)$非零开头的最多带两位小数的数字:^([1-9][0-9]*)+(.[0-9]{1,2})?$带1-2位小数的正数或负数:^(-)?\d+(.\d{1,2})?$正数、负数、和小数:^(-|+)?\d+(.\d+)?$有两位小数的正实数:^[0-9]+(.[0-9]{2})?$有1~3位小数的正实数:^[0-9]+(.[0-9]{1,3})?$非零的正整数:^[1-9]\d$ 或 ^([1-9][0-9]){1,3}$或 ^\+?[1-9][0-9]*$非零的负整数:^-[1-9][]0-9″$ 或 ^-[1-9]\d$ 非负整数:^\d+$ 或 ^[1-9]\d*|0$非正整数:^-[1-9]\d*|0$或 ^((-\d+)|(0+))$非负浮点数:^\d+(.\d+)?$或 ^[1-9]\d*\.\d*|0\.\d*[1-9]\d*|0?\.0+|0$非正浮点数:^((-\d+(.\d+)?)|(0+(.0+)?))$或 ^(-([1-9]\d*\.\d*|0\.\d*[1-9]\d*))|0?\.0+|0$正浮点数:^[1-9]\d.\d|0.\d[1-9]\d$或 ^(([0-9]+\.[0-9]*[1-9][0-9]*)|([0-9]*[1-9][0-9]*\.[0-9]+)|([0-9]*[1-9][0-9]*))$负浮点数:^-([1-9]\d.\d|0.\d[1-9]\d)$或 ^(-(([0-9]+\.[0-9]*[1-9][0-9]*)|([0-9]*[1-9][0-9]*\.[0-9]+)|([0-9]*[1-9][0-9]*)))$浮点数:^(-?\d+)(.\d+)?$或 ^-?([1-9]\d*\.\d*|0\.\d*[1-9]\d*|0?\.0+|0)$二、校验字符的表达式汉字:^[\u4e00-\u9fa5]{0,}$英文和数字:^[A-Za-z0-9]+$或 ^[A-Za-z0-9]{4,40}$长度为3-20的所有字符:^.{3,20}$由26个英文字母组成的字符串:^[A-Za-z]+$由26个大写英文字母组成的字符串:^[A-Z]+$由26个小写英文字母组成的字符串:^[a-z]+$由数字和26个英文字母组成的字符串:^[A-Za-z0-9]+$由数字、26个英文字母或者下划线组成的字符串:^\w+$ 或 ^\w{3,20}中文、英文、数字包括下划线:^[\u4E00-\u9FA5A-Za-z0-9_]+$中文、英文、数字但不包括下划线等符号:^[\u4E00-\u9FA5A-Za-z0-9]+$或 ^[\u4E00-\u9FA5A-Za-z0-9]{2,20}$可以输入含有^%&’,;=?$” 等字符:[^%&’,;=?$\x22]+禁止输入含有~的字符: [^~\x22]+其它.匹配除 n 以外的任何字符。/[\u4E00-\u9FA5]/ 汉字/[\uFF00-\uFFFF]/ 全角符号/[\u0000-\u00FF]/ 半角符号三、特殊需求表达式Email 地址:1^\w+([-+.]\w+)@\w+([-.]\w+).\w+([-.]\w+)$1域名:[a-zA-Z0-9][-a-zA-Z0-9]{0,62}(/.[a-zA-Z0-9][-a-zA-Z0-9]{0,62})+/.?InternetURL:[a-zA-z]+://[^\s] 或 ^http://([\w-]+\.)+[\w-]+(/[\w-./?%&=])?$手机号码:^(13[0-9]|14[5|7]|15[0|1|2|3|5|6|7|8|9]|18[0|1|2|3|5|6|7|8|9])\d{8}$电话号码(“XXX-XXXXXXX”、”XXXX-XXXXXXXX”、”XXX-XXXXXXX”、”XXX-XXXXXXXX”、”XXXXXXX”和”XXXXXXXX):^((\d{3,4}-)|\d{3.4}-)?\d{7,8}$国内电话号码(0511-4405222、021-87888822):\d{3}-\d{8}|\d{4}-\d{7}身份证号(15位、18位数字):^\d{15}|\d{18}$短身份证号码(数字、字母x结尾):^([0-9]){7,18}(x|X)?$或 ^\d{8,18}|[0-9x]{8,18}|[0-9X]{8,18}?$帐号是否合法(字母开头,允许5-16字节,允许字母数字下划线):^[a-zA-Z][a-zA-Z0-9_]{4,15}$密码(以字母开头,长度在6~18之间,只能包含字母、数字和下划线):^[a-zA-Z]\w{5,17}$强密码(必须包含大小写字母和数字的组合,不能使用特殊字符,长度在8-10之间):^(?=.\d)(?=.[a-z])(?=.*[A-Z]).{8,10}$日期格式:^\d{4}-\d{1,2}-\d{1,2}一年的12个月(01~09和1~12):^(0?[1-9]|1[0-2])$一个月的31天(01~09和1~31):^((0?[1-9])|((1|2)[0-9])|30|31)$钱的输入格式有四种钱的表示形式我们可以接受:”10000.00” 和 “10,000.00”, 和没有 “分” 的 “10000” 和 “10,000”:^[1-9][0-9]*$这表示任意一个不以0开头的数字,但是,这也意味着一个字符”0”不通过,所以我们采用下面的形式:^(0|[1-9][0-9]*)$一个0或者一个不以0开头的数字.我们还可以允许开头有一个负号:^(0|-?[1-9][0-9]*)$这表示一个0或者一个可能为负的开头不为0的数字.让用户以0开头好了.把负号的也去掉,因为钱总不能是负的吧.下面我们要加的是说明可能的小数部分:^[0-9]+(.[0-9]+)?$必须说明的是,小数点后面至少应该有1位数,所以”10.”是不通过的,但是 “10” 和 “10.2” 是通过的:^[0-9]+(.[0-9]{2})?$这样我们规定小数点后面必须有两位,如果你认为太苛刻了,可以这样:^[0-9]+(.[0-9]{1,2})?$这样就允许用户只写一位小数.下面我们该考虑数字中的 逗号 了,我们可以这样:^[0-9]{1,3}(,[0-9]{3})*(.[0-9]{1,2})?$1到3个数字,后面跟着任意个 逗号+3个数字,逗号成为可选,而不是必须:^([0-9]+|[0-9]{1,3}(,[0-9]{3})*)(.[0-9]{1,2})?$备注:这就是最终结果了,别忘了+可以用*替代如果你觉得空字符串也可以接受的话(奇怪,为什么?)最后,别忘了在用函数时去掉去掉那个反xml文件:^([a-zA-Z]+-?)+[a-zA-Z0-9]+.[x|X][m|M][l|L]$中文字符的正则表达式:[\u4e00-\u9fa5]双字节字符:^\x00-\xff)空白行的正则表达式:\n\s*\r (可以用来删除空白行)HTML标记的正则表达式:<(\S?)[^>]>.?</\1>|<.? /> (网上流传的版本太糟糕,上面这个也仅仅能部分,对于复杂的嵌套标记依旧无能为力)首尾空白字符的正则表达式:^\s|\s (可以用来删除行首行尾的空白字符(包括空格、制表符、换页符等等),非常有用的表达式)腾讯QQ号:[1-9][0-9]{4,}(腾讯QQ号从10000开始)中国邮政编码:[1-9]\d{5}(?!\d)(中国邮政编码为6位数字)IP地址:\d+.\d+.\d+.\d+(提取IP地址时有用)IP地址:((?:(?:25[0-5]|2[0-4]\d|[01]?\d?\d).){3}(?:25[0-5]|2[0-4]\d|[01]?\d?\d))IP-v4地址:\b(?:(?:25[0-5]|2[0-4][0-9]|[01]?[0-9][0-9]?).){3}(?:25[0-5]|2[0-4][0-9]|[01]?[0-9][0-9]?)\b (提取IP地址时有用)校验IP-v6地址: (([0-9a-fA-F]{1,4}:){7,7}[0-9a-fA-F]{1,4}|([0-9a-fA-F]{1,4}:){1,7}:|([0-9a-fA-F]{1,4}:){1,6}:[0-9a-fA-F]{1,4}|([0-9a-fA-F]{1,4}:){1,5}(:[0-9a-fA-F]{1,4}){1,2}|([0-9a-fA-F]{1,4}:){1,4}(:[0-9a-fA-F]{1,4}){1,3}|([0-9a-fA-F]{1,4}:){1,3}(:[0-9a-fA-F]{1,4}){1,4}|([0-9a-fA-F]{1,4}:){1,2}(:[0-9a-fA-F]{1,4}){1,5}|[0-9a-fA-F]{1,4}:((:[0-9a-fA-F]{1,4}){1,6})|:((:[0-9a-fA-F]{1,4}){1,7}|:)|fe80:(:[0-9a-fA-F]{0,4}){0,4}%[0-9a-zA-Z]{1,}|::(ffff(:0{1,4}){0,1}:){0,1}((25[0-5]|(2[0-4]|1{0,1}[0-9]){0,1}[0-9])\.){3,3}(25[0-5]|(2[0-4]|1{0,1}[0-9]){0,1}[0-9])|([0-9a-fA-F]{1,4}:){1,4}:((25[0-5]|(2[0-4]|1{0,1}[0-9]){0,1}[0-9])\.){3,3}(25[0-5]|(2[0-4]|1{0,1}[0-9]){0,1}[0-9]))子网掩码:((?:(?:25[0-5]|2[0-4]\d|[01]?\d?\d)\.){3}(?:25[0-5]|2[0-4]\d|[01]?\d?\d))校验日期:^(?:(?!0000)[0-9]{4}-(?:(?:0[1-9]|1[0-2])-(?:0[1-9]|1[0-9]|2[0-8])|(?:0[13-9]|1[0-2])-(?:29|30)|(?:0[13578]|1[02])-31)|(?:[0-9]{2}(?:0[48]|[2468][048]|[13579][26])|(?:0[48]|[2468][048]|[13579][26])00)-02-29)$(“yyyy-mm-dd“ 格式的日期校验,已考虑平闰年。)抽取注释:<!–(.*?)–>查找CSS属性:^\s[a-zA-Z\-]+\s[:]{1}\s[a-zA-Z0-9\s.#]+[;]{1}提取页面超链接:(<a\s(?!.\brel=)[^>])(href=”https?:\/\/)((?!(?:(?:www\.)?’.implode(‘|(?:www\.)?’, $follow_list).’))[^” rel=”external nofollow” ]+)”((?!.\brel=)[^>])(?:[^>])>提取网页图片:\< [img][^\\>][src] = [\”\’]{0,1}([^\”\’\ >]*)提取网页颜色代码:^#([A-Fa-f0-9]{6}|[A-Fa-f0-9]{3})$文件扩展名效验:^([a-zA-Z]\:|\\)\\([^\\]+\\)[^\/:?”<>|]+\.txt(l)?$判断IE版本:^.MSIE 5-8?(?!.Trident\/[5-9]\.0).*$
-
-
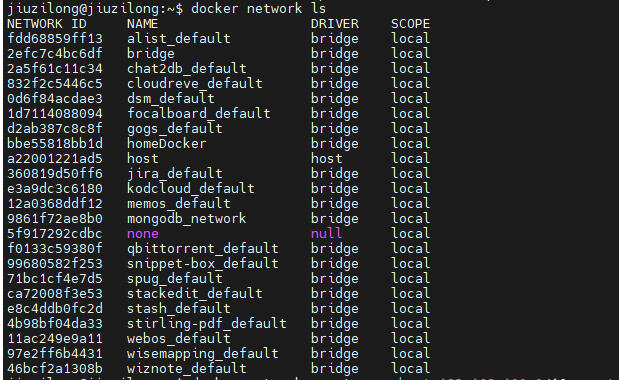
自定义 docker 网络 docker 容器如果没有指定网络,在启动时会默认生成一个桥接的网络,如下图所示:启动的 docker 容器多了,再启动其他容器的时候,就会出现Error response from daemon: Pool overlaps with other one on this address space 的提示。为解决这个问题,可以采用手工创建桥接网络,然后在 docker-compose.yml 中指定网络的方式解决。{card-describe title="本地 docker 环境信息"}jiuzilong@jiuzilong:/data/dockerRoot/apps/chat2db$ docker -v Docker version 24.0.4, build 3713ee1 jiuzilong@jiuzilong:/data/dockerRoot/apps/chat2db$ docker compose version Docker Compose version v2.19.1 jiuzilong@jiuzilong:/data/dockerRoot/apps/chat2db$ {/card-describe}一、创建桥接网络:docker network create --subnet=192.168.0.0/16 --gateway=192.168.0.1 --opt "com.docker.network.bridge.name"="bridge_zzl" bridge_zzl也可以补充些其他网络配置信息:docker network create --subnet=172.66.0.0/16 --gateway=172.66.0.1 --opt "com.docker.network.bridge.default_bridge"="false" --opt "com.docker.network.bridge.name"="bridge_zzl" --opt "com.docker.network.bridge.enable_icc"="true" --opt "com.docker.network.bridge.enable_ip_masquerade"="true" --opt "com.docker.network.bridge.host_binding_ipv4"="0.0.0.0" --opt "com.docker.network.driver.mtu"="1500" bridge_zzl如果创建失败,极有可能是网络数量超标了,可以停掉一些容器再创建。失败截图如下:如果创建成功,会响应创建成功的 NETWORK ID,如下图所示:二、docker-compose.yml 配置网络配置示例:version: '3' services: app: # image: 'jc21/nginx-proxy-manager:2.9.22' # image: 'chishin/nginx-proxy-manager-zh:latest' image: 'zhuzl/nginx-proxy-manager:ssl' restart: unless-stopped container_name: nginxProxyManager ports: - '80:80' - '81:81' - '443:443' networks: - net-zzl volumes: - ./data:/data - ./letsencrypt:/etc/letsencrypt networks: net-zzl: name: bridge_zzl external: true 核心是networks: net-zzl: name: bridge_zzl external: true然后在 docker 应用中通过 networks 指定 networks: - net-zzl{alert type="warning"}特别注意:在拷贝上面代码到 docker-compose.yml 文件时,需要特别留意缩进问题{/alert}
-
ubuntu环境安装Harbor记录 Harbor 是一款优秀的开源企业容器镜像仓库。包括了基于web界面的权限管理(RBAC)、LDAP、审计、安全漏洞扫描、镜像验真、管理界面、自我注册、HA 等企业必需的功能,同时针对中国用户的特点,设计镜像复制和中文支持等功能。官网链接:https://goharbor.io/为方便应用开发部署,想要自己搭建Docker 镜像仓库,以下是部署过程。{card-describe title="Ubuntu版本情况"}zhuzl@zhuzl-M9-PRO:/data/software/harbor$ uname -a Linux zhuzl-M9-PRO 6.2.0-26-generic #26~22.04.1-Ubuntu SMP PREEMPT_DYNAMIC Thu Jul 13 16:27:29 UTC 2 x86_64 x86_64 x86_64 GNU/Linux{/card-describe}一、下载安装包根据Harbor官网的引导,可通过github的发布页面下载离线安装包:https://github.com/goharbor/harbor/releases由于国内网络下载速度堪忧,本次下载使用 ghproxy.com 进行代理加速下载,也就是在下载地址前添加 https://ghproxy.com/。下载记录如下:zhuzl@zhuzl-M9-PRO:/data/software$ wget https://ghproxy.com/https://github.com/goharbor/harbor/releases/download/v2.8.4/harbor-offline-installer-v2.8.4.tgz --2023-08-18 08:48:42-- https://ghproxy.com/https://github.com/goharbor/harbor/releases/download/v2.8.4/harbor-offline-installer-v2.8.4.tgz 正在解析主机 ghproxy.com (ghproxy.com)... 192.9.132.155 正在连接 ghproxy.com (ghproxy.com)|192.9.132.155|:443... 已连接。 已发出 HTTP 请求,正在等待回应... 200 OK 长度: 608175520 (580M) [application/octet-stream] 正在保存至: ‘harbor-offline-installer-v2.8.4.tgz’ harbor-offline-installer-v2.8.4.tgz 100%[==============================================================================================>] 580.00M 4.40MB/s 用时 2m 9s 2023-08-18 08:50:52 (4.49 MB/s) - 已保存 ‘harbor-offline-installer-v2.8.4.tgz’ [608175520/608175520]) zhuzl@zhuzl-M9-PRO:/data/software$ 二、解压安装包文件下载下来是一个以 .tgz 格式结尾的压缩文件,我们可以直接使用 tar 解压,解压命令为(需替换X.Y.Z为下载对应的版本):tar -zxvf harbor-offline-installer-vX.Y.Z.tgz解压记录如下:zhuzl@zhuzl-M9-PRO:/data/software$ tar -zxvf harbor-offline-installer-v2.8.4.tgz harbor/harbor.v2.8.4.tar.gz harbor/prepare harbor/LICENSE harbor/install.sh harbor/common.sh harbor/harbor.yml.tmpl zhuzl@zhuzl-M9-PRO:/data/software$ 三、配置及安装搜了下网上的课程,大多都是从配置证书开始的,我部署应用时一般都是应用开启http服务,使用nginx代理的时候再使用SSL证书对外提供https的访问。3.1 配置拷贝解压出来的 harbor.yml.tmpl 文件为 harbor.yml。修改这个配置文件。主要有如下信息需要修改的地方:hostname: 修改为域名https: 根据需要配置,我本处是直接注释掉了harbor_admin_password:管理员密码data_volume: harbor数据目录,这是宿主机的文件目录修改后执行初始化:./prepare初始化日志记录日下:zhuzl@zhuzl-M9-PRO:/data/dockerRoot/apps/harbor$ ./prepareprepare base dir is set to /data/dockerRoot/apps/harborWARNING:root:WARNING: HTTP protocol is insecure. Harbor will deprecate http protocol in the future. Please make sure to upgrade to httpsGenerated configuration file: /config/portal/nginx.confGenerated configuration file: /config/log/logrotate.confGenerated configuration file: /config/log/rsyslog_docker.confGenerated configuration file: /config/nginx/nginx.confGenerated configuration file: /config/core/envGenerated configuration file: /config/core/app.confGenerated configuration file: /config/registry/config.ymlGenerated configuration file: /config/registryctl/envGenerated configuration file: /config/registryctl/config.ymlGenerated configuration file: /config/db/envGenerated configuration file: /config/jobservice/envGenerated configuration file: /config/jobservice/config.ymlGenerated and saved secret to file: /data/secret/keys/secretkeySuccessfully called func: create_root_certGenerated configuration file: /compose_location/docker-compose.ymlClean up the input dirzhuzl@zhuzl-M9-PRO:/data/dockerRoot/apps/harbor$初始化完成后,会在当前目录生成 `docker-compose.yml`文件,此时,我们可以使用 `docker compose` 启动docker 服务啦,日志记录如下:zhuzl@zhuzl-M9-PRO:/data/dockerRoot/apps/harbor$ sudo docker compose up -d[+] Running 9/9 ✔ Container harbor-log Started 0.3s ✔ Container redis Started 0.7s ✔ Container registry Started 1.1s ✔ Container registryctl Started 0.9s ✔ Container harbor-portal Started 0.8s ✔ Container harbor-db Started 1.1s ✔ Container harbor-core Started 1.5s ✔ Container nginx Started 2.0s ✔ Container harbor-jobservice Started 2.1szhuzl@zhuzl-M9-PRO:/data/dockerRoot/apps/harbor$ 对了,执行`docker compose`的时候一定要用`sudo`,否则会出现文件权限相关的报错。 启动完成后,可以通过 `nginx` 配置代理的方式对外提供服务,配置好后,访问出现如下图所示的登录界面:  在登录界面可以使用管理员账号 admin,进行登录,密码为在`harbor.yml` 文件中`harbor_admin_password` 配置的默认密码。 登录成功后,主界面如下图所示: 
-
-
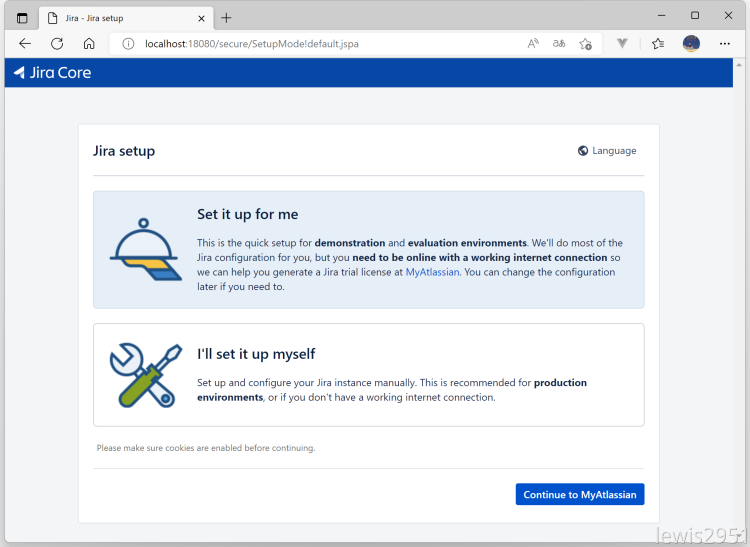
通过Docker Compose安装Jira 由于数据库在服务器上已提前安装好,本处省略MySQL的安装流程。环境说明Jira 相关的文件统一放到 /data/dockerRoot/jira 目录。docker-compose.yml 文件内容如下:version: '3.9' services: jira: container_name: jira image: atlassian/jira-software:latest restart: "no" ports: - 18080:8080 environment: CATALINA_OPTS: -javaagent:/opt/atlassian/jira/atlassian-agent.jar volumes: - ./jira_data:/var/atlassian/application-data/jira - ./libs/atlassian-agent.jar:/opt/atlassian/jira/atlassian-agent.jar - ./libs/mysql-connector-java-8.0.30.jar:/opt/atlassian/jira/lib/mysql-connector-java.jar - ../hosts:/etc/hosts - /etc/timezone:/etc/timezone:ro - /etc/localtime:/etc/localtime:rolibs 目录的文件打包如下:libs.zip启动服务sudo docker compose up -d设置JiraJira 容器启动完毕后,可通过 http://localhost:18080 访问,会自动调整到如下图所示的初始化向导页面:1、设置为中文单击 右上角的「Language」2、我将设置它自己在第二步选择「我将设置它自己」3、数据库连接配置连接数据库选择「其他数据库」,数据库类型根据本地环境进行选择,选择对应的数据库,要提前引入对应数据库的驱动 jar 包。4、设置应用程序属性5、设置许可证如果本地有Java 环境,可以在本地生成许可证,没有的话进入Jira 容器生成也可以执行如下命令,替换对应的服务器ID:java -jar atlassian-agent.jar -d -m test@test.com -n BAT -p jira -o lewis2951 -s B87T-QH0H-UBTM-IU5Q以上命令相关说明如下:java -jar atlassian-agent.jar \ -m zh_season@163.com # Licence Emali \ -n atlassian # Licence Name \ -o atlassian # Licence organization \ -p crowd # Licence product, support: crowd, conf, jira, bitbucket \ -s <copy from website> # License server id以上通过本地环境生成,复制许可证内容到输入框。6、设置管理员根据自己需求设置,Email 可以是一个不存在的,但是建议使用真实Email。7、设置电子邮件通知8、完成部署到此,Jira 就部署完成了。进入欢迎页面,可以创建一个示例项目,9、查看许可证在管理 → 应用程序下可查看许可证信息
-
常用docker 命令 该文档内容主要用于日常记录,会逐步添加重启 docker 服务sudo systemctl daemon-reload sudo systemctl restart docker停止所有运行中的容器docker ps -q | xargs docker stop将当前用户添加到docker用户组,那样就不用每次执行docker命令都加sudosudo usermod -aG docker $USER复制容器中的目录到本地:sudo docker cp <CONTAINER_ID>:/usr/local/tomcat/webapps/ROOT ./temp进入容器sudo docker exec -it mongodb /bin/bash创建网络docker network create --driver=bridge --subnet=192.168.0.0/16 bridge_zzl构建镜像docker build -f ./Dockerfile.devIstio -t console-mobile-ui:0.0.1 .将容器保存为新镜像sudo docker commit nginxProxyManager zhuzl/nginx-proxy-manager:2.11.1-ssl将其他仓库的 docker 镜像推送到本地私服一般用于本地下载外网镜像超级慢的情况,可找台外网的机器 pull,然后 push 到 Docker 私服docker pull ghcr.io/huolalatech/page-spy-web:release docker tag ghcr.io/huolalatech/page-spy-web:release xxx.yyy.zhuzhilong.com/apps/page-spy-web:release docker push xxx.yyy.zhuzhilong.com/apps/page-spy-web:release删除所有未运行的容器;运行的删除不了docker rm $(docker ps -a -q)根据容器的状态删除状态为Exited的容器docker rm $(docker ps -qf status=exited)查看docker日志占用情况及日志清理# /etc/docker/daemon.json 中的 "data-root": "/data/dockerRoot/dataRoot" sudo ls -lh $(sudo find /data/dockerRoot/dataRoot/containers/ -name *-json.log) cat /dev/null > /data/dockerRoot/dataRoot/containers/e876d8da919db8905dece519a81ecc182bc918c20397e5212f2b49e06ec03a01/e876d8da919db8905dece519a81ecc182bc918c20397e5212f2b49e06ec03a01-json.log删除所有tag中带 “none” 关键字的镜像#!/bin/bash # docker rmi $(docker images | grep "none" | awk '{print $3}') TAG=`docker images | grep none| awk '{print $3}'` for tag in $TAG do docker rmi -f $tag done exit 使用 prune 命令删除不再使用的 docker 对象。删除所有未被 tag 标记和未被容器使用的镜像docker image prune
-
处理360路由器不能通过代理在外网访问的问题 缘起2020年的时候,感觉家里的路由实在是太慢了,正好360新出的360WiFi6全屋路由 天穹 V6 路由感觉还蛮不错,就入手了。 使用至今整体还算稳定,功能也能满足大部分使用场景,而且系统自带「自定义hosts」功能,在内网想要使用域名访问部署的服务也就方便多了,虽说不支持泛域名解析,一个一个配有些繁琐,但好歹也省去另外部署DNS的繁琐操作了。只是官方自带的 app 在功能上有不少阉割,像「功能扩展」下的大部分功能就只能通过PC 网页端访问。今年618屯了台配置还不错的迷你主机,准备放在家里长期开机做内网开发服务器用。当然作为一个程序员长期开机的机器,内网穿透肯定是要部署的。上下求索所有准备工作就绪后,想着方便随时配置路由,便把路由通过内网穿透在外网可以随时远程访问。配置好FRP和nginx代理后,登录页面可以正常访问,但是登录后,跳转到主界面,闪一下便又回到登录界面了。问题既然出了,先看看有没有碰到同样问题的小伙伴。便通过360路由官方的社区链接,看看有没有用户反馈相同的问题,于是找到下面这几个反馈同类问题的帖子:360路由P2还是不能通过外网 wan口登录管理?外网怎么访问路由器后台如何在外网下访问路由器的登录界面P1好像不能在外网登录管理页面嘛!!看了一圈,始终没有一个能解决问题的答复,而且看一些标注为「产品答疑师」的回复都不能解决实际反馈的问题,看来是时候施展混迹IT圈多年所学的三脚猫功夫啦。毕竟原理上都是HTTP访问,浏览器发起的HTTP请求只要跟内网请求头信息一致,理论上都是可行的。开始折腾于是通过nginx 代理的地址,真发现如下问题:登录后,发起了「GET /router/get_router_device_capability.cgi」ajax 请求,但是,该接口响应的是302,又重定向到/login.htm登录页面。初步以为是后端对 Host 或 Referer这些头信息做了校验,遂配置nginx相关头信息: proxy_set_header Host http://192.168.0.1; proxy_set_header Referer http://192.168.0.1/login_pc.htm;重启 nginx 再次访问,发现问题依旧。进一步发现请求头中有一个token_id的头信息,值为 undefined,根据 token_id 字符串搜了下网页代码,发现从url获取参数存在问题:该导致了请求的时候根本没获取到用户认证所需的 token_id,导致请求失败。进一步深挖,发现头信息中的 Cookie 是存在 token_id 的:这样的话,是不是可以考虑nginx代理的时候,从Cookie中获取token_id然后设置一个 名为token_id的头请求后端呢?说干就干,一翻摸索后,在nginx配置信息中加入如下信息:set $TOKEN_ID ""; if ($http_cookie ~* "token_id=(.+?)(?=;|$)") { set $TOKEN_ID "$1"; } proxy_set_header token_id "$TOKEN_ID";完整nginx虚拟主机配置信息如下:server { listen 80; server_name router.home.zhuzhilong.cn; location / { proxy_set_header Referer http://192.168.0.1/login_pc.htm; proxy_pass http://192.168.0.1; set $TOKEN_ID ""; if ($http_cookie ~* "token_id=(.+?)(?=;|$)") { set $TOKEN_ID "$1"; } proxy_set_header token_id "$TOKEN_ID"; } }重启路由器,验证成功!!圆满收场最终实现后的效果录屏如下:{dplayer src="/usr/uploads/2023/06/4228503511.mp4"/}
-
将vue-cli搭建的Vue前端工程更新构建工具为pnpm+vite经验分享 缘起我们团队负责的超算云服务控制台前端工程(console-ui)从提交第一行代码(2021-03-18)至今已 2 年多时间,两年多的时间内随着需求的增加,前端工程也越来越庞大,陈旧的基础设施暴露出了如下问题:1、Node.js 版本仍然使用 2021 年发布的 14.x,而最新的 Node 大版本已更新到20.x,仍然使用旧版本导致一些构建工具版本不能随意更新,也同时留下一定的安全隐患。2、项目目前仍使用两年前发行的 Webpack4.46.0 版本作为项目构建工具,随着项目逐渐庞大,Webpack 在开发时编译项目时间通常达到 2 分钟以上,严重影响开发效率。3、前端生态日新月异,守着老旧的生态,不便于团队成长。借本次升级 console-ui 核心 vue版本的契机,考虑同时升级到新的构建工具。Vite 从 2021 年发布以来,在构建速度及开发体验上一直口碑不错,经过两年多的迭代,也趋于稳定,完全可以应用于产线了。且根据官方的介绍 Vite 4.3 开始的版本比之前的版本在开发及构建速度上又有了成倍的提升:发行日志见链接:https://github.com/vitejs/vite/blob/main/packages/vite/CHANGELOG.md开始折腾1、升级 Node.js目前 console-ui 构建还是用的Node.js 14.x, 而现在 Node.js 的 LTS 版本是18.x,按照 Node.js 的版本发行规律,预计目前最新的 20.x 版本在今年的 10 月份将成为下一个 LTS 版本,且 Node.js 的向下兼容性较强,所以目前咱们可以拥抱 Node.js 20.x 相关生态。所以本次升级就直接选用 Node.js 20.x 了。开发机是使用nvm管理 Node.js 多版本的。使用如下命令安装并使用Node.js 20:nvm install 20.3.0 nvm use 20.3.02、升级构建工具在升级过程如下:创建初始工程使用官方开始页面提供的命令初始化一个初始工程:pnpm create vite console-ui --template vue3、console-ui 已有功能最简验证3.1、支持多主题console-ui的设定是可以打包不同主题的页面,构建时根据 env 变量打包不同主题的版本,然后采用不同主题文件。经验证vite也支持,vite.config.js 核心配置代码如下:css: { preprocessorOptions: { scss: { additionalData: `@import "@/styles/themes/${env.VITE_APP_DIST_MODE}.scss";` } } }由于不同的主题有些不同的资源文件(如favicon.ico、主题相关的图片等)需要引用,在这里我们在public 目录下新建2个目录用于管理不同主题资源文件的管理,然后配置不同的publicDir:publicDir: `./public/${distMode}`,3.2、验证多页面支持console-ui提供针对普通用户的 UI 界面,同时也提供管理员使用的维护界面,这两套界面在原工程是使用多页面机制实现的。经验证,vite 也能很好的支持,核心配置代码如下:plugins: [ createHtmlPlugin({ minify: true, pages: [ { entry: '/src/main.js', filename: 'index.html', template: 'index.html', injectOptions: { data: { title: '超算云服务控制台' } } }, { entry: 'src/pages/admin/index.js', filename: 'admin.html', template: 'admin.html', injectOptions: { data: { title: '超算运服务控制台-系统维护' } } } ] }) ]4、开始整合整合时会涉及一些资源文件引用的改造,一般改动会比较多,为不影响主分支开发,建议单独开个分支处理。整合过程比较繁琐,就不一一罗列了,主要涉及如下事项:替换 ENV 变量:vue-cli 工程的环境变量都是以Vue_APP 开头的变量,可以全局替换为VITE_APP开头,而且 Webpack 工程一般使用 process.env.XXX 访问ENV变量,而 Vite 是使用 import.meta.env.XXX 访问 ENV 变量,为了少改动,可以使用如下方式继续使用process.env.XXX 方式访问:define: { 'process.env': { ...env } }调整资源引用问题:Webpack 项目多数使用require('xxx')的方式在 JS 里引入资源,确实特别的方便,但是这一套在 Vite支持不是很好,即便有插件支持(如vite-plugin-commonjs)但依然没有 Webpack 的 require 机制强大。一些不需要参与打包的资源可以放在 public 目录,然后使用URL路径访问,参与打包的文件,可改为 import XXX from 'xxxx.png'的方式引入整体改造过程提交记录截图如下:优化整合后发现打包的文件比原 Webpack 打包的 dist 目录更大,前端工程层面的优化,主要以从以下几点着手处理:压缩:可采用vite-plugin-compression插件对打包后的文件进行了压缩处理静态资源上CDN:优化过程主要使用rollup-plugin-visualizer 对打包后的文件进行分析,对一些占用打包空间较大的文件使用CDN引入的方式进行优化按需引入:如lodash、moment.js等,尽量按需引入,减少非必须的语言包等,能很大程度的减小打包体积。附上本次改造核心的完整 vite.config.js 文件内容:import path from 'path' import vitePluginCommonjs from 'vite-plugin-commonjs' import { createHtmlPlugin } from 'vite-plugin-html' import { visualizer } from 'rollup-plugin-visualizer' import viteCompression from 'vite-plugin-compression' import externalGlobals from 'rollup-plugin-external-globals' // import eslintPlugin from 'vite-plugin-eslint' import { defineConfig, loadEnv } from 'vite' import legacy from '@vitejs/plugin-legacy' import vue2 from '@vitejs/plugin-vue2' export default ({ mode }) => { const env = loadEnv(mode, process.cwd()) const distMode = env.VITE_APP_DIST_MODE || 'paratera' const cdn = { scripts: mode.includes('development') ? [] : [ 'https://statics.paratera.com/console/libs/vue.2.7.14.min.js', // 'https://cdn.jsdelivr.net/npm/vue-router@3.6.5/dist/vue-router.min.js', // 'https://cdn.jsdelivr.net/npm/vuex@3.6.2/dist/vuex.min.js', 'https://statics.paratera.com/console/libs/element-ui.2.15.13.min.js', 'https://statics.paratera.com/console/libs/exceljs.4.3.0.min.js' ] } // https://vitejs.dev/config/ const viteConfig = { base: '/', publicDir: `./public/${distMode}`, define: { 'process.env': { ...env } }, plugins: [ vue2(), // eslintPlugin(), createHtmlPlugin({ minify: true, pages: [ { entry: '/src/main.js', filename: 'index.html', template: 'index.html', injectOptions: { data: { title: '超算云服务控制台', cdn }, tags: [ { injectTo: 'body-prepend', tag: 'div', attrs: { id: 'tag1' } } ] } }, { entry: 'src/pages/admin/index.js', filename: 'admin.html', template: 'admin.html', injectOptions: { data: { title: '超算运服务控制台-系统维护', cdn // injectScript: `<script src="./inject.js"></script>`, } } } ] }), vitePluginCommonjs(), legacy({ targets: ['ie >= 11'], additionalLegacyPolyfills: ['regenerator-runtime/runtime'] }), viteCompression({ verbose: true, // 是否在控制台输出压缩结果 disable: false, // 是否禁用,相当于开关在这里 threshold: 10240, // 体积大于 threshold 才会被压缩,单位 b,1b=8B, 1B=1024KB 那我们这里相当于 9kb多吧,就会压缩 algorithm: 'gzip', // 压缩算法,可选 [ 'gzip' , 'brotliCompress' ,'deflate' , 'deflateRaw'] ext: '.gz' // 文件后缀 }) ], resolve: { extensions: ['.js', '.vue', '.json'], alias: [ { find: /@\/.+/, replacement: (val) => { return val.replace(/^@/, path.resolve(__dirname, './src/')) } }, { // this is required for the SCSS modules find: /^~(.*)$/, replacement: '$1' } ] }, css: { preprocessorOptions: { scss: { additionalData: `@import "@/styles/themes/${distMode}.scss";` } } }, server: { port: 8686 }, build: { // target: 'es2015', // cssTarget: 'chrome80', // brotliSize: false, // chunkSizeWarningLimit: 2000, // commonjsOptions: { // // 改为 ture 后就会转化 require 语法 // transformMixedEsModules: true // }, rollupOptions: { input: { index: path.resolve(process.cwd(), 'index.html'), admin: path.resolve(process.cwd(), 'admin.html') }, external: [ // 'vue', 'element-ui', 'exceljs' ], plugins: [ externalGlobals({ vue: 'Vue', // 'vue-router': 'VueRouter', // vuex: 'Vuex', 'element-ui': 'ELEMENT', 'exceljs': 'ExcelJS' }) ], output: { chunkFileNames: 'assets/js/chunks/[name].[hash].js', assetFileNames: (chunkInfo) => { // 用后缀名称进行区别处理 // 处理其他资源文件名 e.g. css png 等 let subDir = 'images' const extName = path.extname(chunkInfo.name) if (['.css'].includes(extName)) { subDir = 'css' } if (['.woff', '.ttf'].includes(extName)) { subDir = 'fonts' } return `assets/${subDir}/[name].[hash].[ext]` }, // 入口文件名 entryFileNames: 'assets/js/[name].[hash].js' } } } } const lifecycle = process.env.npm_lifecycle_event if (lifecycle.includes(':report')) { viteConfig.plugins.push(visualizer({ open: true, brotliSize: true, gzipSize: true, filename: './dist/report.html' })) } return defineConfig(viteConfig) } 升级前后 package.json 比对:成效对比项优化前(Webpack)优化后(Vite)安装依赖66.60s17.2开发启动110228ms2536ms打包部署123.77s1m 57s对比截图安装依赖:Webpack ↓Vite ↓开发启动:Webpack ↓Vite ↓打包截图:Webpack ↓Vite ↓
-
随动帮助文档实现 背景介绍我们项目提供了在线的项目文档,便于用户在使用过程中有什么问题可以通过直接查文档解决,也在一定程度上减少了公司运营及客服成本。在实际使用过程中,用户反馈造作文档的使用不是很方便,基本上要打开新Tab页签,不能方便的一遍对照文档,一边操作。解决方案为解决以上问题,在参考阿里云及腾讯云相关产品的文档模式后,引入了随动帮助文档机制。该机制主要实现模式如下:1、在相关功能指定位置添加文档入口2、单击文档名称后,在页面左下角显示文档弹出层(以下简称「文档查看器」),主要是系统的大部分功能使用右侧展开的抽屉组件 (Drawer)进行显示。3、打开的文档查看器,可垂直方向最大,可上下左右四边及四个角落通过拖拽调整大小4、可拖拽到页面任意位置5、文档查看器不影响页面中其他组件的交互该功能是系统每个功能模块都有可能会用到的,所以将起提取为一个公共组件。组件只需传入功能标识,然后调用内容管理系统的接口获取数据,如果有数据则显示文档入口,由于一个功能极有可能会对应有多篇帮助文档,用户从文档入口单击将展开文档列表,用户单击需要查看的文档,则在左下角显示文档。实现过程示例中均使用模拟的数据,实际数据在生产环境调用内容管理系统的接口获取。实现文档查看器组件HelpModal.vue文档查看器的拖拽及大小调整均通过指令控制<template> <el-dialog ref="dlg" v-dragAndResize :modal="false" top="auto" :visible.sync="isShow" custom-class="help-modal-wrap" width="400px" :close-on-click-modal="false" append-to-body > <div slot="title" class="dialog-title"> <h3>功能指南</h3> <div class="panel-actions"> <em class="panel-action console-svg svg-vertical-expand margin-right-xs" :class="{ 'svg-vertical-expand': !verticalMaxed, 'svg-vertical-collapse': verticalMaxed }" :title="verticalMaxed ? '还原' :'垂直最大化'" @click="setDlgMaxHeight" /> </div> </div> <div class="dlg-body-inner"> <div class="content-wrap"> <h2 class="article-title"> 如何使用一键转区 </h2> <div class="article-subtitle"> <span class="article-time">更新时间:2022-08-09 10:10</span> </div> <div class="article-content"> <p style="line-height:normal"> <span style="font-family:'arial' , 'helvetica' , sans-serif;font-size:16px"> 可使用【一键转区】功能,将超算账号的数据转移至指定的超算上进行使用,如超算中心A3分区的sc0001账号(即为源目标)转移至超算分区A6的sc0001(即为目的目标),具体操作如下:</span> </p> <p style="line-height:normal"> <span style="font-family:'arial' , 'helvetica' , sans-serif;font-size:16px"> 1. 单击【一键转区】中的【申请一键转区】</span> </p> <p> <span style="font-size:14px"><img src="https://kbs.paratera.com/uploads/1/image/public/202208/20220809100845_a3269g5dky.png" title="" alt="image.png" ></span> </p> <p> <span style="font-size:14px"><img src="https://kbs.paratera.com/uploads/1/image/public/202208/20220809100855_atmxepobl8.png" title="" alt="image.png" ></span> </p> <p><span style="font-size:14px"> </span></p> <p style="line-height:normal"> <span style="font-family:'arial' , 'helvetica' , sans-serif;font-size:14px"> <span style="font-family:'arial' , 'helvetica' , sans-serif;font-size:16px"> 2. 在【源目标】处选择可用的超算分区及超算账号,例如A3超算分区的sc0001;</span></span> </p> <p style="line-height:normal"> <span style="font-family:'arial' , 'helvetica' , sans-serif;font-size:16px"> 在【目的目标】处选择匹配的超算分区,不用选择转区后的超算账号,例如A6超算分区;</span> </p> <p style="line-height:normal"> <span style="font-family:'arial' , 'helvetica' , sans-serif;font-size:16px"> 在【源目标账号环境信息】处填软件使用时的环境要求。</span> </p> <p style="line-height:normal"> <span style="font-family:'arial' , 'helvetica' , sans-serif;font-size:16px"> 3. 单击【确定】,会有提示框告知源目标超算账号保存3个月,3个月后超算账号回收的提醒。</span> </p> <p style="line-height:normal"> <span style="font-family:'arial' , 'helvetica' , sans-serif;font-size:16px"> 4. 在【一键转区】的页面查看工单进展。</span> </p> </div> </div> <div class="outer-link-wrap"> <el-button type="primary" class="btn-open-in-window" @click="openDocLink"> 新窗口查看文档 </el-button> </div> </div> </el-dialog> </template> <script> import { setStyle, on, off, addClass } from 'element-ui/lib/utils/dom' export default { name: 'HelpModal', directives: { dragAndResize: { bind(el, binding, vnode, oldVnode) { addClass(el, 'dlg-wrap-help') // 弹框可拉伸最小宽高 const minWidth = 300 const minHeight = 300 // 获取弹框头部(这部分可双击全屏) const dialogHeaderEl = el.querySelector('.el-dialog__header') // 弹窗 const dragDom = el.querySelector('.el-dialog') dragDom.className = dragDom.className + ' dialog-can-resize' // // 给弹窗加上overflow auto;不然缩小时框内的标签可能超出dialog; // dragDom.style.overflow = 'auto' // 清除选择头部文字效果 dialogHeaderEl.onselectstart = new Function('return false') // 头部加上可拖动cursor dialogHeaderEl.style.cursor = 'move' // 获取原有属性 ie dom元素.currentStyle 火狐谷歌 window.getComputedStyle(dom元素, null); const sty = dragDom.currentStyle || window.getComputedStyle(dragDom, null) // 初始设置在页面左下角 const initialHeight = window.innerHeight * 2 / 3 setStyle(dragDom, 'height', initialHeight + 'px') setStyle(dragDom, 'top', window.innerHeight * 1 / 3 - 10 + 'px') const moveDown = (e) => { e.preventDefault() // 鼠标按下,计算当前元素距离可视区的距离 const disX = e.clientX - dialogHeaderEl.offsetLeft const disY = e.clientY - dialogHeaderEl.offsetTop // 获取到的值带px 正则匹配替换 let styL, styT // 注意在ie中 第一次获取到的值为组件自带50% 移动之后赋值为px if (sty.left.includes('%')) { styL = +document.body.clientWidth * (+sty.left.replace(/%/g, '') / 100) styT = +document.body.clientHeight * (+sty.top.replace(/%/g, '') / 100) } else { styL = +sty.left.replace(/px/g, '') styT = +sty.top.replace(/px/g, '') } document.onmousemove = function(e) { e.preventDefault() // 通过事件委托,计算移动的距离 const l = e.clientX - disX const t = e.clientY - disY // 移动当前元素 dragDom.style.left = `${l + styL}px` dragDom.style.top = `${t + styT}px` // 将此时的位置传出去 // binding.value({x:e.pageX,y:e.pageY}) } document.onmouseup = function(e) { document.onmousemove = null document.onmouseup = null } } on(dialogHeaderEl, 'mousedown', moveDown) // 添加位置调整锚点 const buildResizeElements = (dragDom) => { const directions = ['top', 'right', 'bottom', 'left', 'top-right', 'top-left', 'bottom-right', 'bottom-left'] for (const direction of directions) { const resizeEl = document.createElement('div') resizeEl.className = `resize-handle resize-${direction}` resizeEl.setAttribute('resize', direction) dragDom.appendChild(resizeEl) } } buildResizeElements(dragDom) let moveOpts = null on(document, 'mousedown', (event) => { if (event.which !== 1 && event.type === 'mousedown') { return } const { target } = event if (!target.className.includes('resize-handle')) { return } const resizeDirection = target.getAttribute('resize') moveOpts = { resizeDirection: resizeDirection, clientX: event.clientX, clientY: event.clientY, startWidth: dragDom.offsetWidth, startHeight: dragDom.offsetHeight, offsetLeft: dragDom.offsetLeft, offsetTop: dragDom.offsetTop } const screenWidth = window.innerWidth const screenHeight = window.innerHeight const mouseMoveHandler = (event) => { event.preventDefault() const style = dragDom.style const resizeDirection = moveOpts.resizeDirection const { startWidth, startHeight } = moveOpts let left = moveOpts.offsetLeft let top = moveOpts.offsetTop let width = moveOpts.startWidth let height = moveOpts.startHeight let clientX = event.clientX let clientY = event.clientY let x = (clientX = screenWidth <= clientX ? screenWidth : clientX) <= 0 ? 0 : clientX let y = (clientY = screenHeight <= clientY ? screenHeight : clientY) <= 0 ? 0 : clientY x = event.clientX - moveOpts.clientX y = event.clientY - moveOpts.clientY switch (resizeDirection) { case 'top': top = y + top height = -y + height break case 'right': width = x + width break case 'bottom': height = y + height break case 'left': left = x + left width = -x + width break case 'top-left': left = x + left top = y + top width = -x + width height = -y + height break case 'top-right': top = y + top width = x + width height = -y + height break case 'bottom-right': width = x + startWidth height = y + startHeight break case 'bottom-left': left = x + left width = -x + startWidth height = y + startHeight } left = left <= 0 ? 0 : left top = top <= 0 ? 0 : top style.left = left + 'px' style.top = top + 'px' style.width = Math.max(minWidth, width) + 'px' style.height = Math.max(minHeight, height) + 'px' } const mouseUpHandler = (event) => { console.error('mouseUp', event) off(document, 'mousemove', mouseMoveHandler) off(document, 'mouseup', mouseUpHandler) } on(document, 'mousemove', mouseMoveHandler) on(document, 'mouseup', mouseUpHandler) }) } } }, props: { show: { type: Boolean, required: true, default: false }, docId: { type: Number, required: true } }, data() { return { originStyle: null, verticalMaxed: false } }, computed: { isShow: { get() { return this.show }, set(val) { this.$emit('update:show', val) } } }, created() { this.init() }, methods: { async init() { }, setDlgMaxHeight() { const $dlg = this.$refs['dlg'] console.log('dlg', $dlg) const dlgEl = $dlg.$el.childNodes[0] const dlgStyle = dlgEl.style if (this.verticalMaxed) { setStyle(dlgEl, 'top', this.originStyle.top) setStyle(dlgEl, 'height', this.originStyle.height) } else { this.originStyle = { top: dlgStyle.top, height: dlgStyle.height } setStyle(dlgEl, 'top', 0) setStyle(dlgEl, 'height', window.innerHeight + 'px') } this.verticalMaxed = !this.verticalMaxed }, openDocLink() { window.open('https://kbs.paratera.com/info/1272') } } } </script> <style lang="scss"> @import "./modal-resize.scss"; .help-modal-wrap { border-radius: 0; pointer-events: all; margin: 0; left: 10px; top: calc(100vh - 100% - 10px); // transition: all ease 0.2s; .el-dialog__header { padding: 10px; background-image: url(./header-bg-2.jpg); background-repeat: no-repeat; background-position: 100% 0%; background-size:cover; background-color: $theme-light-1; color:#fff; position: relative; em.console-svg { font-size: 16px; cursor: pointer } .el-dialog__headerbtn { top: 15px; right: 15px; } .el-dialog__close { color:#fff; } } .el-dialog__body { flex: auto; overflow: auto; height: 100%; padding: 0; } .dlg-body-inner { box-sizing: border-box; height: 100%; // position: relative; // overflow: auto; // min-height: 352px; // max-height: calc(100vh - 60px); } } </style> <style lang="scss" scoped> @import "../../dashboard/modals/ArticleContent.scss"; :deep(.dlg-wrap-help) { pointer-events: none; } .dialog-title { h3 { font-size: 16px; font-weight:normal; } } .panel-actions { position: absolute; right: 30px; top: 10px; } .panel-action { width: 24px; height:24px; line-height: 24px; text-align: center; display:inline-block; margin: 0 3px; cursor: pointer; &:hover { background-color:rgba(0,0,0,0.15) } } .content-wrap { height: calc(100% - 95px); overflow: auto; padding: 10px; } article { padding-top: 20px; } .article-title { text-align: left; color: #333333; padding-top: 10px; font-size: 22px; font-weight: normal; } .article-subtitle { position: relative; width: 100%; padding-top: 10px; text-align: left; color: #999; font-size: 14px; } .article-content { padding: 10px; } .outer-link-wrap { padding: 10px; position: static; background-color: #fff; width: 100%; bottom: 0; } .btn-open-in-window { display: block; width: 100%; box-sizing: border-box; margin: 0 auto; } </style> <style> .dlg-wrap-help { pointer-events: none; z-index: 9000!important; } </style> modal-resize.scss.dialog-can-resize .resize-handle { position: absolute; z-index: 100; display: block } .dialog-can-resize .resize-top { cursor: n-resize; top: -3px; left: 0px; height: 7px; width: 100% } .dialog-can-resize .resize-bottom { cursor: s-resize; bottom: -3px; left: 0px; height: 7px; width: 100% } .dialog-can-resize .resize-right { cursor: e-resize; right: -3px; top: 0px; width: 7px; height: 100% } .dialog-can-resize .resize-left { cursor: w-resize; left: -3px; top: 0px; width: 7px; height: 100% } .dialog-can-resize .resize-bottom-right { cursor: se-resize; width: 20px; height: 20px; right: -8px; bottom: -8px; background: url('./resize_corner.png') no-repeat; opacity: .4; filter: alpha(opacity=40) } .dialog-can-resize .resize-bottom-left { cursor: sw-resize; width: 16px; height: 16px; left: -8px; bottom: -8px } .dialog-can-resize .resize-top-left { cursor: nw-resize; width: 16px; height: 16px; left: -8px; top: -8px } .dialog-can-resize .resize-top-right { cursor: ne-resize; width: 16px; height: 16px; right: -8px; top: -8px } .dialog-can-resize .aui-min,.dialog-can-resize .aui-max { display: block } .dialog-can-resize .resize-top-right:before,.dialog-can-resize .resize-bottom-right:before,.dialog-can-resize .resize-bottom-left:before,.dialog-can-resize .resize-top-left:before { position: absolute; content: ""; -ms-transition: all .2s; -webkit-transition: all .2s; -moz-transition: all .2s; -o-transition: all .2s; transition: all .2s; width: 15px; height: 15px; opacity: 0; pointer-events: none; border: 1px solid #1890ff; border-radius: 0 } .dialog-can-resize .resize-top-right:hover:before,.dialog-can-resize .resize-bottom-right:hover:before,.dialog-can-resize .resize-bottom-left:hover:before,.dialog-can-resize .resize-top-left:hover:before,.dialog-can-resize .resize-top-right:active:before,.dialog-can-resize .resize-bottom-right:active:before,.dialog-can-resize .resize-bottom-left:active:before,.dialog-can-resize .resize-top-left:active:before { opacity: 1 } .dialog-can-resize .resize-top-right:before { border-left: none; border-bottom: none; border-radius: 0 4px 0 0; left: -8px; top: 8px } .dialog-can-resize .resize-bottom-right:before { border-left: none; border-top: none; border-radius: 0 0 4px 0; left: -4px; top: -4px } .dialog-can-resize .resize-bottom-left:before { border-right: none; border-top: none; border-radius: 0 0 0 4px; left: 8px; top: -8px } .dialog-can-resize .resize-top-left:before { border-right: none; border-bottom: none; border-radius: 4px 0 0 0; left: 8px; top: 8px } 实现文档入口组件<template> <div v-if="docList.length > 0" class="fn-doc-wrap"> <el-popover position="bottom" trigger="hover" > <el-button slot="reference" type="text" class="padding-xs"> <em class="console-svg svg-fn-help" /> </el-button> <ul class="doc-list"> <li v-for="docItem in docList" :key="docItem.id" @click="showHelpModal(docItem.id)"> <p v-text="docItem.title" /><svg width="18" height="18" viewBox="0 0 18 18" fill="none" xmlns="http://www.w3.org/2000/svg" class="icon-tool-arrow" data-v-68bcb17a=""><path d="M13.7031 11.5259L13.7031 4.77588L6.95314 4.77589M4.30093 14.177L13.3949 5.08301" stroke-width="1.5" stroke-linecap="round" stroke-linejoin="round"></path></svg> </li> </ul> </el-popover> </div> </template> <script> export default { name: 'ParaFnDoc', desc: '随动帮助文档入口组件,使用过程中只需要传入关键词即可', props: { keyword: { type: String, required: true } }, data() { return { docList: [] } }, created() { this.init() }, methods: { init() { // TODO 根据关键词获取文档列表 this.docList = [ { id: 1, title: '一键转区功能说明' }, { id: 2, title: '为什么一键转区功能不可用?' }, { id: 3, title: '为什么一键转区提交后没有及时生效?' } ] }, showHelpModal(docId) { window.ParaCommon.showHelpModal(docId) } } } </script> <style lang="scss" scoped> .fn-doc-wrap { display: inline-block; vertical-align: middle; } .doc-list li { line-height: 22px; margin-bottom: 5px; padding: 7px 10px; list-style:none; display: flex; align-items: center; justify-content: center; &:hover { background-color: #f7f8fa; cursor: pointer; .icon-tool-arrow { stroke: #1e80ff; } } p { flex: 1 } .link-arrow { color:blue } } </style> 实现后的效果{dplayer src="/usr/uploads/2023/06/592593977.mp4"/}
-
Ubuntu 添加FRP客户端自启动 背景介绍今年618 的时候购置了一台迷你主机,主要用于家庭内部服务器使用,主要基于Docker 部署其他应用,而 Ubuntu 作为 docker 原生支持最好的操作系统,而且还有漂亮的桌面,当然也就成了本迷你主机的操作系统首选。装完系统后,部署的很多应用只能内部使用,为了方便,当然不能只局限于家庭内部环境使用。结合之前不熟的FRP服务端,完全可以对外提供WEB服务,于是便有了本期的教程。下载 FRPFRP 是服务端和客户端打包在一个压缩包文件里的,可以直接从github下载就好。FRP 发布地址:https://github.com/fatedier/frp/releases本处直接下载最新的0.49.0 版本,根据操作系统,本处选择frp_0.49.0_linux_amd64.tar.gz 进行下载:wget https://github.com/fatedier/frp/releases/download/v0.49.0/frp_0.49.0_linux_amd64.tar.gz下载后 解压文件tar -zxvf frp_0.49.0_linux_amd64.tar.gz将解压的文件移动到当前用户有权限的目录,本案例中移动到 /data/apps/frp目录编辑 frpc.ini 文件本处结合实际情况,修改内容如下,部分涉密数据做了调整:[common] server_addr = SERVER_IP server_port = 7000 # for authentication token = TOKEN log_file = /data/apps/frp/frpc.log log_level = info log_max_days = 30 [home_ssh] type = tcp local_ip = 127.0.0.1 local_port = 22 remote_port = 4000 [home_web_pan] type = http local_ip = 127.0.0.1 local_port = 80 http_user = zhuzl http_pwd = PASSWORD subdomain = pan [home_web_kod] type = http local_ip = 127.0.0.1 local_port = 80 http_user = zhuzl http_pwd = PASSWORD subdomain = kod 配置完成后,可直接运行frpc 验证是否OK../frpc若有问题,可检查frpc.ini相关配置信息是否正确配置frpc自启动配置自启动过程中,为避免权限相关问题,本处直接切换为 root 账号添加 frpc.servicevi /etc/systemd/system/frpc.service输入如下服务配置内容[Unit] Description=Frp Client Service After=network.target [Service] Type=simple User=jiuzilong Restart=on-failure RestartSec=5s ExecStart=/data/apps/frp/frpc -c /data/apps/frp/frpc.ini [Install] WantedBy=multi-user.target 启用服务# 启用服务 systemctl enable frpc.service # 禁用服务 systemctl disable frpc.service重启服务systemctl daemon-reload systemctl start frpc验证服务启动状态systemctl status frpc参考链接FRP官方文档: https://gofrp.org/docs/overview/FRP服务端安装并设置开机自启动: https://blog.zhuzhilong.cn/software/install-frps-as-service.html推荐另一种docker compose 的启动方式:version: '3.3' services: frpc: restart: always network_mode: host volumes: - './frpc.ini:/etc/frp/frpc.ini' container_name: frpc image: snowdreamtech/frpc
-
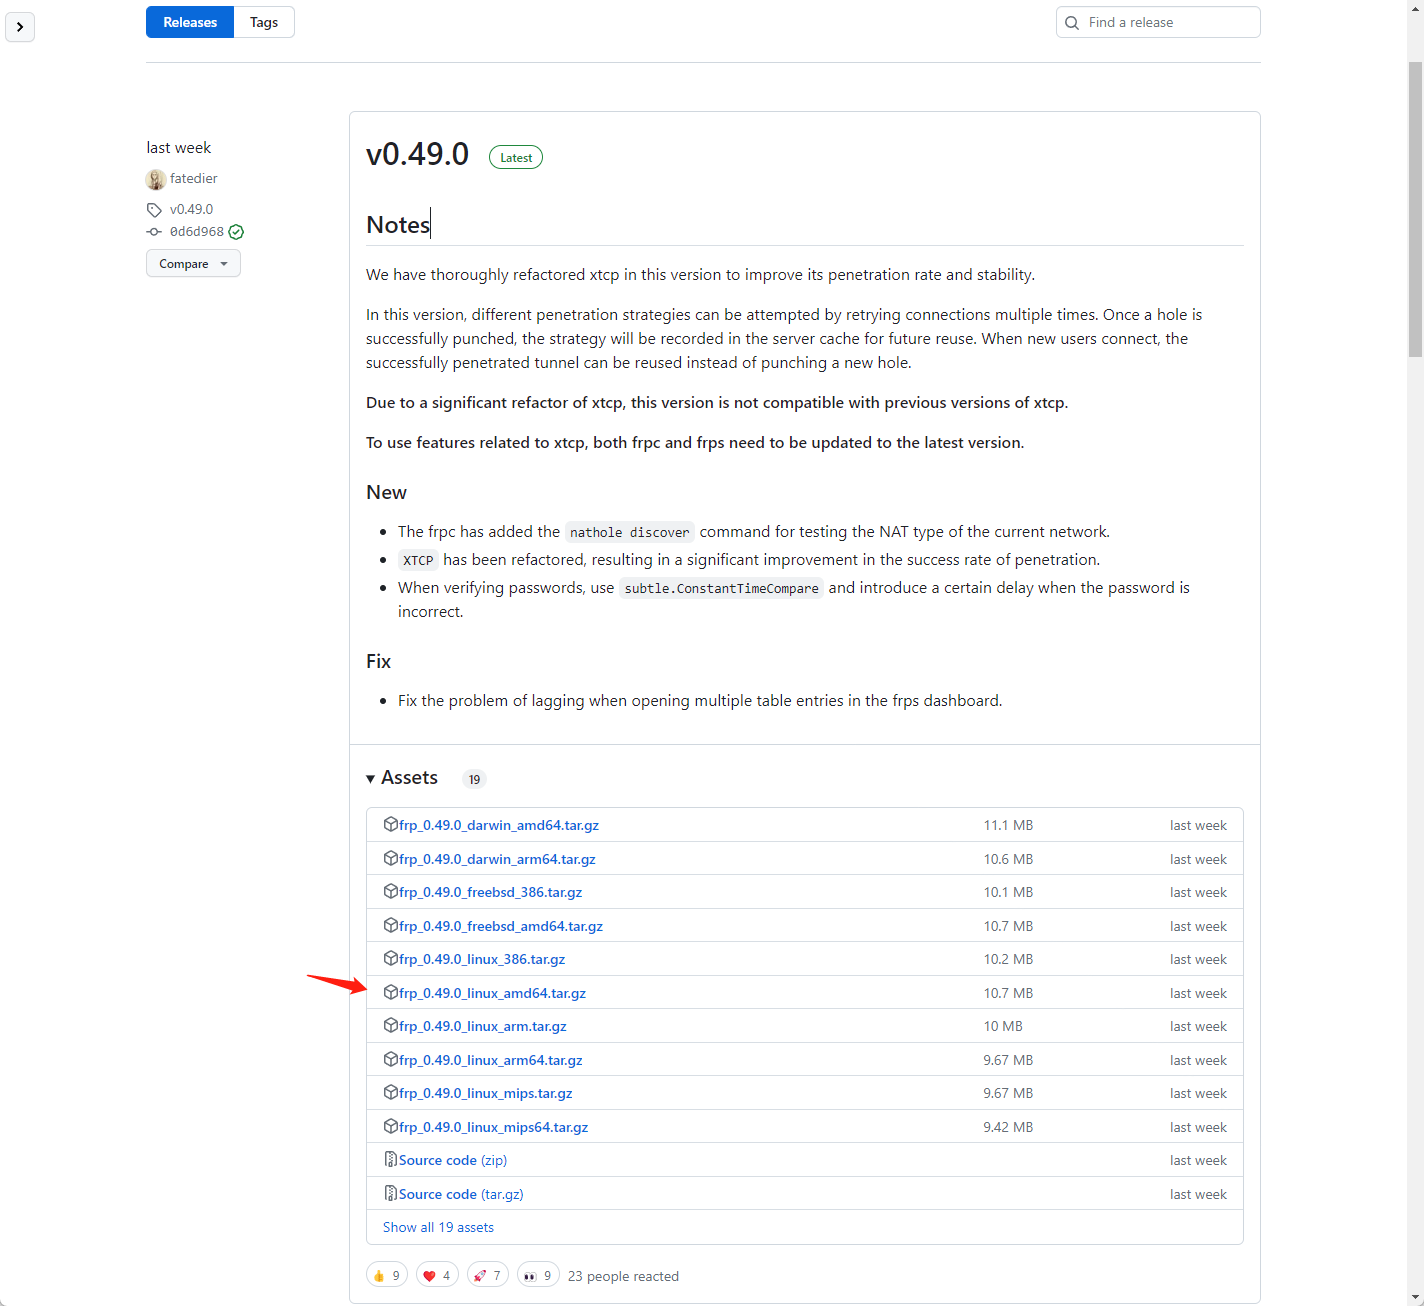
部署Cloudreve 参考链接:https://docs.cloudreve.org/getting-started/install#docker-composedocker-compose.ymlversion: "3.8" services: cloudreve: container_name: cloudreve image: cloudreve/cloudreve:latest restart: unless-stopped ports: - "8004:5212" volumes: - temp_data:/data - ./cloudreve/uploads:/cloudreve/uploads - ./cloudreve/conf.ini:/cloudreve/conf.ini - ./cloudreve/cloudreve.db:/cloudreve/cloudreve.db - ./avatar:/cloudreve/avatar depends_on: - aria2 aria2: container_name: aria2 image: ddsderek/aria2-pro restart: unless-stopped environment: - RPC_SECRET=your_aria_rpc_token - RPC_PORT=6800 - DOWNLOAD_DIR=/data - PUID=1000 - PGID=1000 - UMASK_SET=022 - TZ=Asia/Shanghai volumes: - ./aria2/config:/config - temp_data:/data volumes: temp_data: driver: local driver_opts: type: none device: ./data o: bind 在当前目录创建相关目录及文件mkdir -vp cloudreve/{uploads,avatar} \ && touch cloudreve/conf.ini \ && touch cloudreve/cloudreve.db \ && mkdir -p aria2/config \ && mkdir -p data/aria2 \ && chmod -R 777 data/aria2启动容器docker compose up -d启动后从日志中查看登录账号信息:
-
部署spug 参考: https://www.spug.cc/docs/install-docker创建 docker-compose.ymlversion: '3.9' services: spug: image: openspug/spug-service container_name: spug privileged: true restart: always volumes: - ./service:/data/spug - ./repos:/data/repos ports: - 8002:80 environment: - MYSQL_DATABASE=spug - MYSQL_USER=spug - MYSQL_PASSWORD=Passw0rd - MYSQL_HOST=192.168.1.200 - MYSQL_PORT=3306启动容器docker compose up -d初始化以下操作会创建一个用户名为 zhuzl 密码为 Passw0rd 的管理员账户,可自行替换管理员账户/密码。docker exec spug init_spug zhuzl Passw0rd