搜索到
15
篇与
软件
的结果
-
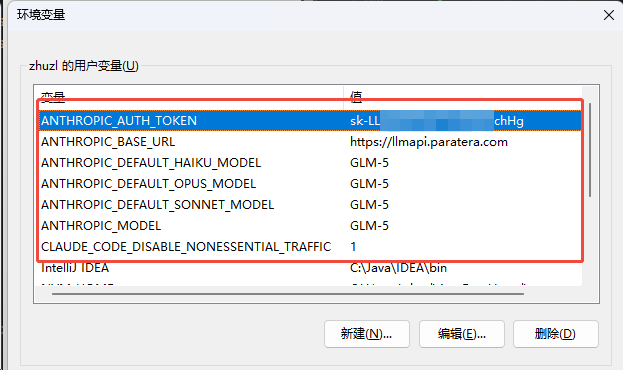
 Claude Code 使用记录 安装及配置安装执行下面命令前,需提前安装好Node.jsnpm install -g @anthropic-ai/claude-code配置我本地使用的是 Windows 作为开发机,需要连接公司的大模型服务,需要根据 Claude Code 的说明配置环境变量:相关变量整理如下:变量值说明ANTHROPIC_AUTH_TOKENsk-xxxxxhHgAuthorization 标头的自定义值(您在此处设置的值将以 Bearer 为前缀)ANTHROPIC_BASE_URLhttps://llmapi.paratera.comMaaS 提供商的BaseURLANTHROPIC_DEFAULT_HAIKU_MODELGLM-5用于 haiku 的模型,或后台功能ANTHROPIC_DEFAULT_OPUS_MODELGLM-5用于 opus 的模型,或在 Plan Mode 活跃时用于 opusplan 的模型。ANTHROPIC_DEFAULT_SONNET_MODELGLM-5用于 sonnet 的模型,或在 Plan Mode 不活跃时用于 opusplan 的模型。ANTHROPIC_MODELGLM-5要使用的模型设置的名称CLAUDE_CODE_DISABLE_NONESSENTIAL_TRAFFIC1等同于设置 DISABLE_AUTOUPDATER(禁用自动更新)、DISABLE_BUG_COMMAND(禁用 /bug 命令)、DISABLE_ERROR_REPORTING(退出 Sentry 错误报告) 和 DISABLE_TELEMETRY(退出 Statsig 遥测)更多环境变量参考 Claude 官网:https://code.claude.com/docs/zh-CN/settings#%E7%8E%AF%E5%A2%83%E5%8F%98%E9%87%8F常用命令# 开启 YOLO 模式 claude --dangerously-skip-permissions # 升级 claude update # 继续上次会话 claude -c实用小技巧使用!前缀直接执行Bash命令 :无需通过 Claude 解释,直接运行系统命令如!git status、! git log,节省 token 且结果自动加入上下文Ctrl+R搜索历史提示词 :复杂的 prompt 很难记?按Ctrl+R可交互式搜索之前用过的提示词,按 Tab 编辑,Enter 执行Ctrl+S暂存当前草稿 :写 prompt 到一半需要查资料?按 Ctrl+S 暂存,处理完其他事情后草稿自动恢复/sandbox沙盒模式预授权:预先定义权限范围(如允许npm test,禁止rm -rf),在此范围内无需每次点击“允许”ultrathink深度思考模式 :在prompt中加入ultrathink关键词,Claude会分配最多32K tokens进行内部推理,适合架构设计、难缠bug等复杂问题常用快捷键! for bash modedouble tap esc to clear inputctrl + shift + - to undo/ for commandsshift + Tab to auto-accept editsalt + v to paste images@ for file pathsctrl + o for verbose outputmeta + p to switch model& for backgroundctrl + t to show todosctrl + s to stash prompt\⏎ for newline引用文件的方法直接拖拽文件到对话框输入 @ 选择当前目录文件输入 @/ + 文件名进行全局搜索使用 @src/auth.js 引用单个文件,@src/components/引用整个目录,支持模糊匹配直接键入关键词后按 Tab 触发全局搜索自动检测激活文件:编辑器中当前打开文件自动加入上下文选中代码行后 Claude 仅解析选区常用 Skill 推荐Superpowers开源:https://github.com/obra/superpowers简单使用# 1、安装应用市场 /plugin marketplace add obra/superpowers-marketplace # 2、安装插件 /plugin install superpowers@superpowers-marketplaceUI UX Pro Max官网:https://uupm.cc/开源:https://github.com/nextlevelbuilder/ui-ux-pro-max-skill简单使用# 1、安装全局cli命令行工具 npm install -g uipro-cli # 2、针对不同的AI工具初始化skill uipro init --ai claude # Claude Code uipro init --ai cursor # Cursor uipro init --ai windsurf # Windsurf uipro init --ai antigravity # Antigravity uipro init --ai copilot # GitHub Copilot uipro init --ai kiro # Kiro uipro init --ai codex # Codex CLI uipro init --ai qoder # Qoder uipro init --ai roocode # Roo Code uipro init --ai gemini # Gemini CLI uipro init --ai trae # Trae uipro init --ai opencode # OpenCode uipro init --ai continue # Continue uipro init --ai codebuddy # CodeBuddy uipro init --ai droid # Droid (Factory) uipro init --ai kilocode # KiloCode uipro init --ai warp # Warp uipro init --ai augment # Augment uipro init --ai all # All assistants # 其他 cli 命令 uipro versions # List available versions uipro update # Update to latest version uipro init --offline # Skip GitHub download, use bundled assets uipro uninstall # Remove skill (auto-detect platform) uipro uninstall --ai claude # Remove specific platform uipro uninstall --global # Remove from global install
 -
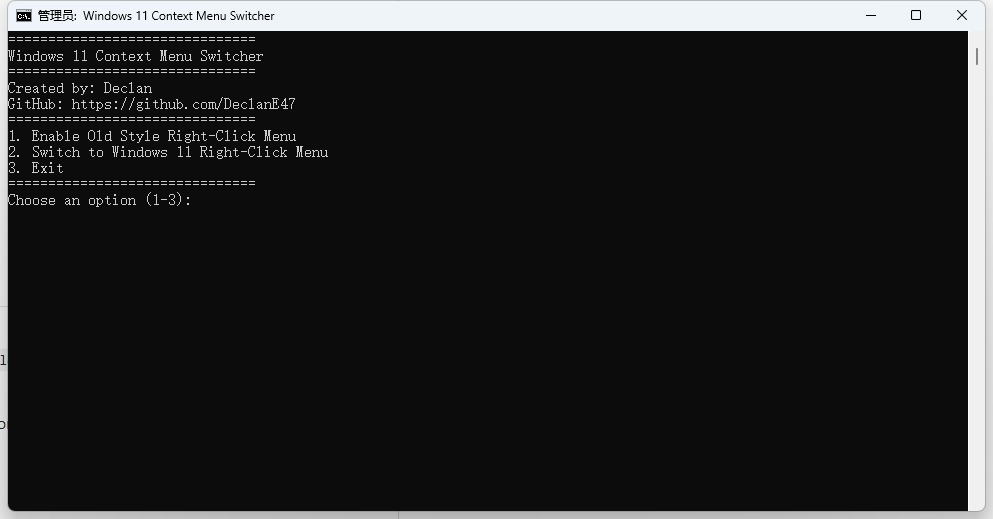
【软件推荐】一键切换Windows11 右键菜单工具:Windows 11 Context Menu Switcher 使用 Windows 11 两年多了,一直不怎么习惯 Windows 11 默认的右键菜单,感觉提供的右键菜单都是基本上不会用到的,每次都要点击底部的「显示更多选项」,然后再选择要使用的菜单项,每次这样都这样操作,确实极大的影响心情及工作效率。之前通过一些教程通过修改注册表的方式处理过一次,但是手工修改注册表的方式操作起来还是略显繁琐。软件介绍今天偶然在 Github 找到了一个针对这种场景的小工具:Windows 11 Context Menu Switcher。顾名思义,他是一款专门用于 Windows11 右键菜单切换的小工具。他是一个简单的 CMD 脚本,可让您在旧式右键上下文菜单和默认 Windows 11 上下文菜单之间轻松切换。此脚本提供了一个用户友好的界面,并自动重新启动 Windows 资源管理器以立即应用更改。软件特征在 Windows 11 上启用旧式右键上下文菜单。支持切换回 Windows 11 右键单击上下文菜单。切换后自动重新启动 Windows 资源管理器以应用更改。提供基于 cmd 的易于使用的菜单交互界面。使用方式1、下载 bat 脚本文件下载地址:https://github.com/DeclanE47/Windows11-Context-Menu-Switcher若访问 Github 不便,可将如下内容保存为 .bat 格式的文件:@echo off title Windows 11 Context Menu Switcher :menu cls echo =============================== echo Windows 11 Context Menu Switcher echo =============================== echo Created by: Declan echo GitHub: https://github.com/DeclanE47 echo =============================== echo 1. Enable Old Style Right-Click Menu echo 2. Switch to Windows 11 Right-Click Menu echo 3. Exit echo =============================== set /p choice=Choose an option (1-3): if "%choice%"=="1" goto oldmenu if "%choice%"=="2" goto newmenu if "%choice%"=="3" exit :oldmenu reg add "HKCU\Software\Classes\CLSID\{86ca1aa0-34aa-4e8b-a509-50c905bae2a2}\InprocServer32" /f /ve echo Old style right-click menu enabled. goto restart :newmenu reg delete "HKCU\Software\Classes\CLSID\{86ca1aa0-34aa-4e8b-a509-50c905bae2a2}" /f echo Windows 11 right-click menu restored. goto restart :restart echo Restarting Windows Explorer to apply changes... taskkill /f /im explorer.exe >nul 2>&1 start explorer.exe echo Restart complete. pause goto menu 2、右键 bat 文件,以管理员身份运行3、根据提示选择操作项选项1:启用旧式右键菜单选项2:恢复 Windows 11 右键菜单选项3:退出脚本4、重启 Windows 资源管理器执行完脚本后将自动重启 Explorer 进程以应用更改
-
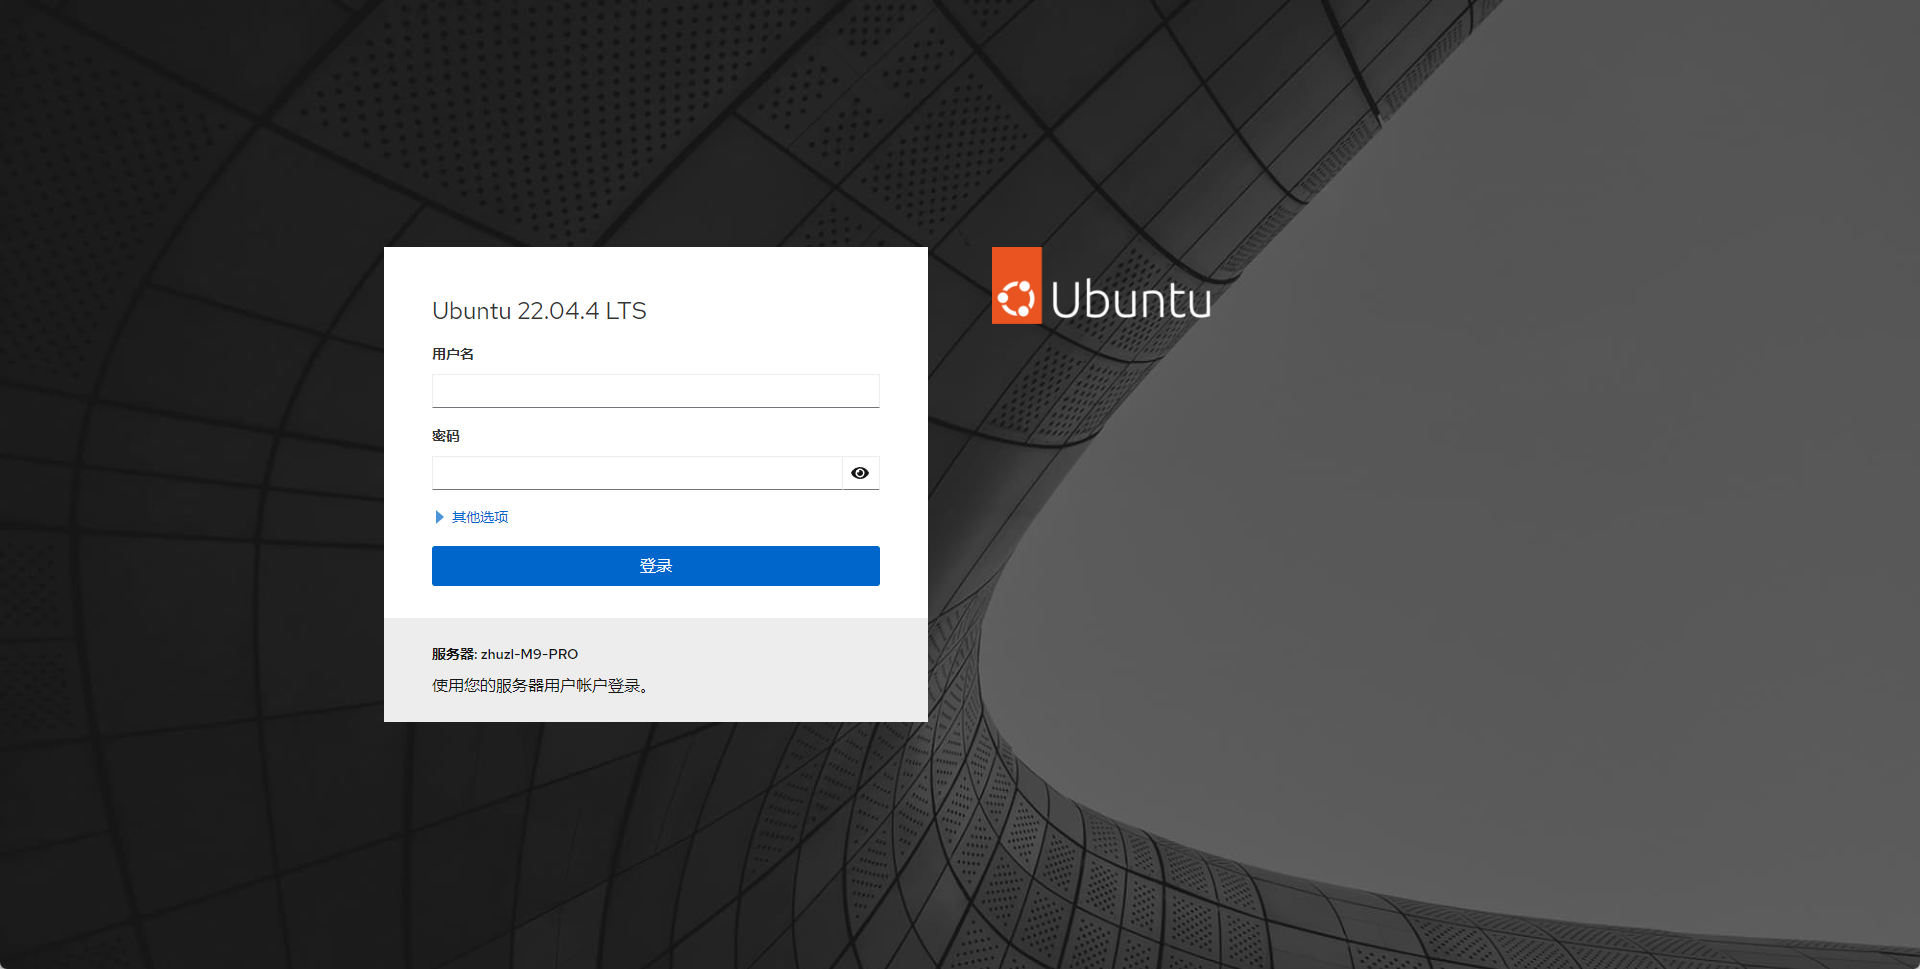
推荐一款好用的Linux Web 可视化管理工具——Cockpit 软件介绍Cockpit是一个易于使用、集成、易于浏览和开放的基于 Web 的服务器界面。支持多种linux发行版软件常用功能系统日志信息查看系统存储信息查看仪表盘系统配置与系统基本操作Docker容器监控系统网络监控Web命令行终端软件部署Cockpit 支持多种 Linux 发行版,各类型安装命令参见官网链接:https://cockpit-project.org/running.html。根据官网的安装说明,下面以 Ubuntu 为例进行简单讲解。安装命令如下:. /etc/os-release sudo apt install -t ${VERSION_CODENAME}-backports cockpit上面的命令执行效果如下:zhuzl@zhuzl-M9-PRO:~$ . /etc/os-release zhuzl@zhuzl-M9-PRO:~$ sudo apt install -t ${VERSION_CODENAME}-backports cockpit 正在读取软件包列表... 完成 正在分析软件包的依赖关系树... 完成 正在读取状态信息... 完成 将会同时安装下列软件: cockpit-bridge cockpit-networkmanager cockpit-packagekit cockpit-storaged cockpit-system cockpit-ws finalrd libblockdev-mdraid2 libbytesize-common libbytesize1 libpwquality-tools mdadm 建议安装: cockpit-doc cockpit-sosreport udisks2-btrfs udisks2-lvm2 sssd-dbus dracut-core 下列【新】软件包将被安装: cockpit cockpit-bridge cockpit-networkmanager cockpit-packagekit cockpit-storaged cockpit-system cockpit-ws finalrd libblockdev-mdraid2 libbytesize-common libbytesize1 libpwquality-tools mdadm 升级了 0 个软件包,新安装了 13 个软件包,要卸载 0 个软件包,有 122 个软件包未被升级。 需要下载 7,490 kB 的归档。 解压缩后会消耗 10.4 MB 的额外空间。 您希望继续执行吗? [Y/n] y 获取:1 http://cn.archive.ubuntu.com/ubuntu jammy-backports/universe amd64 cockpit-bridge amd64 324-1~bpo22.04.1 [393 kB] 获取:2 http://cn.archive.ubuntu.com/ubuntu jammy-backports/universe amd64 cockpit-ws amd64 324-1~bpo22.04.1 [882 kB] 获取:3 http://mirrors.tuna.tsinghua.edu.cn/ubuntu jammy/universe amd64 libpwquality-tools amd64 1.4.4-1build2 [9,752 B] 获取:4 http://cn.archive.ubuntu.com/ubuntu jammy-backports/universe amd64 cockpit-system all 324-1~bpo22.04.1 [3,204 kB] 获取:5 http://cn.archive.ubuntu.com/ubuntu jammy-backports/universe amd64 cockpit all 324-1~bpo22.04.1 [20.1 kB] 获取:6 http://cn.archive.ubuntu.com/ubuntu jammy-backports/universe amd64 cockpit-networkmanager all 324-1~bpo22.04.1 [846 kB] 获取:7 http://cn.archive.ubuntu.com/ubuntu jammy-backports/universe amd64 cockpit-packagekit all 324-1~bpo22.04.1 [844 kB] 获取:8 http://mirrors.tuna.tsinghua.edu.cn/ubuntu jammy/universe amd64 libbytesize-common all 2.6-1 [7,454 B] 获取:9 http://mirrors.tuna.tsinghua.edu.cn/ubuntu jammy/universe amd64 libbytesize1 amd64 2.6-1 [12.1 kB] 获取:10 http://mirrors.tuna.tsinghua.edu.cn/ubuntu jammy-updates/main amd64 mdadm amd64 4.2-0ubuntu2 [464 kB] 获取:11 http://mirrors.tuna.tsinghua.edu.cn/ubuntu jammy/universe amd64 libblockdev-mdraid2 amd64 2.26-1 [11.8 kB] 获取:12 http://cn.archive.ubuntu.com/ubuntu jammy-backports/universe amd64 cockpit-storaged all 324-1~bpo22.04.1 [789 kB] 获取:13 http://mirrors.tuna.tsinghua.edu.cn/ubuntu jammy/main amd64 finalrd all 9build1 [7,306 B] 已下载 7,490 kB,耗时 13秒 (577 kB/s) 正在预设定软件包 ... 正在选中未选择的软件包 cockpit-bridge。 (正在读取数据库 ... 系统当前共安装有 262830 个文件和目录。) 准备解压 .../00-cockpit-bridge_324-1~bpo22.04.1_amd64.deb ... 正在解压 cockpit-bridge (324-1~bpo22.04.1) ... 正在选中未选择的软件包 cockpit-ws。 准备解压 .../01-cockpit-ws_324-1~bpo22.04.1_amd64.deb ... 正在解压 cockpit-ws (324-1~bpo22.04.1) ... 正在选中未选择的软件包 libpwquality-tools。 准备解压 .../02-libpwquality-tools_1.4.4-1build2_amd64.deb ... 正在解压 libpwquality-tools (1.4.4-1build2) ... 正在选中未选择的软件包 cockpit-system。 准备解压 .../03-cockpit-system_324-1~bpo22.04.1_all.deb ... 正在解压 cockpit-system (324-1~bpo22.04.1) ... 正在选中未选择的软件包 cockpit。 准备解压 .../04-cockpit_324-1~bpo22.04.1_all.deb ... 正在解压 cockpit (324-1~bpo22.04.1) ... 正在选中未选择的软件包 cockpit-networkmanager。 准备解压 .../05-cockpit-networkmanager_324-1~bpo22.04.1_all.deb ... 正在解压 cockpit-networkmanager (324-1~bpo22.04.1) ... 正在选中未选择的软件包 cockpit-packagekit。 准备解压 .../06-cockpit-packagekit_324-1~bpo22.04.1_all.deb ... 正在解压 cockpit-packagekit (324-1~bpo22.04.1) ... 正在选中未选择的软件包 libbytesize-common。 准备解压 .../07-libbytesize-common_2.6-1_all.deb ... 正在解压 libbytesize-common (2.6-1) ... 正在选中未选择的软件包 libbytesize1:amd64。 准备解压 .../08-libbytesize1_2.6-1_amd64.deb ... 正在解压 libbytesize1:amd64 (2.6-1) ... 正在选中未选择的软件包 mdadm。 准备解压 .../09-mdadm_4.2-0ubuntu2_amd64.deb ... 正在解压 mdadm (4.2-0ubuntu2) ... 正在选中未选择的软件包 libblockdev-mdraid2:amd64。 准备解压 .../10-libblockdev-mdraid2_2.26-1_amd64.deb ... 正在解压 libblockdev-mdraid2:amd64 (2.26-1) ... 正在选中未选择的软件包 cockpit-storaged。 准备解压 .../11-cockpit-storaged_324-1~bpo22.04.1_all.deb ... 正在解压 cockpit-storaged (324-1~bpo22.04.1) ... 正在选中未选择的软件包 finalrd。 准备解压 .../12-finalrd_9build1_all.deb ... 正在解压 finalrd (9build1) ... 正在设置 libpwquality-tools (1.4.4-1build2) ... 正在设置 finalrd (9build1) ... Created symlink /etc/systemd/system/sysinit.target.wants/finalrd.service → /lib/systemd/system/finalrd.service. 正在设置 libbytesize-common (2.6-1) ... 正在设置 cockpit-bridge (324-1~bpo22.04.1) ... 正在设置 libbytesize1:amd64 (2.6-1) ... 正在设置 cockpit-ws (324-1~bpo22.04.1) ... Creating group cockpit-wsinstance with gid 998. Creating user cockpit-wsinstance (User for cockpit-ws instances) with uid 998 and gid 998. Created symlink /etc/systemd/system/sockets.target.wants/cockpit.socket → /lib/systemd/system/cockpit.socket. 正在设置 mdadm (4.2-0ubuntu2) ... Generating mdadm.conf... done. update-initramfs: deferring update (trigger activated) Sourcing file `/etc/default/grub' Sourcing file `/etc/default/grub.d/init-select.cfg' Generating grub configuration file ... File descriptor 3 (pipe:[363435355]) leaked on vgs invocation. Parent PID 1007874: grub-probe File descriptor 3 (pipe:[363435355]) leaked on vgs invocation. Parent PID 1007874: grub-probe File descriptor 3 (pipe:[363435355]) leaked on vgs invocation. Parent PID 1007902: /usr/sbin/grub-probe File descriptor 3 (pipe:[363435355]) leaked on vgs invocation. Parent PID 1007902: /usr/sbin/grub-probe File descriptor 3 (pipe:[363435355]) leaked on vgs invocation. Parent PID 1007914: /usr/sbin/grub-probe File descriptor 3 (pipe:[363435355]) leaked on vgs invocation. Parent PID 1007914: /usr/sbin/grub-probe File descriptor 3 (pipe:[363435355]) leaked on vgs invocation. Parent PID 1007924: /usr/sbin/grub-probe File descriptor 3 (pipe:[363435355]) leaked on vgs invocation. Parent PID 1007924: /usr/sbin/grub-probe File descriptor 3 (pipe:[363435355]) leaked on vgs invocation. Parent PID 1007934: /usr/sbin/grub-probe File descriptor 3 (pipe:[363435355]) leaked on vgs invocation. Parent PID 1007934: /usr/sbin/grub-probe File descriptor 3 (pipe:[363435355]) leaked on vgs invocation. Parent PID 1007944: /usr/sbin/grub-probe File descriptor 3 (pipe:[363435355]) leaked on vgs invocation. Parent PID 1007944: /usr/sbin/grub-probe File descriptor 3 (pipe:[363435355]) leaked on vgs invocation. Parent PID 1008001: /usr/sbin/grub-probe File descriptor 3 (pipe:[363435355]) leaked on vgs invocation. Parent PID 1008001: /usr/sbin/grub-probe Found linux image: /boot/vmlinuz-6.8.0-49-generic Found initrd image: /boot/initrd.img-6.8.0-49-generic File descriptor 3 (pipe:[363435355]) leaked on vgs invocation. Parent PID 1008083: /usr/sbin/grub-probe File descriptor 3 (pipe:[363435355]) leaked on vgs invocation. Parent PID 1008083: /usr/sbin/grub-probe File descriptor 3 (pipe:[363435355]) leaked on vgs invocation. Parent PID 1008094: /usr/sbin/grub-probe File descriptor 3 (pipe:[363435355]) leaked on vgs invocation. Parent PID 1008094: /usr/sbin/grub-probe File descriptor 3 (pipe:[363435355]) leaked on vgs invocation. Parent PID 1008104: /usr/sbin/grub-probe File descriptor 3 (pipe:[363435355]) leaked on vgs invocation. Parent PID 1008104: /usr/sbin/grub-probe File descriptor 3 (pipe:[363435355]) leaked on vgs invocation. Parent PID 1008114: /usr/sbin/grub-probe File descriptor 3 (pipe:[363435355]) leaked on vgs invocation. Parent PID 1008114: /usr/sbin/grub-probe Found linux image: /boot/vmlinuz-6.8.0-40-generic Found initrd image: /boot/initrd.img-6.8.0-40-generic File descriptor 3 (pipe:[363435355]) leaked on vgs invocation. Parent PID 1008391: /usr/sbin/grub-probe File descriptor 3 (pipe:[363435355]) leaked on vgs invocation. Parent PID 1008391: /usr/sbin/grub-probe Memtest86+ needs a 16-bit boot, that is not available on EFI, exiting Warning: os-prober will not be executed to detect other bootable partitions. Systems on them will not be added to the GRUB boot configuration. Check GRUB_DISABLE_OS_PROBER documentation entry. Adding boot menu entry for UEFI Firmware Settings ... done Created symlink /etc/systemd/system/mdmonitor.service.wants/mdcheck_continue.timer → /lib/systemd/system/mdcheck_continue.timer. Created symlink /etc/systemd/system/mdmonitor.service.wants/mdcheck_start.timer → /lib/systemd/system/mdcheck_start.timer. Created symlink /etc/systemd/system/mdmonitor.service.wants/mdmonitor-oneshot.timer → /lib/systemd/system/mdmonitor-oneshot.timer. 正在设置 cockpit-system (324-1~bpo22.04.1) ... 正在设置 cockpit-networkmanager (324-1~bpo22.04.1) ... 正在设置 libblockdev-mdraid2:amd64 (2.26-1) ... 正在设置 cockpit-packagekit (324-1~bpo22.04.1) ... 正在设置 cockpit-storaged (324-1~bpo22.04.1) ... 正在设置 cockpit (324-1~bpo22.04.1) ... 正在处理用于 man-db (2.10.2-1) 的触发器 ... 正在处理用于 libc-bin (2.35-0ubuntu3.8) 的触发器 ... 正在处理用于 initramfs-tools (0.140ubuntu13.4) 的触发器 ... update-initramfs: Generating /boot/initrd.img-6.8.0-49-generic I: The initramfs will attempt to resume from /dev/dm-1 I: (/dev/mapper/vgubuntu-swap_1) I: Set the RESUME variable to override this.安装后通过端口检测服务是否正确:zhuzl@zhuzl-M9-PRO:~$ sudo lsof -i:9090 COMMAND PID USER FD TYPE DEVICE SIZE/OFF NODE NAME systemd 1 root 164u IPv6 363430477 0t0 TCP *:9090 (LISTEN) zhuzl@zhuzl-M9-PRO:~$从上面的命令结果可知,Cockpit 已成功安装并监听 9090 端口。此时我们可以在服务器的防火墙放行 9090 端口后直接通过9090端口访问,由于是web服务,我们也可以使用Nginx 代理对外提供服务,根据个人喜好来就好。初体验登录页从登录页我们可以看到,登录窗都做到了自动国际化,还是不错的。使用 Linux 系统的账号登录,显示如下失败页面:根据界面的报错提示,执行sudo journalctl -u cockpit命令查看日志,内容如下:zhuzl@zhuzl-M9-PRO:~$ sudo journalctl -u cockpit [sudo] zhuzl 的密码: 11月 22 16:07:20 zhuzl-M9-PRO systemd[1]: Starting Cockpit Web Service... 11月 22 16:07:20 zhuzl-M9-PRO cockpit-certificate-ensure[1048208]: /usr/lib/cockpit/cockpit-certificate-helper: line 25: sscg: command not found 11月 22 16:07:20 zhuzl-M9-PRO cockpit-certificate-ensure[1048209]: .+++++++++++++++++++++++++++++++++++++++++++++++++++++++++++++++++*.......+......+....+++++++++++++++++++++++++++++> 11月 22 16:07:20 zhuzl-M9-PRO cockpit-certificate-ensure[1048209]: .....+............+.............+..+....+...+.....+.+++++++++++++++++++++++++++++++++++++++++++++++++++++++++++++++> 11月 22 16:07:20 zhuzl-M9-PRO cockpit-certificate-ensure[1048209]: ----- 11月 22 16:07:20 zhuzl-M9-PRO systemd[1]: Started Cockpit Web Service. 11月 22 16:10:02 zhuzl-M9-PRO systemd[1]: cockpit.service: Deactivated successfully.根据提示是找不到sscg命令,我们安装一下sudo apt install sscg该命令执行情况如下:zhuzl@zhuzl-M9-PRO:/home/zhuzl# sudo apt install sscg 正在读取软件包列表... 完成 正在分析软件包的依赖关系树... 完成 正在读取状态信息... 完成 将会同时安装下列软件: libpath-utils1 powertop 建议安装: cpufrequtils laptop-mode-tools 下列【新】软件包将被安装: libpath-utils1 powertop sscg 升级了 0 个软件包,新安装了 3 个软件包,要卸载 0 个软件包,有 88 个软件包未被升级。 需要下载 225 kB 的归档。 解压缩后会消耗 705 kB 的额外空间。 您希望继续执行吗? [Y/n] y 获取:1 http://mirrors.tuna.tsinghua.edu.cn/ubuntu jammy/main amd64 libpath-utils1 amd64 0.6.2-1 [9,254 B] 获取:2 http://mirrors.tuna.tsinghua.edu.cn/ubuntu jammy/universe amd64 sscg amd64 3.0.2-1 [23.9 kB] 获取:3 http://mirrors.tuna.tsinghua.edu.cn/ubuntu jammy/main amd64 powertop amd64 2.14-1build1 [191 kB] 已下载 225 kB,耗时 57秒 (3,917 B/s) 正在选中未选择的软件包 libpath-utils1:amd64。 (正在读取数据库 ... 系统当前共安装有 263679 个文件和目录。) 准备解压 .../libpath-utils1_0.6.2-1_amd64.deb ... 正在解压 libpath-utils1:amd64 (0.6.2-1) ... 正在选中未选择的软件包 sscg。 准备解压 .../sscg_3.0.2-1_amd64.deb ... 正在解压 sscg (3.0.2-1) ... 正在选中未选择的软件包 powertop。 准备解压 .../powertop_2.14-1build1_amd64.deb ... 正在解压 powertop (2.14-1build1) ... 正在设置 libpath-utils1:amd64 (0.6.2-1) ... 正在设置 powertop (2.14-1build1) ... 正在设置 sscg (3.0.2-1) ... 正在处理用于 man-db (2.10.2-1) 的触发器 ... 正在处理用于 libc-bin (2.35-0ubuntu3.8) 的触发器 ... zhuzl@zhuzl-M9-PRO:/home/zhuzl#主界面版本信息概览-指标和历史数据概览-硬件详细信息日志存储网络用户账户服务终端
-
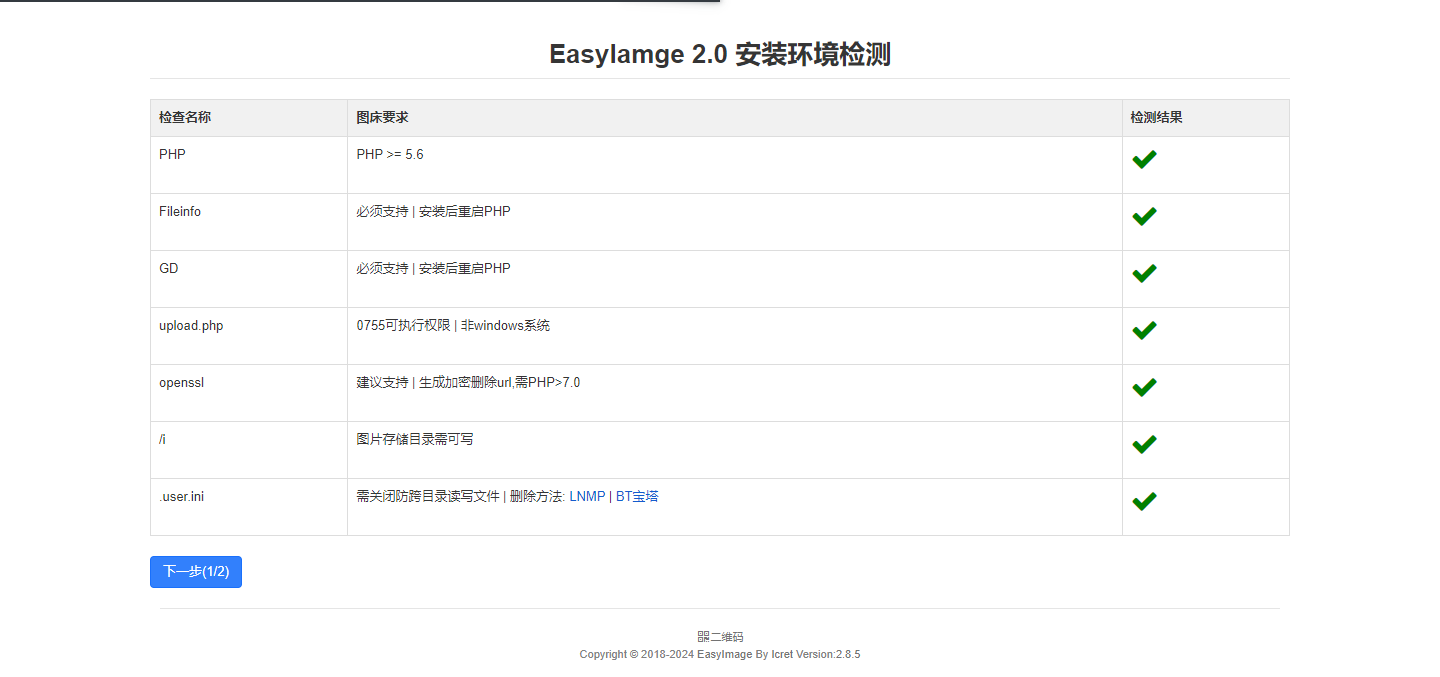
Docker搭建一款功能强大、易于使用的图床程序和图像处理工具 软件介绍EasyImages是一款功能强大的图床程序和图像处理工具,它在多个方面展现出其独特的优势和特点,无论是作为个人用户还是开发者来说都是一个不错的选择。基本特点自托管特性 :EasyImages提供自托管功能,这意味着用户可以完全控制自己的图片数据和隐私,无需依赖第三方图床服务,从而避免了数据隐私风险、服务限制和图片加载延迟等问题。批量上传与多种URL形式 :支持批量上传图片,并能返回多种形式的URL,包括图片直链、Markdown格式URL、BBCCode、Html、缩略图等,满足用户在不同场景下的需求。在线图片管理 :提供一个直观的在线图片管理界面,用户可以方便地查看、编辑、组织和管理上传的图片,支持创建文件夹、排序图片、批量删除或打包图片等功能。上传限制与格式转换 :支持设置上传图片的最低宽度和高度,确保图片质量;同时,能够自动将上传的图片转换为不同的格式,以满足网站或应用的需求。水印功能:支持自动为上传的图片添加文字或图片水印,有助于保护图片版权和防止滥用。资源占用少 :对于安装环境和服务器性能要求非常低,甚至不需要数据库支持,使得在较小的服务器上也能轻松运行且不会占用过多资源。安全性与控制 :提供黑白名单上传功能,允许用户设置哪些IP地址或用户可以上传图片;同时,支持上传日志IP定位和限制每日上传次数等功能,以增强图床的安全性。数据统计与网站统计 :提供数据统计功能,帮助用户跟踪图片的上传情况、资源占用情况和存储使用情况等;此外,还支持网站统计功能,以提供更全面的信息。API支持 :提供了全面的API支持,使开发者能够在其项目中方便地上传和管理图片。图像处理功能除了作为图床程序外,EasyImages还具备强大的图像处理功能。它是一款轻量级且高效的JavaScript库,专为简化和加速图像处理而设计。基于HTML5的Canvas API构建,充分利用了浏览器的硬件加速能力,使得在处理大量或高分辨率的图片时也能保持流畅的性能。EasyImages提供了多种常用的图像操作功能,如缩放、裁剪、旋转、添加水印等。通过简洁的API接口,开发者可以快速地在自己的项目中集成并实现复杂的图片处理需求。此外,它还具有良好的社区支持和丰富的示例代码可供参考学习。相关连接官方网站:https://icret.github.io/EasyImages2.0/#/GitHub地址:https://github.com/icret/EasyImages2.0Docker镜像:https://hub.docker.com/r/ddsderek/easyimage应用部署根据官网推荐的方式,使用 docker compose 部署,编排文件内容如下:services: easyimage: image: ddsderek/easyimage:latest container_name: easyimage networks: - net-zzl ports: - 8113:80 environment: - TZ=Asia/Shanghai - PUID=1000 - PGID=1000 - DEBUG=false volumes: - ./config:/app/web/config - ./data:/app/web/i restart: unless-stopped networks: net-zzl: name: bridge_zzl external: true使用 docker compose up -d 启动服务后,进入如下图所示的安装环境检测页面:单击「下一步」按钮,进入「网站基础配置」页面:填写信息后,单击「开始安装」按钮,安装完成后进入下图所示的管理员登录页面:输入账号、密码后,进入如下图所示的主界面:
-
一款超级好用的端口映射工具:rinetd 2014年的时候参与江西交通厅的项目,由于厅里只有一台跳板机可以访问省政府的在线办事内网服务,而内网机房也只有一台服务器能访问跳板机,而我们的项目又需要访问相关服务,然后就在内网的服务器上部署了个端口映射的软件,当时一直记得这款软件超级简单易用。近期一台开发服务器上的网络环境有同类的需求,但是时隔近10年,连名字都忘了,还好平常有记录工作日志的习惯,从10年前的工作日志里找到了当时的记录,就是它了: rinetd软件介绍rinetd 是一个简单易用的端口映射/转发/重定向工具。它通常用于将网络流量从一个端口转发到另一个端口,或者从一个IP地址转发到另一个IP地址。rinetd特别适用于那些需要将服务请求从一个网络地址或端口转发到另一个不同地址或端口的情况。rinetd的特点:简单性:配置简单,通过一个配置文件就可以完成设置。轻量级:rinetd自身占用的系统资源非常少。支持IPv4:它支持IPv4网络连接的重定向。安全性:可以设置允许哪些IP地址进行转发,从而提供一定程度的网络访问控制。软件使用安装rinetd:在大多数 Linux 发行版中,rinetd可以通过包管理器安装。例如,在基于Debian的系统(如Ubuntu)中,可以使用以下命令安装:sudo apt-get update sudo apt-get install rinetd以下是源码安装代码:windows: rinetd-win.ziplinux: rinetd.tar.gz配置rinetd:rinetd 的配置文件位于 /etc/rinetd.conf。以下是配置文件的一个基本示例:# # this is the configuration file for rinetd, the internet redirection server # # you may specify global allow and deny rules here # only ip addresses are matched, hostnames cannot be specified here # the wildcards you may use are * and ? # # allow 192.168.2.* # deny 192.168.2.1? # # forwarding rules come here # # you may specify allow and deny rules after a specific forwarding rule # to apply to only that forwarding rule # # bindadress bindport connectaddress connectport # for rocketMQ # 将所有发往本机18090端口的连接重定向到192.168.150.250的18080端口。 0.0.0.0 18090 192.168.150.250 18080 0.0.0.0 18091 192.168.150.250 18081 0.0.0.0 18092 192.168.150.250 18082 #0.0.0.0 18093 192.168.150.250 18083 0.0.0.0 18076 192.168.150.250 19876 # logging information logfile /var/log/rinetd.log # uncomment the following line if you want web-server style logfile format # logcommon日常运维命令# 启动服务 sudo systemctl restart rinetd # 重启服务 sudo systemctl restart rinetd # 查看运行状态 sudo systemctl status rinetd # 设为开机自启动 sudo systemctl enable rinetd特别说明:确保系统的防火墙规则允许 rinetd 进行必要的网络通信。
-
ChestnutCMS相关发布操作说明 本文档主要说明 ChestnutCMS 发布操作的相关逻辑,站点发布发布首页仅发布发布站点首页,生成站点首页静态文件发布全站发布全站需要选择发布指定状态的内容,此操作会发布站点下所有指定状态的内容,生成内容详情页静态文件;发布所有站点下栏目首页及列表页,生成栏目首页及列表页静态文件;发布站点首页,生成站点首页静态文件。发布栏目发布栏目在栏目编辑页面直接点击发布按钮,弹出栏目发布弹窗,可勾选是否发布栏目下所有子栏目,未勾选只发布当前栏目首页及列表页 + 站点首页,勾选则发布当前栏目及所有子栏目的首页及列表页 + 站点首页。单击后打开如下图所示的对话框:发布栏目及内容在栏目编辑页面鼠标移动到发布按钮,点击下拉框中发布指定状态内容选项,弹出栏目发布弹窗,可勾选是否发布栏目下所有子栏目,未勾选只发布当前栏目首页及列表页 + 当前栏目下的内容详情页 + 站点首页,勾选则发布当前栏目及所有子栏目的首页及列表页 + 当前栏目及所有子栏目下的内容详情页 + 站点首页。发布内容在内容列表或内容编辑页面点击发布按钮,发布指定内容详情页 + 内容所在栏目及所有祖级栏目的栏目首页和列表页 + 站点首页。发布页面部件设置页面部件模板根据页面部件模板生成静态文件,适用于在模板中使用<@cms_pagewidget>标签引用的页面部件。未设置页面部件模板需要根据模板中引用此页面部件的页面来发布,例如首页使用<@cms_pagewidget_data>或<@cms_advertisement>标签引用了页面部件数据,则需要发布首页。通过SSI方式包含的模板发布SSI包含模板主要应用于<@cms_include>标签,常见于公共页头和页尾,默认24小时缓存,因此如果SSI包含的模板有更新时,需要在后台模板管理菜单清理对应的模板缓存后再发布任意引用此模板的页面即可。
-
使用 linuxserver/firefox 实现外网网站加速访问 背景介绍之前建设网站过程中,有部分域名ICP备案麻烦,就买了台新加坡的服务器搭了几个网站,基本上也没什么访问量。早些年还用这种服务器搭个梯子之类的,但是近些年对自建梯子管控越来越严了,自建梯子的情况极有可能出现IP被封的风险。为了规避常规FQ软件的风险,在docker学习过程中发现有不少浏览器镜像,跑起来后可以直接通过浏览器访问docker容器内的浏览器服务,这样在规避风险的情况下,也能较方便的访问外网服务。理论上他是一个服务器上的浏览器,将它跑在内网环境上之后,它自然就能够访问内网资源。服务器能访问什么网站就可以访问什么网站,所以。。。搭建我们使用 docker compose 来管理 我们的镜像服务,docker-compose.yml 目录的内容如下:services: firefox: image: linuxserver/firefox:latest restart: unless-stopped container_name: firefox security_opt: - seccomp:unconfined #optional environment: - PUID=1000 - PGID=100 - TZ=Asia/Shanghai - LC_ALL=zh_CN.UTF-8 - CUSTOM_USER=zhuzl # 用户名 - PASSWORD=123456 # 密码 ports: - 8100:3000 volumes: - ./config:/config - /usr/share/fonts/chinese:/usr/share/fonts/chinese # 挂载中文字体目录,否则会出现中文乱码的问题 shm_size: "1gb"启动服务后,可在nginx配置代理,代理示例如下: location ^~ / { proxy_pass http://localhost:8100; proxy_set_header Host $host; proxy_set_header X-Real-IP $remote_addr; proxy_set_header X-Forwarded-For $proxy_add_x_forwarded_for; proxy_set_header REMOTE-HOST $remote_addr; proxy_set_header Upgrade $http_upgrade; proxy_set_header Connection $connection_upgrade; proxy_http_version 1.1; # proxy_hide_header Upgrade; add_header X-Cache $upstream_cache_status; #Set Nginx Cache set $static_fileNpPoblu9 0; if ( $uri ~* "\.(gif|png|jpg|css|js|woff|woff2)$" ) { set $static_fileNpPoblu9 1; expires 1m; } if ( $static_fileNpPoblu9 = 0 ) { add_header Cache-Control no-cache; } }配置好后,可使用浏览器访问了,访问后初始界面如下:优化配置优化配置一:解决乱码问题如果未挂载中文字体的话,会出现下面这种乱码情况:所以我们需要将中文字体文件拷贝到宿主机的某个目录,如 /usr/share/fonts/chinese,然后挂载到容器的 /usr/share/fonts/chinese 目录,这样在启动容器的时候就可以自动价值中文字体了。优化配置二:安装翻译插件由于我们访问的外网多为英文内容,为便于快速消化内容,可给浏览器安装翻译插件,我这里安装了功能强大的「沉浸式翻译」,官网是:https://immersivetranslate.com/,进入官网后,可以直接点击「Firefox扩展」,进入Firefox 应用商店直接安装,安装后就可以很方便的使用了:使用体验整体访问速度上跟本地没什么蛮大区别,由于是基于KasmVNC的虚拟桌面技术,不能直接使用快捷键复制、粘贴内容,虽说设置中有「无缝剪切板」之类的开关,但是试了下也没效果,也有可能是我理解方面的问题吧:不过也可以使用 KasmVNC 自带的 剪贴板实现剪切板的读写:有一点需要特别注意的: 一定不要关闭最后一个浏览器标签 ,否则就直接黑屏了。黑屏后的话,需要重启docker服务才能继续使用。
-
提词器工具合集 迅捷提词全能王官网:https://www.xunjiepdf.com/ticiqi点评:题词模式有拍摄、悬浮窗、提词板 3 种模式。除了提词功能外,软件的视频和图片功能也是非常实用的,工具非常齐全。芦笋提词器官网:https://tcq.lusun.com/点评:一款支持智能跟读、隐形提词的应用,支持Windows、Mac、Android、iOS。支持智能跟读、隐形提词、AI 辅助提词,广泛适用于网课、视频拍摄、直播、录口播、 vlog、视频面试、演讲、口才训练等领域。PromptSmart官网:https://www.promptsmart.com/点评:会根据语速自动调整提词速度,同时文本会自动滚动Teleprompter官网:https://cn.teleprompter-online.com/点评:在线工具,平时准备演讲或录视频的时候,可以用这个工具提示。除了支持在线录音、播放暂停外,还支持文本水平、垂直翻转以及镜像,方便录制。提客提词器官网:https://www.tttci.com/点评:有在线版也有客户端,有悬浮、隐形、多彩提词功能,支持 AI 跟随提词。QPrompt - 提词器开源地址:https://github.com/Cuperino/QPrompt-Teleprompter点评:适合所有视频创作者的提词器软件Speakflow — 在线提词器官网:https://www.speakflow.com/点评:同步远程滚动文本、文本调整、集成人工智能和语音识别等Promptr官网:https://promptr.co/点评:基于网络的提词器应用程序无需注册或下载,它有多种格式选项、文本调整、镜像视图和正常视图,让您轻松阅读Free online teleprompter software with voice activated scrolling.官网:https://telepromptermirror.com/telepromptersoftware.htm点评:免费提词器软件,支持语音激活,提供自动滚动、声控滚动、键盘快捷键、字体颜色管理等强大功能。PromptDog官网:https://promptdog.com/点评:一款适用于 Windows 和 macOS 设备的优秀提词器软件
-
推荐一款统计代码行数的VSCode插件 基本介绍在撰写软著文档或做项目结项时我们一般都需要统计工程的代码行数,如果逐个文件进行统计的话,不仅费时费力,还不一定能得到准确的数据,所以我就在做这工作的时候找了下相关的工具,发现 VSCode 有一款好用的插件:Lines of Code(LOC)插件市场链接:https://marketplace.visualstudio.com/items?itemName=lyzerk.linecounterGithub 链接:https://github.com/alimozdemir/vscode-linecounter该插件当前的介绍信息见截图:基本使用安装后,可使用 Ctrl+Shift+P 打开 命令面板,然后输入 LineCount,显示如下选项:相关选项对应的是:LineCount:Count Workspace files:统计当前工作区所有文件的代码行数LineCount:Count current file:统计当前文件的代码行数选择 LineCount:Count Workspace files 后,系统将进行相关统计操作,统计完后会在当前工程的out目录生成 linecounter.txt 和 linecounter.json 文件,其中 linecounter.txt 文件内容如下:=============================================================================== EXTENSION NAME : linecounter EXTENSION VERSION : 0.2.7 ------------------------------------------------------------------------------- count time : 2023-12-27 09:21:44 count workspace : d:\GitRoot\SE\console\console-ui total files : 563 total code lines : 72734 total comment lines : 3925 total blank lines : 3554 statistics | extension| total code| total comment| total blank|percent| ------------------------------------------------------------------------- | .devIstio| 44| 2| 7| 0.060| | .stage| 34| 0| 0| 0.047| | .production| 41| 0| 0| 0.056| | | 193| 74| 42| 0.27| | .development| 36| 0| 0| 0.049| | .js| 13156| 1998| 752| 18| | .html| 2347| 6| 333| 3.2| | .md| 1660| 243| 419| 2.3| | .svg| 1743| 0| 107| 2.4| | .json| 3403| 7| 5| 4.7| | .yaml| 4153| 17| 626| 5.7| | .stg| 9| 2| 5| 0.012| | .blsc| 10| 2| 7| 0.014| | .conf| 103| 5| 27| 0.14| | .key| 30| 0| 0| 0.041| | .yml| 71| 0| 4| 0.098| | .crt| 28| 0| 0| 0.038| | .scss| 1778| 83| 312| 2.4| | .vue| 43126| 1467| 715| 59| | .css| 769| 19| 193| 1.1| ------------------------------------------------------------------------- .browserslistrc, code is 3, comment is 0, blank is 0. .editorconfig, code is 9, comment is 0, blank is 1. .env, code is 19, comment is 0, blank is 0. .env.blsc.development, code is 20, comment is 0, blank is 0. .env.blsc.devIstio, code is 20, comment is 0, blank is 0. .env.blsc.production, code is 23, comment is 0, blank is 0. .env.blsc.stage, code is 21, comment is 0, blank is 0. .env.development, code is 16, comment is 0, blank is 0. .env.devIstio, code is 14, comment is 0, blank is 0. .env.production, code is 18, comment is 0, blank is 0. .env.stage, code is 13, comment is 0, blank is 0. .eslintignore, code is 1, comment is 4, blank is 0. .eslintrc.js, code is 196, comment is 129, blank is 0. .gitignore, code is 20, comment is 0, blank is 2. .prettierrc, code is 6, comment is 0, blank is 0. admin.html, code is 21, comment is 2, blank is 0. cspell.json, code is 96, comment is 7, blank is 2. default.conf, code is 14, comment is 0, blank is 2. ... 统计的文件列表 src\views\userCenter\modals\WarningCcLimitModal.vue, code is 218, comment is 5, blank is 1. vite.config.js, code is 183, comment is 30, blank is 5. ===============================================================================从上面的信息不难看出当前工程内的文件总数及总代码行数, 包括注释行数及空行数。其中该插件有不少配置信息,可以在统计前根据实际情况进行文件排除等场景,配置信息示例数据如下(相关配置信息保存到 VS Code 的 settings.json 文件):{ "LineCount.showStatusBarItem": true, "LineCount.statistics": true, "LineCount.includes": [ "**/*" ], "LineCount.excludes": [ "**/.vscode/**", "**/node_modules/**" ], "LineCount.output": { "txt": true, "json": true, "csv": true, "md": true, "outdir":"out" }, "LineCount.sort": "filename", "LineCount.order": "asc", "LineCount.comment":[ { "ext": ["c","cpp","java"], "separator": { "linecomment": "//", "linetol":false, "blockstart": "/*", "blockend": "*/", "blocktol": false, "string":{ "doublequotes": true, "singlequotes": true } } }, { "ext": ["html"], "separator": { "blockstart": "<!--", "blockend": "-->", } } ] }
-
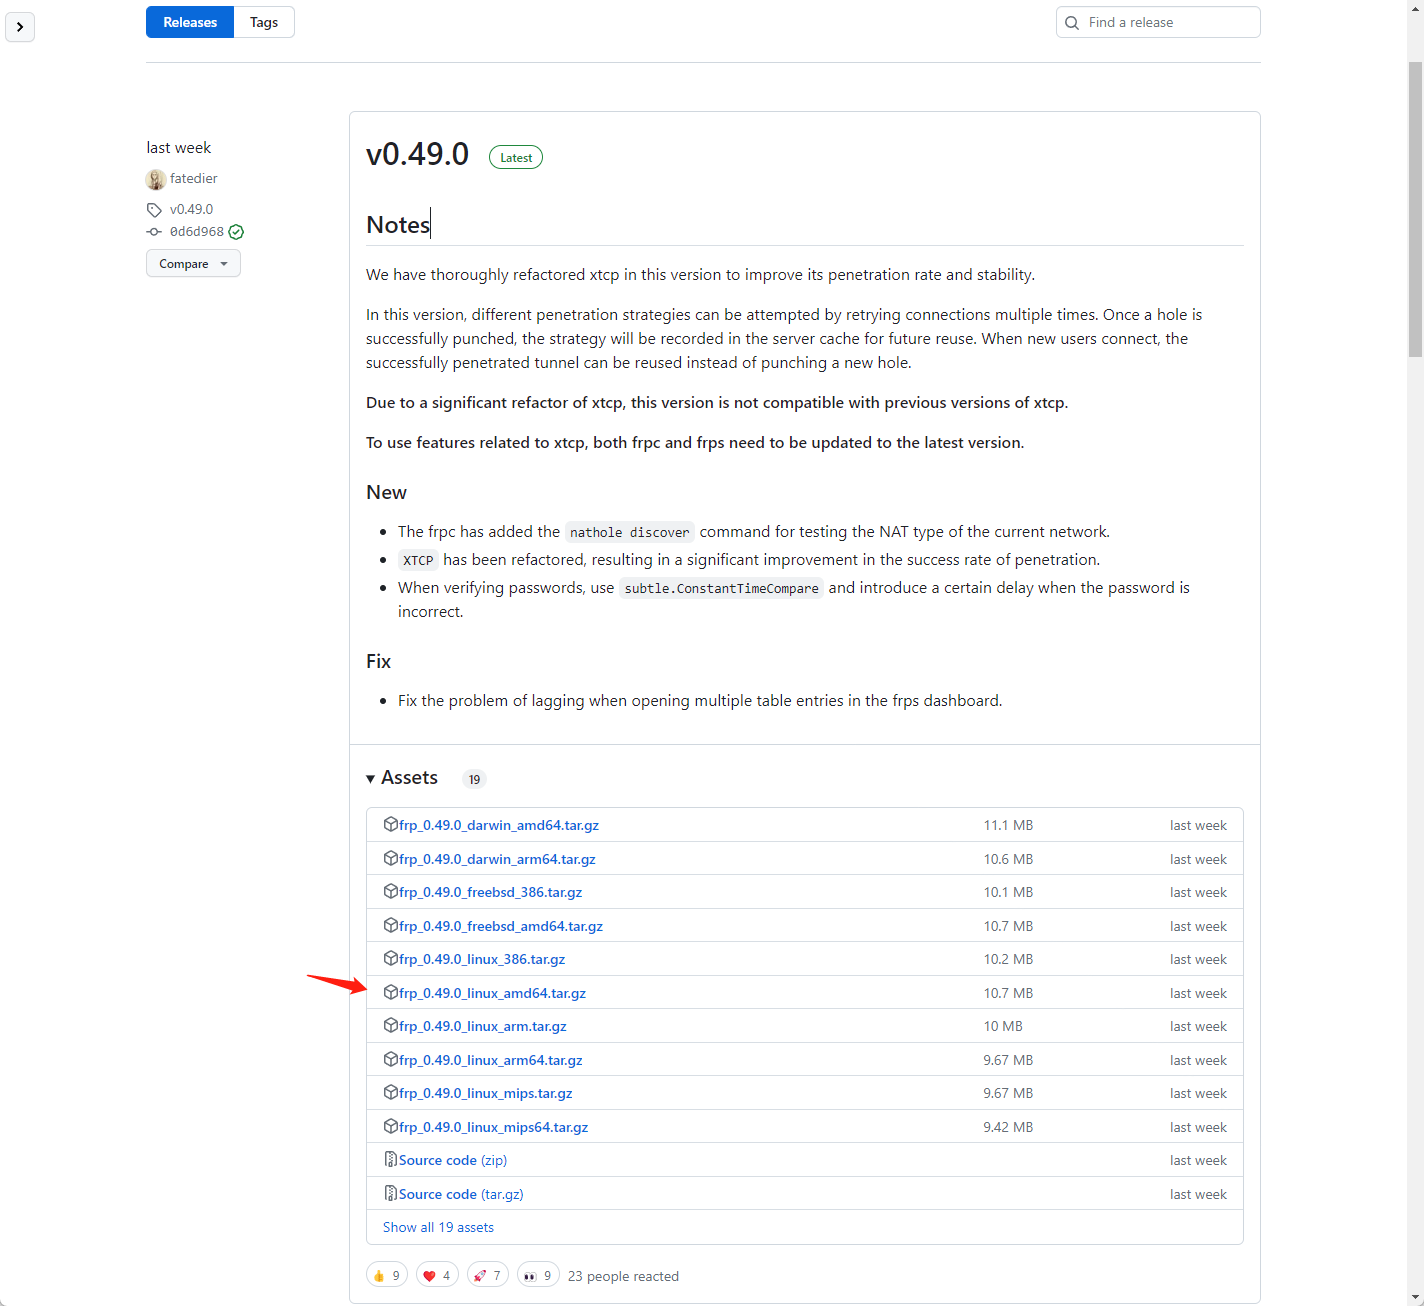
Ubuntu 添加FRP客户端自启动 背景介绍今年618 的时候购置了一台迷你主机,主要用于家庭内部服务器使用,主要基于Docker 部署其他应用,而 Ubuntu 作为 docker 原生支持最好的操作系统,而且还有漂亮的桌面,当然也就成了本迷你主机的操作系统首选。装完系统后,部署的很多应用只能内部使用,为了方便,当然不能只局限于家庭内部环境使用。结合之前不熟的FRP服务端,完全可以对外提供WEB服务,于是便有了本期的教程。下载 FRPFRP 是服务端和客户端打包在一个压缩包文件里的,可以直接从github下载就好。FRP 发布地址:https://github.com/fatedier/frp/releases本处直接下载最新的0.49.0 版本,根据操作系统,本处选择frp_0.49.0_linux_amd64.tar.gz 进行下载:wget https://github.com/fatedier/frp/releases/download/v0.49.0/frp_0.49.0_linux_amd64.tar.gz下载后 解压文件tar -zxvf frp_0.49.0_linux_amd64.tar.gz将解压的文件移动到当前用户有权限的目录,本案例中移动到 /data/apps/frp目录编辑 frpc.ini 文件本处结合实际情况,修改内容如下,部分涉密数据做了调整:[common] server_addr = SERVER_IP server_port = 7000 # for authentication token = TOKEN log_file = /data/apps/frp/frpc.log log_level = info log_max_days = 30 [home_ssh] type = tcp local_ip = 127.0.0.1 local_port = 22 remote_port = 4000 [home_web_pan] type = http local_ip = 127.0.0.1 local_port = 80 http_user = zhuzl http_pwd = PASSWORD subdomain = pan [home_web_kod] type = http local_ip = 127.0.0.1 local_port = 80 http_user = zhuzl http_pwd = PASSWORD subdomain = kod 配置完成后,可直接运行frpc 验证是否OK../frpc若有问题,可检查frpc.ini相关配置信息是否正确配置frpc自启动配置自启动过程中,为避免权限相关问题,本处直接切换为 root 账号添加 frpc.servicevi /etc/systemd/system/frpc.service输入如下服务配置内容[Unit] Description=Frp Client Service After=network.target [Service] Type=simple User=jiuzilong Restart=on-failure RestartSec=5s ExecStart=/data/apps/frp/frpc -c /data/apps/frp/frpc.ini [Install] WantedBy=multi-user.target 启用服务# 启用服务 systemctl enable frpc.service # 禁用服务 systemctl disable frpc.service重启服务systemctl daemon-reload systemctl start frpc验证服务启动状态systemctl status frpc参考链接FRP官方文档: https://gofrp.org/docs/overview/FRP服务端安装并设置开机自启动: https://blog.zhuzhilong.cn/software/install-frps-as-service.html推荐另一种docker compose 的启动方式:version: '3.3' services: frpc: restart: always network_mode: host volumes: - './frpc.ini:/etc/frp/frpc.ini' container_name: frpc image: snowdreamtech/frpc
-
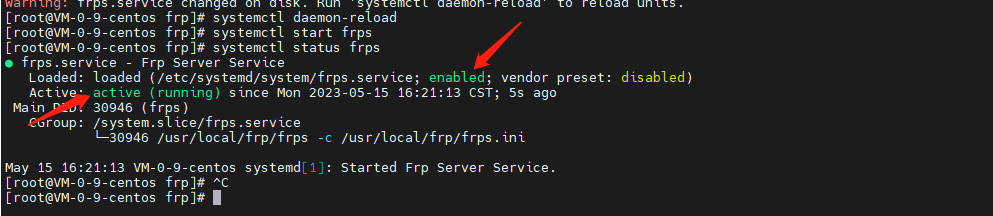
FRP服务端安装并设置开机自启动 背景介绍之前一直有使用FRP做内网穿透,一般主要用于远程桌面和对外提供http服务进行测试,由于域名备案信息被撤销,原有解析过去的二级域名被拦截了,所以考虑将FRP 服务端部署到一台墙外的服务器上去,搜了一圈没找到之前的部署记录,本次也就只好将安装过程记录备忘了。安装时间:2023-05-14 15:51安装下载最新版本的frpfrp 在GitHub的地址是,# 进入用户目录 cd /usr/local # 下载frp 最新版, wget https://github.com/fatedier/frp/releases/download/v0.48.0/frp_0.48.0_linux_amd64.tar.gz # 解压 tar -zxvf frp_0.48.0_linux_amd64.tar.gz配置打开服务端配置文件vi /usr/local/frp/frps.ini 参考frps_full.ini,将服务端配置文件(frps.ini)修改为如下内容[common] bind_addr = 0.0.0.0 bind_port = 7000 token = TOKEN_INFO # udp port to help make udp hole to penetrate nat bind_udp_port = 7001 # if you want to support virtual host, you must set the http port for listening (optional) # Note: http port and https port can be same with bind_port vhost_http_port = 80 vhost_https_port = 443 # console or real logFile path like ./frps.log log_file = ./frps.log # set dashboard_addr and dashboard_port to view dashboard of frps # dashboard_addr's default value is same with bind_addr # dashboard is available only if dashboard_port is set dashboard_addr = 0.0.0.0 dashboard_port = 7500 # dashboard user and passwd for basic auth protect dashboard_user = admin dashboard_pwd = admin # dashboard TLS mode dashboard_tls_mode = false # authentication_method specifies what authentication method to use authenticate frpc with frps. # If "token" is specified - token will be read into login message. # If "oidc" is specified - OIDC (Open ID Connect) token will be issued using OIDC settings. By default, this value is "token". authentication_method = token # if subdomain_host is not empty, you can set subdomain when type is http or https in frpc's configure file # when subdomain is test, the host used by routing is test.frps.com subdomain_host = lan.dev.trswcm.com自启动添加自启动文件vi /etc/systemd/system/frps.service输入如下内容:[Unit] Description=Frp Server Service After=network.target [Service] Type=simple User=root Restart=on-failure RestartSec=5s ExecStart=/usr/local/frp/frps -c /usr/local/frp/frps.ini [Install] WantedBy=multi-user.target添加可执行权限chmod +x /etc/systemd/system/frps.service注册服务systemctl enable frps.service当出现如下提示信息后表示注册成功 [root@VM-0-9-centos systemd]# systemctl enable frps.service Created symlink from /etc/systemd/system/multi-user.target.wants/frps.service to /etc/systemd/system/frps.service.启动服务systemctl daemon-reload systemctl start frps启动过程有可能会报错,报错的话,请根据错误提示进行相应调整查看服务状态systemctl status frps出现如下截图所示信息则表示已启动成功:推荐另一种简单的docker-compose 的方式:‵‵‵ yamlversion: '3.3'services:frps: restart: always network_mode: host volumes: - './frps.ini:/etc/frp/frps.ini' container_name: frps image: snowdreamtech/frps
-
思源笔记docker私有化部署及使用体验分享 说明考虑到网络问题、数据隐私和安全性,很多人都无法放心将所有笔记保存在 Notion、Wolai 这类纯在线服务上,一旦服务变卦 (比如收费、倒闭等) 都会很被动。所以,如果有一款既拥有各种先进特性,还能自建服务器的开源笔记软件,那就非常完美了!而它就是思源笔记以下是思源笔记官网的介绍,着实让人心动:部署官网提供 Docker 方式,让私有化部署便捷了不少。只需要两条命令即可:# 拉取镜像 docker pull b3log/siyuan # docker 运行 docker run --name siyuan -it -d --restart=always -v /data/siyuan/workspace:/siyuan/workspace -p 6806:6806 -u $(id -u):$(id -g) b3log/siyuan --workspace=/siyuan/workspace或使用 docker-compose 方式部署:services: siyuannote: image: b3log/siyuan container_name: siyuannote privileged: true restart: always # 可修改下方的xxxxxx为自己的访问授权码 command: ['--workspace=/siyuan/workspace/', '--accessAuthCode=xxxxxx'] user: '1000:1000' ports: - 6806:6806 volumes: - ./data:/siyuan/workspace environment: # A list of time zone identifiers can be found at https://en.wikipedia.org/wiki/List_of_tz_database_time_zones - TZ=Asia/Shanghai注意: 镜像中是使用默认创建的普通用户 siyuan(uid 1000/gid 1000)来启动内核进程的,所以在宿主机创建工作空间文件夹时请注意设置该文件夹所属用户组:chown -R 1000:1000 ./data,命令行启动容器时需要带参数 -u 1000:1000。配置 nginx 对外提供服务我使用的腾讯云的服务器,将思源笔记使用docker 运行后,通常使用 nginx 代理对外提供应用服务。nginx 代理配置信息如下server { listen 80; server_name siyuannote.work.zhuzhilong.com; index index.html index.htm default.htm default.html; root /www/wwwroot/siyuannote.work.zhuzhilong.com; location / { proxy_pass http://10.0.12.15:6806; proxy_set_header Host $host; proxy_set_header X-Real-IP $remote_addr; proxy_set_header X-Forwarded-For $proxy_add_x_forwarded_for; proxy_set_header REMOTE-HOST $remote_addr; proxy_http_version 1.1; proxy_set_header Upgrade $http_upgrade; proxy_set_header Connection "Upgrade"; add_header X-Cache $upstream_cache_status; #Set Nginx Cache add_header Cache-Control no-cache; } access_log /www/wwwlogs/siyuannote.work.zhuzhilong.com.log; error_log /www/wwwlogs/siyuannote.work.zhuzhilong.com.error.log; }配制好后,重启 nginx 服务即可使用我们nginx配置的域名(siyuannote.work.zhuzhilong.com)访问了。初体验国际化初次访问的时候,默认是英文版的,可以按Alt + P,在打开的对话框中,选择 Appearance -> Language 中选择 简体中文:使用体验Block编辑思源笔记在使用体验上,较常规markdown编辑器,一大特色就是Block编辑模式,按下 /后可快速使用内置 20+ 种类型的块元素和 10+ 种行级元素。表格排版对于一些结构化的数据,难免会使用表格进行布局,而常规的markdown 在使用表格时异常难使用,思源笔记提供右键方式操作表格,也还算灵活:粘贴 Markdown初次使用的时候,直接把 markdown 内容在编辑器中Ctrl + V 粘贴,发现直接变成代码块了(2024-06-28更新:该问题已在试用的最新版本(版本号: v3.0.17)修复)。感觉有些不习惯,这一点语雀做得最好。在快捷键中查看了下 粘贴为纯文本方式 ,可以使用 Ctrl + Shift + V。从快捷键配置界面可以看出思源笔记的快捷键还是很丰富的,而且可以自定义。粘贴剪贴板中的图片经验证可直接粘贴剪贴板中的截图图片上传到服务器中,图片上传后持久化存储在服务器思源笔记工作目录的assets目录中。没有看到可以配置图床的地方。安全配置思源笔记部署后默认是不需要密码即可访问的,我们私有化部署更多的是要控制只有我们自己能访问。可在配置界面的 关于 -> 访问授权码 中 设置授权码 (2024-06-28更新:在试用的最新版本(版本号: v3.0.17)已改为在部署时指定访问授权码,界面中不再提供配置入口):配置后将只能输入授权码解锁后才可访问:功能扩展思源笔记提供「集市」模块,可在线下载主题、模板、图标、模板、挂件,初步使用感觉还是蛮方便的。插件机制给思源笔记扩展了无限可能,还有很多功能可以在后续的使用中逐步体验。尾声Typora 开启强制收费模式后,有短暂的使用过 Mark Text,但是发现 Mark Text 在打开较大 Markdown 文件时比较卡顿。偶然在公众号中看到推荐的思源笔记,通过官网了解后,便有了试用的冲动。使用下来,感觉可以作为后续的主力 Markdown 编辑器使用。Links官网:https://b3log.org/siyuan/思源笔记Docker镜像:https://hub.docker.com/r/b3log/siyuan
-
Keyviz – 开源按键可视化工具:实时显示键盘按键[Windows] 介绍Keyviz 是一款开源、免费的按键可视化工具,它可以实时显示用户当前按下的按键,可自定义显示按键风格、样式,非常适合录屏、演示等场合使用。其可定制性让你能制作出任意风格的按键风格:使用很简单,在设置界面的 Style 里选中一个喜欢的、独特的键盘样式以及位置,对于很多截图、录屏、直播用户,甚至可以作为个人标识使用:还可以设置显示全部按键,或者仅显示快捷键,比如 Ctrl + C,但不显示 Shift + 1、A、B、C 等按键。最重要的是宣传图做的好看,那么用户将来截图录屏也会很漂亮。链接官网:https://kutt.appinn.net/UPg2QUGithub:https://github.com/mulaRahul/keyviz
-
Pointer-Focus:一款功能强大的教学、录屏辅助软件 现在这个时代电脑大家应该都有,你肯定有过给别人展示或者演示自己的操作,尤其是疫情期间会用得很多。例如上网课讲解题、腾讯会议开会、线上答辩什么的。为了表达更清晰,我们就很需要光标高亮、显示按键、聚光灯、画笔、放大镜等功能。Pointer-FocusPointerFocus 是一款非常出名的教学辅助工具,软件功能效果生动,助你讲解更加清晰,一套下来轻松不少。专为想要突出鼠标指针的演示者、培训师和教师而设计。该应用程序提供了一些易于使用的功能,例如高亮光标、鼠标聚光灯、击键可视化、放大镜和屏幕注释。在 PointerFocus 的帮助下,您可以让观众专注于感兴趣的领域,并使您的演示更易于理解。软件官网:https://www.pointerfocus.com/资金允许的情况推荐使用正版,正版官网加个为 $12.5谁需要 PointerFocus?老师演讲者演示制造商培训师PointerFocus 功能用彩色圆圈突出显示鼠标指针当您单击鼠标按钮时,环形动画可以向您的观众展示您的鼠标单击动作。可以高亮显示光标、显示圆圈、显示单击操作文本,还可以自定义大小和颜色。每次点击都会有特效,这样可以让人更加集中鼠标位置。启动热键是 F8,这个可以记一下。击键可视化可以向您的观众展示您刚刚按下了哪些快捷键。此功能可以帮助您使演示更易于理解。有时候你需要进行快捷键时,这个功能就非常恰到好处了!只要按下Ctrl、Shift、Alt、win、insert键开头,显示功能就会自动弹出来。启动热键是 F9,这个可以记一下。鼠标聚光灯当您选择此工具时,它将使屏幕变暗并在鼠标指针周围放置一个“聚光灯”。这可以将听众的注意力集中在感兴趣的领域。这可是个好东西,可以突出某些重要部分进行讲解,可以叫做“高光时刻”。图片启动热键是 F10,这个可以记一下。屏幕注释笔这个是必备的功能了,需要表示什么直接写,直接画。启动热键是F11,这个可以记一下。支持画笔、线条、箭头、矩形、椭圆,还可以更改画笔颜色和大小。屏幕放大镜当您选择此工具时,您可以在屏幕上显示任何部分的观众详细信息。这个和高光有一丁点像,但又不是同一个东西,可以在电脑局部放大。启动热键是F12,这个可以记一下。安卓远程控制您可以使用 Android App 来远程控制鼠标操作和 PointerFocus 功能。安卓客户端软件已打包到本文底部的下载压缩包了。必看安装教程下载地址:PointerFocus v2.4.zip软件安装完成后需要替换补丁和填写注册码直接复制补丁到安装目录下进行替换
-
Git常用命令 前言Git,是一个开源的分布式版本控制系统,用以有效、高速的处理从很小到非常大的项目版本管理。支持克隆/下载。Git教程: Git Book 官方中文文档Git GUI客户端: TortoiseGit(Windows)Git常用命令仓库# 在当前目录新建一个Git代码库 $ git init # 新建一个目录,将其初始化为Git代码库 $ git init [project-name] # 下载一个项目和它的整个代码历史 $ git clone [url]配置# 显示当前的Git配置 $ git config --list # 编辑Git配置文件 $ git config -e [--global] # 设置提交代码时的用户信息 $ git config [--global] user.name "[name]" $ git config [--global] user.email "[email address]"增加/删除文件# 添加指定文件到暂存区 $ git add [file1] [file2] ... # 添加指定目录到暂存区,包括子目录 $ git add [dir] # 添加当前目录的所有文件到暂存区 $ git add . # 添加每个变化前,都会要求确认 # 对于同一个文件的多处变化,可以实现分次提交 $ git add -p # 删除工作区文件,并且将这次删除放入暂存区 $ git rm [file1] [file2] ... # 停止追踪指定文件,但该文件会保留在工作区 $ git rm --cached [file] # 改名文件,并且将这个改名放入暂存区 $ git mv [file-original] [file-renamed]代码提交# 提交暂存区到仓库区 $ git commit -m [message] # 提交暂存区的指定文件到仓库区 $ git commit [file1] [file2] ... -m [message] # 提交工作区自上次commit之后的变化,直接到仓库区 $ git commit -a # 提交时显示所有diff信息 $ git commit -v # 使用一次新的commit,替代上一次提交 # 如果代码没有任何新变化,则用来改写上一次commit的提交信息 $ git commit --amend -m [message] # 重做上一次commit,并包括指定文件的新变化 $ git commit --amend [file1] [file2] ...分支# 列出所有本地分支 $ git branch # 列出所有远程分支 $ git branch -r # 列出所有本地分支和远程分支 $ git branch -a # 新建一个分支,但依然停留在当前分支 $ git branch [branch-name] # 新建一个分支,并切换到该分支 $ git checkout -b [branch] # 新建一个分支,指向指定commit $ git branch [branch] [commit] # 新建一个分支,与指定的远程分支建立追踪关系 $ git branch --track [branch] [remote-branch] # 切换到指定分支,并更新工作区 $ git checkout [branch-name] # 切换到上一个分支 $ git checkout - # 建立追踪关系,在现有分支与指定的远程分支之间 $ git branch --set-upstream [branch] [remote-branch] # 合并指定分支到当前分支 $ git merge [branch] # 选择一个commit,合并进当前分支 $ git cherry-pick [commit] # 删除分支 $ git branch -d [branch-name] # 删除远程分支 $ git push origin --delete [branch-name] $ git branch -dr [remote/branch]标签# 列出所有tag $ git tag # 新建一个tag在当前commit $ git tag [tag] # 新建一个tag在指定commit $ git tag [tag] [commit] # 删除本地tag $ git tag -d [tag] # 删除远程tag $ git push origin :refs/tags/[tagName] # 查看tag信息 $ git show [tag] # 提交指定tag $ git push [remote] [tag] # 提交所有tag $ git push [remote] --tags # 新建一个分支,指向某个tag $ git checkout -b [branch] [tag]查看信息# 显示有变更的文件 $ git status # 显示当前分支的版本历史 $ git log # 显示commit历史,以及每次commit发生变更的文件 $ git log --stat # 搜索提交历史,根据关键词 $ git log -S [keyword] # 显示某个commit之后的所有变动,每个commit占据一行 $ git log [tag] HEAD --pretty=format:%s # 显示某个commit之后的所有变动,其"提交说明"必须符合搜索条件 $ git log [tag] HEAD --grep feature # 显示某个文件的版本历史,包括文件改名 $ git log --follow [file] $ git whatchanged [file] # 显示指定文件相关的每一次diff $ git log -p [file] # 显示过去5次提交 $ git log -5 --pretty --oneline # 显示所有提交过的用户,按提交次数排序 $ git shortlog -sn # 显示指定文件是什么人在什么时间修改过 $ git blame [file] # 显示暂存区和工作区的差异 $ git diff # 显示暂存区和上一个commit的差异 $ git diff --cached [file] # 显示工作区与当前分支最新commit之间的差异 $ git diff HEAD # 显示两次提交之间的差异 $ git diff [first-branch]...[second-branch] # 显示今天你写了多少行代码 $ git diff --shortstat "@{0 day ago}" # 显示某次提交的元数据和内容变化 $ git show [commit] # 显示某次提交发生变化的文件 $ git show --name-only [commit] # 显示某次提交时,某个文件的内容 $ git show [commit]:[filename] # 显示当前分支的最近几次提交 $ git reflog远程同步# 下载远程仓库的所有变动 $ git fetch [remote] # 显示所有远程仓库 $ git remote -v # 显示某个远程仓库的信息 $ git remote show [remote] # 增加一个新的远程仓库,并命名 $ git remote add [shortname] [url] # 取回远程仓库的变化,并与本地分支合并 $ git pull [remote] [branch] # 上传本地指定分支到远程仓库 $ git push [remote] [branch] # 强行推送当前分支到远程仓库,即使有冲突 $ git push [remote] --force # 推送所有分支到远程仓库 $ git push [remote] --all撤销# 恢复暂存区的指定文件到工作区 $ git checkout [file] # 恢复某个commit的指定文件到暂存区和工作区 $ git checkout [commit] [file] # 恢复暂存区的所有文件到工作区 $ git checkout . # 重置暂存区的指定文件,与上一次commit保持一致,但工作区不变 $ git reset [file] # 重置暂存区与工作区,与上一次commit保持一致 $ git reset --hard # 重置当前分支的指针为指定commit,同时重置暂存区,但工作区不变 $ git reset [commit] # 重置当前分支的HEAD为指定commit,同时重置暂存区和工作区,与指定commit一致 $ git reset --hard [commit] # 重置当前HEAD为指定commit,但保持暂存区和工作区不变 $ git reset --keep [commit] # 新建一个commit,用来撤销指定commit # 后者的所有变化都将被前者抵消,并且应用到当前分支 $ git revert [commit] # 暂时将未提交的变化移除,稍后再移入 $ git stash $ git stash pop其他# 生成一个可供发布的压缩包 $ git archive


![Keyviz – 开源按键可视化工具:实时显示键盘按键[Windows]](https://blog.zhuzhilong.cn/usr/uploads/2022/08/1225799395.png)