搜索到
4
篇与
frp
的结果
-
 FRP升级记录 背景介绍FRP 是一款非常优秀的内网穿透和反向代理软件,它允许用户通过公网访问内网资源,无需复杂的网络配置,极大地提高了工作效率。程序员的电脑基本上不关机,偶尔需要从其他电脑取些文件或远程处理点工作上的事,就非常需要这样的软件。2023年部署的时候 FRP 最新版本是 FRP 0.51.2,使用 docker 部署,从 0.52.0 开始,FRP 将配置文件由 ini 格式改为 toml 格式了,格式变更后,导致原来的配置文件不能复用,便一直未升级到最新版。年底趁手头紧要工作处理完了,便想着顺带升级一下。服务端升级服务端部署在腾讯云一台国内服务器上,使用 docker compose 编排,升级后的 docker-compose.yaml 文件内容如下:services: frps_work: restart: always network_mode: host volumes: - ./frps.toml:/etc/frp/frps.toml - ./logs:/etc/frp/logs container_name: frps_work image: snowdreamtech/frps:0.61.1frps.toml 文件内容如下:bindPort = 7200 auth.method = "token" auth.token = "admin" vhostHTTPPort = 89 vhostHTTPSPort = 4444 subDomainHost = "work.zhuzhilong.com" enablePrometheus = true webServer.addr = "0.0.0.0" webServer.port = 7202 # 由于使用nginx代理的时候开启了基于 webauth 的认证,这里我就不开启了 #webServer.user = "zzl" #webServer.password = "password"上面的配置中,我们配置了一个89端口的http服务,并使用 .work.zhuzhilong.com 的泛域名作为二级域名后缀。我们需要使用nginxProxyManager 配置一个代理,将 .work.zhuzhilong.com 的请求都代理到 89 端口:开启 SSL,这样代理的服务可以同时启用 http 服务及 https 服务访问:客户端升级之前买了一台迷你主机放在公司,作为开发服务器使用,使用的 Ubuntu 操作系统,使用 docker 部署的frpc客户端,修改后的 docker-compose.yaml 文件内容如下:services: frpczzl: restart: always network_mode: host volumes: # - ./frpc.ini:/etc/frp/frpc.ini - ./frpc.toml:/etc/frp/frpc.toml - ./logs/:/etc/frp/logs/ container_name: frpczzl # image: snowdreamtech/frpc:0.51.2 image: snowdreamtech/frpc:0.61.1frpc.toml 核心内容如下:user = "work" serverAddr = "119.29.149.159" serverPort = 7200 auth.token = "admin" # for tcp [[proxies]] name = "work-mysql-3306" type = "tcp" localIP = "127.0.0.1" localPort = 3306 remotePort = 3402 # for web [[proxies]] name = "work-http-123" httpUser = "zhuzl" httpPassword = "zhuzl" type = "http" localIP = "127.0.0.1" localPort = 80 subdomain = "123" [[proxies]] name = "work-http-spug" type = "http" localIP = "127.0.0.1" localPort = 80 subdomain = "spug" dashboardfrps中我们开启的webServer,可以通过 7202 端口查看 dashboard,界面截图如下:相关链接:Github:https://github.com/fatedier/frp官网:https://gofrp.org/
 -
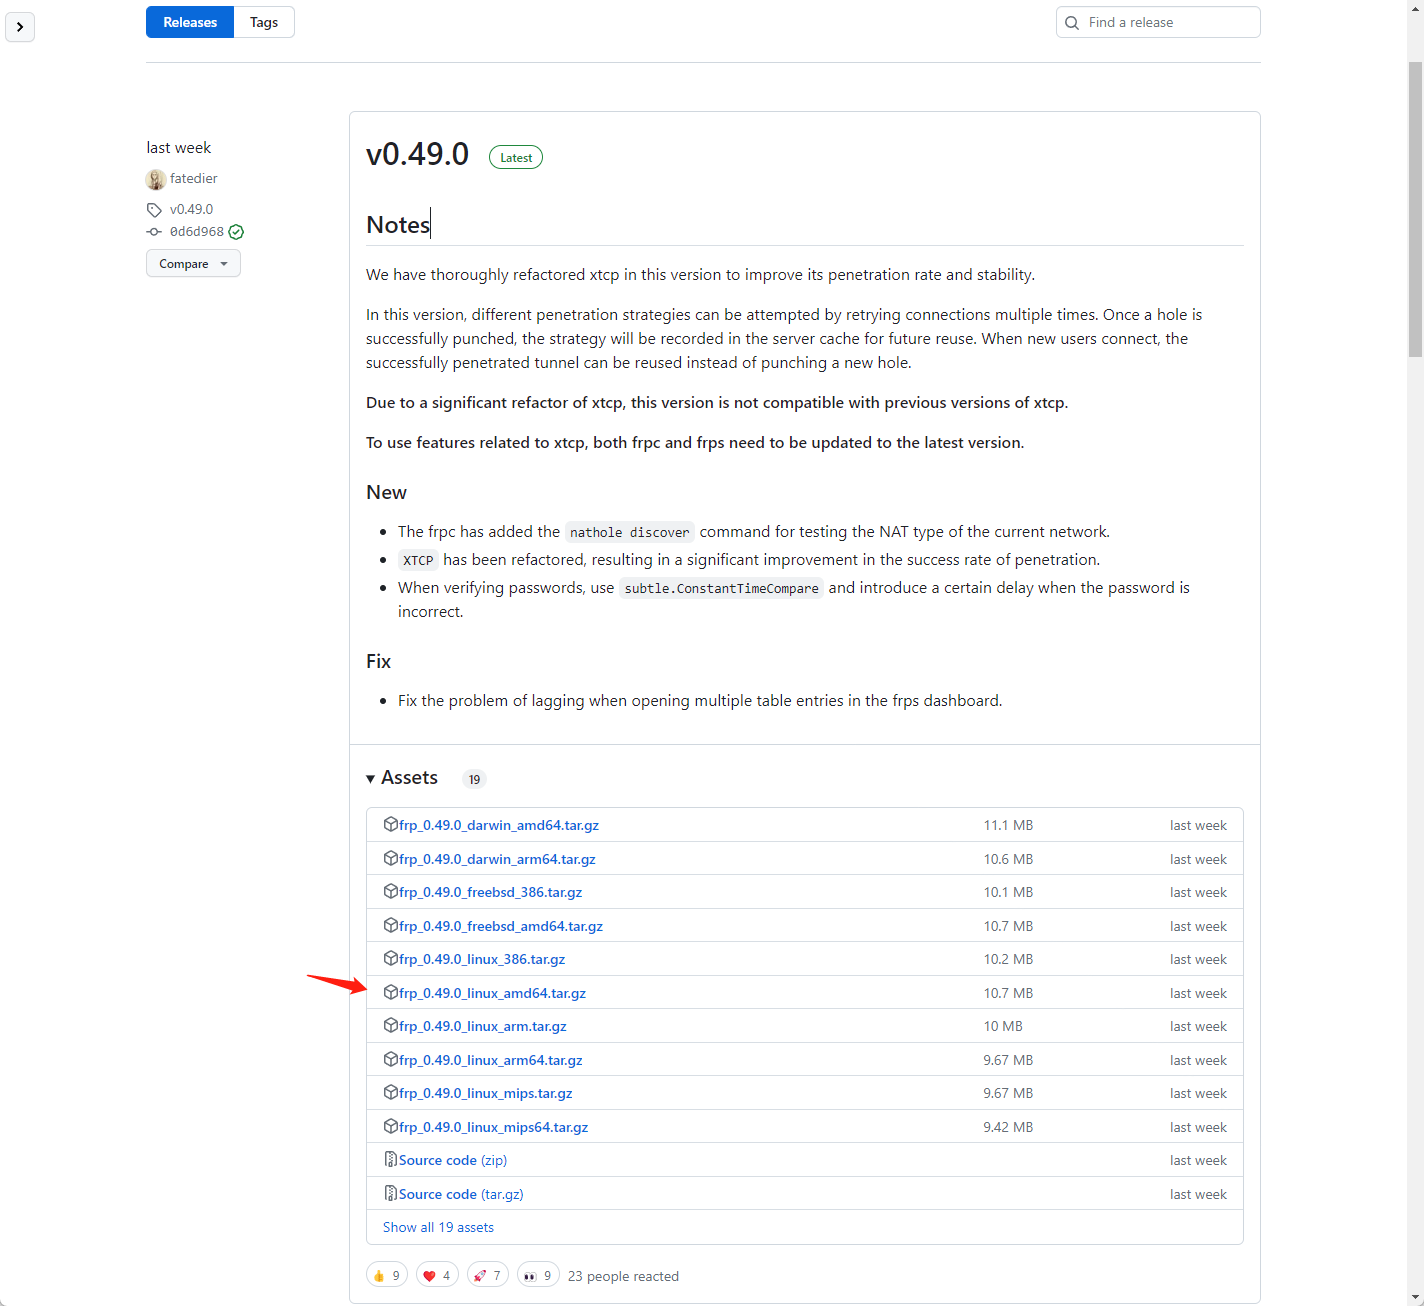
Ubuntu 添加FRP客户端自启动 背景介绍今年618 的时候购置了一台迷你主机,主要用于家庭内部服务器使用,主要基于Docker 部署其他应用,而 Ubuntu 作为 docker 原生支持最好的操作系统,而且还有漂亮的桌面,当然也就成了本迷你主机的操作系统首选。装完系统后,部署的很多应用只能内部使用,为了方便,当然不能只局限于家庭内部环境使用。结合之前不熟的FRP服务端,完全可以对外提供WEB服务,于是便有了本期的教程。下载 FRPFRP 是服务端和客户端打包在一个压缩包文件里的,可以直接从github下载就好。FRP 发布地址:https://github.com/fatedier/frp/releases本处直接下载最新的0.49.0 版本,根据操作系统,本处选择frp_0.49.0_linux_amd64.tar.gz 进行下载:wget https://github.com/fatedier/frp/releases/download/v0.49.0/frp_0.49.0_linux_amd64.tar.gz下载后 解压文件tar -zxvf frp_0.49.0_linux_amd64.tar.gz将解压的文件移动到当前用户有权限的目录,本案例中移动到 /data/apps/frp目录编辑 frpc.ini 文件本处结合实际情况,修改内容如下,部分涉密数据做了调整:[common] server_addr = SERVER_IP server_port = 7000 # for authentication token = TOKEN log_file = /data/apps/frp/frpc.log log_level = info log_max_days = 30 [home_ssh] type = tcp local_ip = 127.0.0.1 local_port = 22 remote_port = 4000 [home_web_pan] type = http local_ip = 127.0.0.1 local_port = 80 http_user = zhuzl http_pwd = PASSWORD subdomain = pan [home_web_kod] type = http local_ip = 127.0.0.1 local_port = 80 http_user = zhuzl http_pwd = PASSWORD subdomain = kod 配置完成后,可直接运行frpc 验证是否OK../frpc若有问题,可检查frpc.ini相关配置信息是否正确配置frpc自启动配置自启动过程中,为避免权限相关问题,本处直接切换为 root 账号添加 frpc.servicevi /etc/systemd/system/frpc.service输入如下服务配置内容[Unit] Description=Frp Client Service After=network.target [Service] Type=simple User=jiuzilong Restart=on-failure RestartSec=5s ExecStart=/data/apps/frp/frpc -c /data/apps/frp/frpc.ini [Install] WantedBy=multi-user.target 启用服务# 启用服务 systemctl enable frpc.service # 禁用服务 systemctl disable frpc.service重启服务systemctl daemon-reload systemctl start frpc验证服务启动状态systemctl status frpc参考链接FRP官方文档: https://gofrp.org/docs/overview/FRP服务端安装并设置开机自启动: https://blog.zhuzhilong.cn/software/install-frps-as-service.html推荐另一种docker compose 的启动方式:version: '3.3' services: frpc: restart: always network_mode: host volumes: - './frpc.ini:/etc/frp/frpc.ini' container_name: frpc image: snowdreamtech/frpc
-
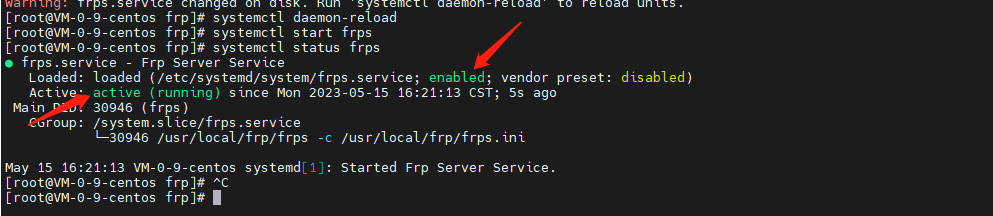
FRP服务端安装并设置开机自启动 背景介绍之前一直有使用FRP做内网穿透,一般主要用于远程桌面和对外提供http服务进行测试,由于域名备案信息被撤销,原有解析过去的二级域名被拦截了,所以考虑将FRP 服务端部署到一台墙外的服务器上去,搜了一圈没找到之前的部署记录,本次也就只好将安装过程记录备忘了。安装时间:2023-05-14 15:51安装下载最新版本的frpfrp 在GitHub的地址是,# 进入用户目录 cd /usr/local # 下载frp 最新版, wget https://github.com/fatedier/frp/releases/download/v0.48.0/frp_0.48.0_linux_amd64.tar.gz # 解压 tar -zxvf frp_0.48.0_linux_amd64.tar.gz配置打开服务端配置文件vi /usr/local/frp/frps.ini 参考frps_full.ini,将服务端配置文件(frps.ini)修改为如下内容[common] bind_addr = 0.0.0.0 bind_port = 7000 token = TOKEN_INFO # udp port to help make udp hole to penetrate nat bind_udp_port = 7001 # if you want to support virtual host, you must set the http port for listening (optional) # Note: http port and https port can be same with bind_port vhost_http_port = 80 vhost_https_port = 443 # console or real logFile path like ./frps.log log_file = ./frps.log # set dashboard_addr and dashboard_port to view dashboard of frps # dashboard_addr's default value is same with bind_addr # dashboard is available only if dashboard_port is set dashboard_addr = 0.0.0.0 dashboard_port = 7500 # dashboard user and passwd for basic auth protect dashboard_user = admin dashboard_pwd = admin # dashboard TLS mode dashboard_tls_mode = false # authentication_method specifies what authentication method to use authenticate frpc with frps. # If "token" is specified - token will be read into login message. # If "oidc" is specified - OIDC (Open ID Connect) token will be issued using OIDC settings. By default, this value is "token". authentication_method = token # if subdomain_host is not empty, you can set subdomain when type is http or https in frpc's configure file # when subdomain is test, the host used by routing is test.frps.com subdomain_host = lan.dev.trswcm.com自启动添加自启动文件vi /etc/systemd/system/frps.service输入如下内容:[Unit] Description=Frp Server Service After=network.target [Service] Type=simple User=root Restart=on-failure RestartSec=5s ExecStart=/usr/local/frp/frps -c /usr/local/frp/frps.ini [Install] WantedBy=multi-user.target添加可执行权限chmod +x /etc/systemd/system/frps.service注册服务systemctl enable frps.service当出现如下提示信息后表示注册成功 [root@VM-0-9-centos systemd]# systemctl enable frps.service Created symlink from /etc/systemd/system/multi-user.target.wants/frps.service to /etc/systemd/system/frps.service.启动服务systemctl daemon-reload systemctl start frps启动过程有可能会报错,报错的话,请根据错误提示进行相应调整查看服务状态systemctl status frps出现如下截图所示信息则表示已启动成功:推荐另一种简单的docker-compose 的方式:‵‵‵ yamlversion: '3.3'services:frps: restart: always network_mode: host volumes: - './frps.ini:/etc/frp/frps.ini' container_name: frps image: snowdreamtech/frps
-
使用WinSW.exe安装FRP为系统启动服务 本机 FRP 所在目录:D:\greenSoft\FRP\frp_0.36.2_windows_amd64日常使用FRP,我们都需要使用命令行的方式启动,特此我准备了个startFRP.bat的启动文件:frpc.exe -c ./frpc.ini该方式可手工启动,但会打开一个命令行的黑窗口在桌面上,在使用电脑的过程中偶尔会由于误操作导致关闭了,根据以往在windows下使用nginx的经验,我们可以使用WinSW.exe这个小工具实现将FRP注册成系统服务即可,操作步骤如下:1、下载 WinSW.exe 文件到FRP所在目录2、在该目录下新建winsw.xml文件,文件内容如下所示:<service> <id>frp</id> <name>frp</name> <description>用frp发布本地电脑网站到外网</description> <executable>frpc</executable> <arguments>-c frpc.ini</arguments> <logmode>reset</logmode> </service>3、在命令行中使用 winsw install 安装为服务。执行该命令后会显示成功提示。4、进入windows 服务管理器,查看是否存在名称为frp的服务。