搜索到
155
篇与
朱治龙
的结果
-
 ChestnutCMS相关发布操作说明 本文档主要说明 ChestnutCMS 发布操作的相关逻辑,站点发布发布首页仅发布发布站点首页,生成站点首页静态文件发布全站发布全站需要选择发布指定状态的内容,此操作会发布站点下所有指定状态的内容,生成内容详情页静态文件;发布所有站点下栏目首页及列表页,生成栏目首页及列表页静态文件;发布站点首页,生成站点首页静态文件。发布栏目发布栏目在栏目编辑页面直接点击发布按钮,弹出栏目发布弹窗,可勾选是否发布栏目下所有子栏目,未勾选只发布当前栏目首页及列表页 + 站点首页,勾选则发布当前栏目及所有子栏目的首页及列表页 + 站点首页。单击后打开如下图所示的对话框:发布栏目及内容在栏目编辑页面鼠标移动到发布按钮,点击下拉框中发布指定状态内容选项,弹出栏目发布弹窗,可勾选是否发布栏目下所有子栏目,未勾选只发布当前栏目首页及列表页 + 当前栏目下的内容详情页 + 站点首页,勾选则发布当前栏目及所有子栏目的首页及列表页 + 当前栏目及所有子栏目下的内容详情页 + 站点首页。发布内容在内容列表或内容编辑页面点击发布按钮,发布指定内容详情页 + 内容所在栏目及所有祖级栏目的栏目首页和列表页 + 站点首页。发布页面部件设置页面部件模板根据页面部件模板生成静态文件,适用于在模板中使用<@cms_pagewidget>标签引用的页面部件。未设置页面部件模板需要根据模板中引用此页面部件的页面来发布,例如首页使用<@cms_pagewidget_data>或<@cms_advertisement>标签引用了页面部件数据,则需要发布首页。通过SSI方式包含的模板发布SSI包含模板主要应用于<@cms_include>标签,常见于公共页头和页尾,默认24小时缓存,因此如果SSI包含的模板有更新时,需要在后台模板管理菜单清理对应的模板缓存后再发布任意引用此模板的页面即可。
 -
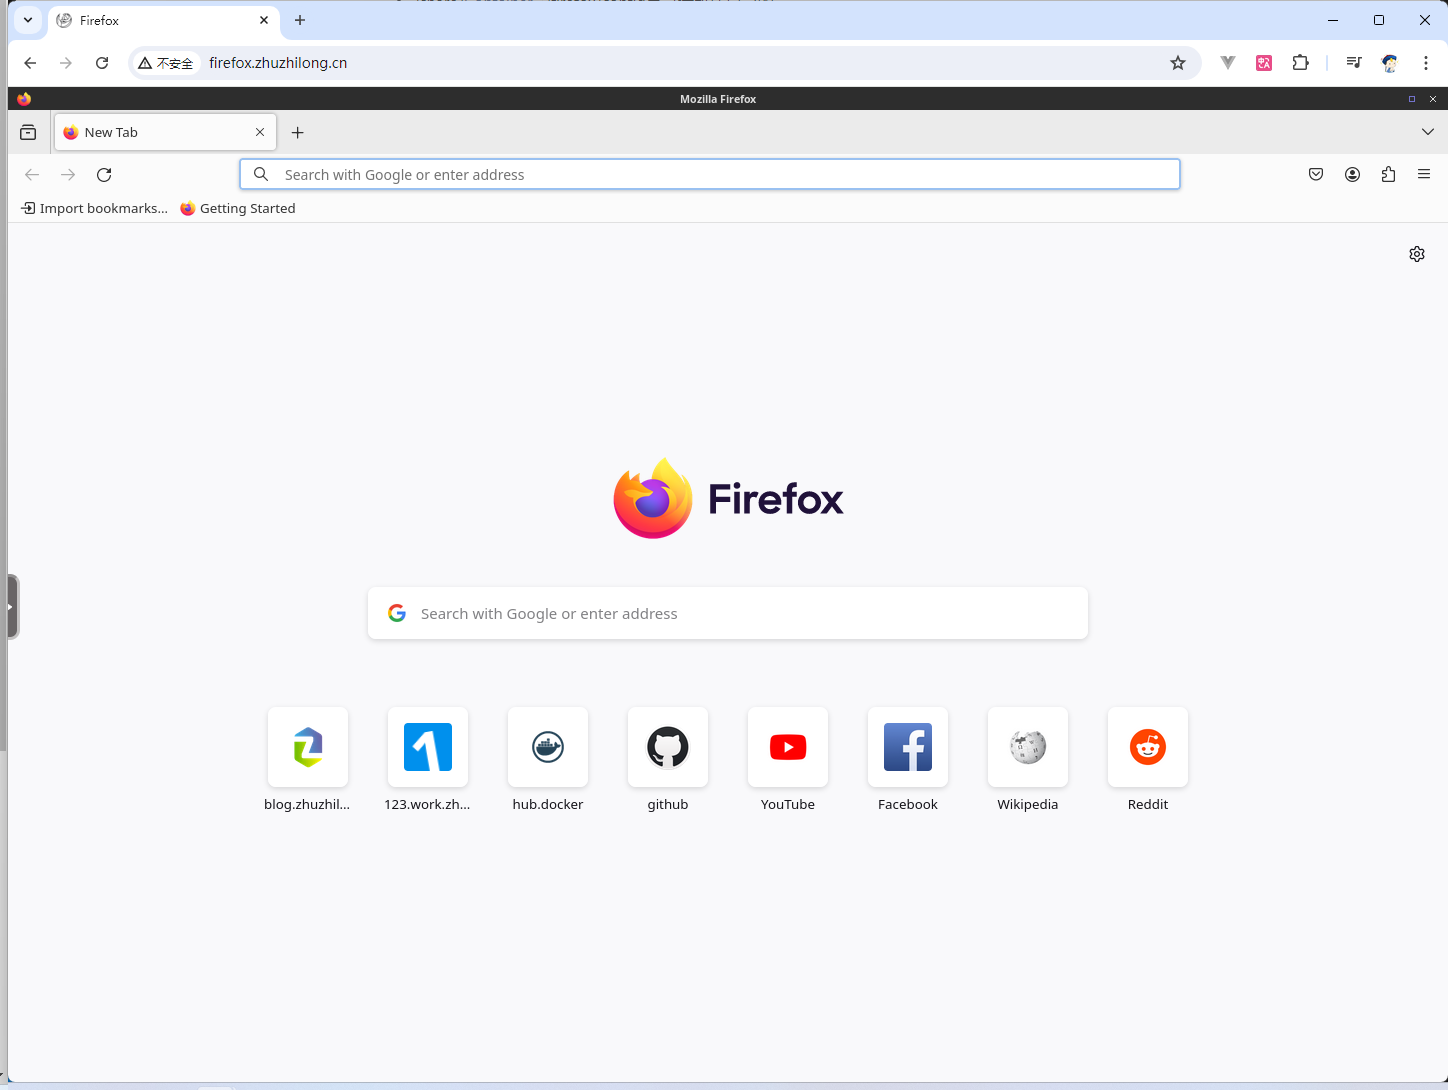
使用 linuxserver/firefox 实现外网网站加速访问 背景介绍之前建设网站过程中,有部分域名ICP备案麻烦,就买了台新加坡的服务器搭了几个网站,基本上也没什么访问量。早些年还用这种服务器搭个梯子之类的,但是近些年对自建梯子管控越来越严了,自建梯子的情况极有可能出现IP被封的风险。为了规避常规FQ软件的风险,在docker学习过程中发现有不少浏览器镜像,跑起来后可以直接通过浏览器访问docker容器内的浏览器服务,这样在规避风险的情况下,也能较方便的访问外网服务。理论上他是一个服务器上的浏览器,将它跑在内网环境上之后,它自然就能够访问内网资源。服务器能访问什么网站就可以访问什么网站,所以。。。搭建我们使用 docker compose 来管理 我们的镜像服务,docker-compose.yml 目录的内容如下:services: firefox: image: linuxserver/firefox:latest restart: unless-stopped container_name: firefox security_opt: - seccomp:unconfined #optional environment: - PUID=1000 - PGID=100 - TZ=Asia/Shanghai - LC_ALL=zh_CN.UTF-8 - CUSTOM_USER=zhuzl # 用户名 - PASSWORD=123456 # 密码 ports: - 8100:3000 volumes: - ./config:/config - /usr/share/fonts/chinese:/usr/share/fonts/chinese # 挂载中文字体目录,否则会出现中文乱码的问题 shm_size: "1gb"启动服务后,可在nginx配置代理,代理示例如下: location ^~ / { proxy_pass http://localhost:8100; proxy_set_header Host $host; proxy_set_header X-Real-IP $remote_addr; proxy_set_header X-Forwarded-For $proxy_add_x_forwarded_for; proxy_set_header REMOTE-HOST $remote_addr; proxy_set_header Upgrade $http_upgrade; proxy_set_header Connection $connection_upgrade; proxy_http_version 1.1; # proxy_hide_header Upgrade; add_header X-Cache $upstream_cache_status; #Set Nginx Cache set $static_fileNpPoblu9 0; if ( $uri ~* "\.(gif|png|jpg|css|js|woff|woff2)$" ) { set $static_fileNpPoblu9 1; expires 1m; } if ( $static_fileNpPoblu9 = 0 ) { add_header Cache-Control no-cache; } }配置好后,可使用浏览器访问了,访问后初始界面如下:优化配置优化配置一:解决乱码问题如果未挂载中文字体的话,会出现下面这种乱码情况:所以我们需要将中文字体文件拷贝到宿主机的某个目录,如 /usr/share/fonts/chinese,然后挂载到容器的 /usr/share/fonts/chinese 目录,这样在启动容器的时候就可以自动价值中文字体了。优化配置二:安装翻译插件由于我们访问的外网多为英文内容,为便于快速消化内容,可给浏览器安装翻译插件,我这里安装了功能强大的「沉浸式翻译」,官网是:https://immersivetranslate.com/,进入官网后,可以直接点击「Firefox扩展」,进入Firefox 应用商店直接安装,安装后就可以很方便的使用了:使用体验整体访问速度上跟本地没什么蛮大区别,由于是基于KasmVNC的虚拟桌面技术,不能直接使用快捷键复制、粘贴内容,虽说设置中有「无缝剪切板」之类的开关,但是试了下也没效果,也有可能是我理解方面的问题吧:不过也可以使用 KasmVNC 自带的 剪贴板实现剪切板的读写:有一点需要特别注意的: 一定不要关闭最后一个浏览器标签 ,否则就直接黑屏了。黑屏后的话,需要重启docker服务才能继续使用。
-
写在入职并行3周年之际 一早收到公司人力系统自动推送的入职 3 周年提醒,让人不禁感叹时光飞逝。不知不觉中,我在并行已经度过了三年的时光。回顾这三年的工作历程,每一步都充满了挑战与成长。在这个具有纪念意义的时刻,我对自己在公司期间参与的主要工作做个回顾。前端规范的拟订在我刚加入公司之初,团队正处于组建初期阶段,我们面临的主要挑战之一是如何确保代码的统一性和可维护性。为此,我积极参与了公司前端开发规范的制定工作。我们对代码格式、命名规则以及组件的开发和使用规范等每一个细节都进行了深入的讨论和细致的推敲。这一规范制定过程不仅加深了我对前端开发最佳实践的理解,而且显著提升了团队的协作效率。搭建 dev-guide在前端规范制定完成后,我主导使用 webpack + vue + markdown-it 等技术栈搭建了团队日常开发用到的 dev-guide。这个 dev-guide 是一个纯静态工程,它不仅详尽记录了所有开发规范,还整合了日常使用的工具链接以及团队开发应用在不同环境下的链接。它已经成为新员工入职培训的关键资料,并且极大地便利了团队成员在开发过程中的信息检索。dev-guide 的设计兼顾了易用性和可维护性,使得新成员能够迅速适应,而经验丰富的成员也能轻松获取所需信息。此外,这种做法不仅提升了我们的开发效率,还确保了团队内部知识的共享和传承。参与超算云服务控制台前端开发作为团队中的一名专职前端开发工程师,参与公司控制台产品的前端开发是我工作中的一项重要内容。在这个过程中,我主要负责了如下工作:整体布局重构多主题改造(能分别打包成并行蓝和北龙红两个不同版本)国际化灰度发布(功能灰度上线)消息模块重构扫码登录功能快捷方式一键转区功能开发作业详情导出优化超算中心图表展示及交互全站搜索原型站点建设随动文档移动端站点建设年度用户计算报告(2023)整个前端开发过程中,通过与后端工程师的紧密合作,不经提升了我的团队协作能力,并积累了丰富的前端开发经验。使用CMS搭建控制台KBS在进行控制台项目的开发过程中,我们深刻地意识到构建一个详尽且易于访问的知识库的重要性。这个知识库的主要目的是记录和展示控制台的使用指南,以便用户能够随时随地在线访问和查阅这些信息。为了实现这一目标,我们进行了深入的调研和对比分析,以确保选择最合适的解决方案。经过一系列的评估和比较,我们最终决定采用基于 jspxCMS 来构建这个知识库系统。jspxCMS 是一个功能强大的内容管理系统,它提供了丰富的功能和灵活性,能够满足我们对知识库的各种需求。通过使用 jspxCMS,我们可以轻松地管理和发布控制台的使用指南,确保信息的准确性和及时更新。此外,jspxCMS 还具备用户友好的界面和强大的扩展性,这使得我们能够根据项目的具体需求进行定制和优化。这个过程中,我负责了如下工作:知识库站点模板制作知识库首页模板产品页模板内容页模板实现检索功能北龙超云版知识库模板后台改造改造左侧菜单导航样式应用资源文件分离改造。将上传文件目录、模板目录、索引文件目录从war包中分离后台界面支持并行蓝风格和北龙红风格详细项目情况见本博客之前分享的内容: 记一次KBS项目实施经验分享引入 Torna 管理项目接口文档在项目初期,我们采用了 smart-doc 工具来解析 Java 代码,自动生成 API 文档。最初,这些文档以单个 HTML 文件的形式呈现。然而,随着接口数量的不断增加,我们注意到文档的打开和加载速度变得异常缓慢。此外,随着项目的微服务化演进,我们在原有的 console-biz 基础上集成了更多工程,发现原有的文档生成方式无法有效整合所有接口文档。因此,我们开始探索其他解决方案。经过初步调研,我们发现 Torna 能够在最小的改动范围内满足我们的项目需求。基于此,我们在内部搭建了一套专门用于接口管理的系统。使用 Matomo 收集用户行为数据并做数据分析为了更深入地洞察用户的行为模式和需求,我们利用Matomo工具搜集了丰富的用户行为数据。经过对这些数据的细致分析,我们揭示了产品使用过程中存在的若干问题和潜在的改进领域,并据此实施了多次迭代优化。这一过程不仅让我掌握了数据分析的基础技巧,还提升了我对数据驱动开发理念的认识。从0 搭建开发维护中心(DMC)前端工程并实现完整功能在 DMC 项目中,我从零开始,基于 TDesign 构建了整个前端架构,并独立完成了所有功能的实现。该项目全面挑战了我的个人技能,涵盖了从需求分析、技术选择到具体功能实现的每一个环节,每一步都要求我展现出严谨和细致的工作态度。通过参与这个项目,我显著增强了自己在项目管理和问题解决方面的能力。基于 DataGear 搭建大屏展示系统并制作大屏随着项目推进至关键阶段,我们认识到有必要引入一个大屏幕展示系统,以便生动地展示各种统计数据。经过深入调研,我们选择了 DataGear 作为构建该系统的工具。在这一过程中,我承担了整个系统搭建以及两个主要大屏页面的制作任务。通过参与这个项目,我不仅掌握了 DataGear 的使用技巧,还学会了大屏幕展示的设计理念和实施技术。总结与展望三年的时光虽短暂,却在我的职业生涯中占据了至关重要的位置。在这段时间里,我在技术领域取得了显著的进步,并在团队协作与项目管理等多个方面积累了宝贵的经验。展望未来,我将持续保持对知识的渴望,不断磨练自己的技术能力,以期为公司和团队作出更大的贡献。这三年的工作经历让我深刻认识到,前端开发远不止于编写代码,它更是一个持续学习和创新的旅程。我衷心感谢公司为我提供的发展平台和机遇,同时对团队领导和同事们的支持与协助表示感激。
-
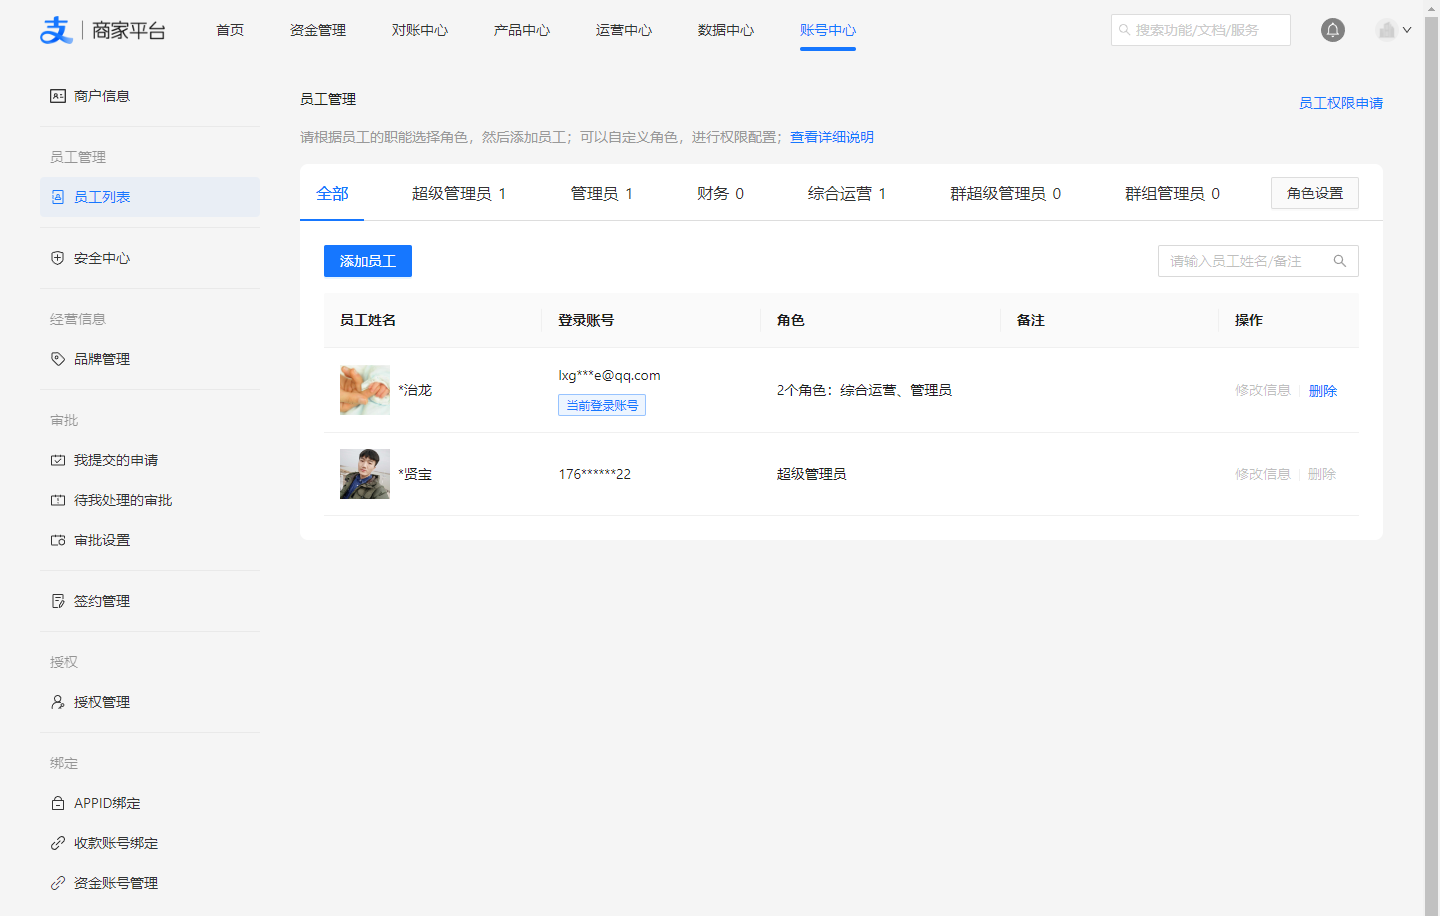
对接支付宝实现门户网站在线支付功能 前言近期,我所在团队负责的控制台项目计划新增在线充值功能。为实现此功能,我们首先需完成在线支付环节的对接。初期,我们将优先接入支付宝支付服务。值得一提的是,我上一次进行支付宝对接,还是在十多年前参与的笨鸟旅行项目,那时我们采用的是 jsp + mybatis 技术栈。与现在便捷的SDK调用相比,当时的开发条件相对简陋,整个项目甚至连 maven 包管理工具都未使用,前端工程化也仅处于起步阶段,CI/CD流程更是无从谈起。回顾过去,不禁让人感叹技术发展带来的日新月异。支付宝支付流程支付宝支付流程大致如下:1、 注册商家并绑定开发人员 :支付宝商家平台( https://b.alipay.com/ )注册商家,多说一嘴,注册成功后,可以在商家平台的账号中心 → 员工列表 添加员工为子账号,这样后续就不需要老是麻烦Boss帮忙扫码或提供验证码了:2、 申请开通支付产品: 商家平台的产品中心根据业务场景需要,申请开通相关支付产品。如我们申请开通了「电脑网站支付」、「手机网站支付」两款支付产品,申请后一般几分钟就开通了。3、 创建应用: 开通产品后就可以创建应用了,单击对应的产品可以进入关联应用页面创建应用并关联,这个界面需要超级管理员将开发人员添加为开放平台的管理员,这样开发人员就可以在开放平台进行应用相关配置了。4、 开发配置: 进入支付宝开放平台,进入应用详情,可在「开发设置」模块中根据流程配置加密证书等信息{gird column="2" gap="10"}{gird-item}{mtitle title="根据提示下载工具生成CSR文件"/}{/gird-item}{gird-item}{mtitle title="上传生成的CSR文件"/}{/gird-item}{gird-item}{mtitle title="手机验证"/}{/gird-item}{gird-item}{mtitle title="证书生成结果"/}{/gird-item}{/gird}5、发布上线:申请完的应用都是开发中状态,前期验证阶段踩了些小坑,以为配置好并生成证书就可以着手开发对接了,后面才发现状态为开发中的应用,是无法调用线上正式接口的,需要应用上线才行,所以我们在「开发设置」中配置好以后就直接提交审核就好,一般提交审核一天左右就可以审核通过,审核通过就可以正式开发对接了。6、开发对接:开发对接根据支付宝官网的文档来就好,现在对接支付宝可以直接使用高度封装的 SDK,开发速度上快了不少。电脑网站支付产品的文档链接为:https://opendocs.alipay.com/open/270/105898?pathHash=b3b2b667 。前期尝试了使用 v3 版本的对接方式(文档链接为: https://opendocs.alipay.com/open-v3/05w3qc ),但一直报证书方面的错误,后改用旧版本的 SDK 没发现问题。直接上代码码了那么多字,总算到最简单的环节了,我们的后端服务核心技术栈:JDK17 + SpringBoot 2.7.x + lombok + Mybatis-plus + MySQL + Hutool,使用 Maven 构建项目,所以我们这个示例工程也是基于上面的技术栈。以下是支付相关的核心代码:一、准备工作1、引入 Alipay SDK在项目 pom.xml 文件 的 dependencies 节点中加入 Alipay SDK 的依赖:<dependency> <groupId>com.alipay.sdk</groupId> <artifactId>alipay-sdk-java</artifactId> <version>4.39.104.ALL</version> </dependency>由于 V3 版本没有验证通过,这里我们没有根据文档站中的建议采用 V3 版本。2、定义配置类跟支付宝对接相关的信息我们统一写到 application.yml 配置文件中, 使用一个配置类来快速加载配置文件中的数据。package com.paratera.console.pay.config; import com.alipay.api.AlipayConfig; import lombok.Data; import org.springframework.boot.context.properties.ConfigurationProperties; import org.springframework.context.annotation.Configuration; @Configuration @ConfigurationProperties(prefix = "alipay") @Data public class AlipayProperties extends AlipayConfig { /** * 支付成功通知URL */ private String notifyUrl; }然后,我们在application.yml 中添加如下配置信息:alipay: appId: 2021004153624250 serverUrl: https://openapi.alipay.com/gateway.do notifyUrl: https://paydemo.work.pojian.online/pay/ali/notify privateKey: MIIEvgIBADANBgkqhkiG9w0BAQEF....RMXJeS alipayPublicCertPath: /alipay/alipayCertPublicKey_RSA2.crt rootCertPath: /alipay/alipayRootCert.crt appCertPath: /alipay/appCertPublicKey_2021004153624250.crt encryptKey: EfaaDErfTRvO2islsjk3thAQ==3、定义签名校验方法为避免一些没必要的安全隐患,后端接收到支付宝推送的通知内容需要做验签操作,验签通过后再进行核心业务操作。/** * 验签 * @param paramMap * @return */ public boolean checkSign(Map<String, String> paramMap) { try { String alipayPublicKey = alipayProperties.getAlipayPublicKey(); if (ObjectUtil.isEmpty(alipayPublicKey)) { String alipayPublicCertPath = alipayProperties.getAlipayPublicCertPath(); alipayPublicKey = AlipaySignature.getAlipayPublicKey(alipayPublicCertPath); alipayProperties.setAlipayPublicKey(alipayPublicKey); } return AlipaySignature.rsaCheckV1(paramMap, alipayPublicKey, alipayProperties.getCharset(), "RSA2"); } catch (AlipayApiException e) { throw new RuntimeException(e); } }二、对接「统一收单下单并支付页面接口」1、controller 定义支付申请入口@PostMapping(path="/pay-prepare") @ResponseBody public String pay(PayForm payForm) throws AlipayApiException { String payHtml = alipayService.payPrepare(payForm); if (ObjectUtil.isEmpty(payHtml)) { return "支付失败"; } return payHtml; }PayForm 主要定义充值相关的字段,如充值金额、用户Id、邮箱、备注等,根据业务自己来就好,我这里采用最简的数据:package com.paratera.console.pay.model.form; import lombok.Data; import javax.validation.constraints.NotBlank; /** * 支付表单 */ @Data public class PayForm { /**0 * 用户Id */ @NotBlank(message = "用户Id不能为空") private String userId; /** * 支付金额 */ @NotBlank(message = "支付金额不能为空") private String money; }2、业务实现 AlipayService.payPrepare()public String payPrepare(PayForm payForm) throws AlipayApiException { Faker faker = new Faker(Locale.CHINA); CertAlipayRequest alipayConfig = new CertAlipayRequest(); alipayConfig.setServerUrl(alipayProperties.getServerUrl()); alipayConfig.setAppId(alipayProperties.getAppId()); alipayConfig.setPrivateKey(alipayProperties.getPrivateKey()); alipayConfig.setAlipayPublicCertPath(alipayProperties.getAlipayPublicCertPath()); alipayConfig.setCertPath(alipayProperties.getAppCertPath()); alipayConfig.setSignType("RSA2"); alipayConfig.setCharset("UTF-8"); alipayConfig.setFormat("json"); alipayConfig.setRootCertPath(alipayProperties.getRootCertPath()); alipayConfig.setEncryptor(alipayProperties.getEncryptKey()); AlipayClient alipayClient = new DefaultAlipayClient(alipayConfig); // 实例化客户端 AlipayTradePagePayRequest payRequest = new AlipayTradePagePayRequest(); payRequest.setReturnUrl("https://paydemo.work.pojian.online/payResult.html"); payRequest.setNotifyUrl(alipayProperties.getNotifyUrl()); AlipayTradePagePayModel alipayTradePayModel = new AlipayTradePagePayModel(); // 调用 alipay.trade.pay LocalDateTime payTime = LocalDateTimeUtil.now(); String orderNo = "PAY" + DateUtil.format(payTime, DatePattern.PURE_DATE_PATTERN) + faker.number().digits(6); alipayTradePayModel.setOutTradeNo(orderNo); alipayTradePayModel.setTotalAmount(payForm.getMoney()); alipayTradePayModel.setSubject("控制台充值-" + DateUtil.format(payTime, DatePattern.PURE_DATE_PATTERN) + "-" + payForm.getMoney() + "元"); alipayTradePayModel.setProductCode("FAST_INSTANT_TRADE_PAY"); payRequest.setBizModel(alipayTradePayModel); AlipayTradePagePayResponse response = alipayClient.pageExecute(payRequest, "POST"); // 发起调用 String pageRedirectionData = response.getBody(); // log.info(pageRedirectionData); if (response.isSuccess()) { // log.info("调用成功"); // 保存充值记录 AddRechargePayForm addForm = new AddRechargePayForm(); addForm.setOrderNo(orderNo); addForm.setSubject(alipayTradePayModel.getSubject()); addForm.setPayMethod("ALIPAY"); addForm.setUserId(payForm.getUserId()); // 原单位是元,需要转换为分 BigDecimal money = new BigDecimal(payForm.getMoney()).multiply(BigDecimal.valueOf(100)); addForm.setPayMoney(money); rechargePayService.addRechargePay(addForm); return pageRedirectionData; } else { log.error("调用失败"); // sdk版本是"4.38.0.ALL"及以上,可以参考下面的示例获取诊断链接 String diagnosisUrl = DiagnosisUtils.getDiagnosisUrl(response); log.error(diagnosisUrl); } return null; }上面的过程主要是生成如下所示的包含签名数据的html代码,在网页里通过自动提交表单的方式跳转到支付宝的付款页面:<form name="punchout_form" method="post" action="https://openapi.alipay.com/gateway.do?app_cert_sn=653da2afe61d430fcc9376b008245959&charset=UTF-8&alipay_root_cert_sn=687b59193f3f462dd5336e5abf83c5d8_02941eef3187dddf3d3b83462e1dfcf6&method=alipay.trade.page.pay&sign=gQOZ2g8xU9lyA2k55FJNSTbleinvaFA%2FjrfuUInElycpytnWweBVDECnC0q7d2tZ%2FOQvxQc5%2Fyxm2OBTc7ERa%2Fs5%2Fi4vTAD2QyukrlKLN1SleGZP5%2FihTpcB%2BM5WkpHyQjsRrnHeFHB3i8Nzfc%2B9ICdz5xJCx8dlu%2BVN9qb51hx9y4eyTvWd2XY4%2BfmW3RHsE8PYQ6VU9YtMP8wjFonaPMExY9WnpJn74fNVj8wLHmxYemxkW80qXhbOxGik2qHY9NWfkWZsYhzMbBu5%2BUBXWdprlbakThSPqXjNpagUMmdPNiGjvLWy3XYtFHfYsOQdbIIPrPlhuQIYmmUfJF9M3w%3D%3D&return_url=https%3A%2F%2Fpaydemo.work.pojian.online%2FpayResult.html¬ify_url=https%3A%2F%2Fpaydemo.work.pojian.online%2Fpay%2Fali%2Fnotify&version=1.0&app_id=2021004153624250&sign_type=RSA2×tamp=2024-06-26+18%3A15%3A01&alipay_sdk=alipay-sdk-java-4.39.104.ALL&format=json"> <input type="hidden" name="biz_content" value="{"out_trade_no":"PAY20240626445677","product_code":"FAST_INSTANT_TRADE_PAY","subject":"控制台充值-20240626-0.1元","total_amount":"0.1"}"> <input type="submit" value="立即支付" style="display:none" > </form> <script>document.forms[0].submit();</script>二、对接支付结果的异步通知发起支付操作的时候我们有指定两个URL:return_url:用于支付完成后跳转到我们的页面给用户展示支付结果notify_url:用于支付完成后通知后端更新支付结果,由于return_url给的支付结果一般不可信,所以我们一般采用这个地址告诉支付宝,用户支付完后异步通知我们哪个接口1、定义接收通知的接口/** * 支付宝付款通知 * * https://opendocs.alipay.com/open/270/105902?pathHash=d5cd617e&ref=api * @return */ @RequestMapping("/notify") public String payNotify(HttpServletRequest request) throws UnsupportedEncodingException { log.info("====== 开始接收支付宝支付回调通知 ======"); Map<String, String> paramMap = new HashMap<>(); Map<String, String[]> requestParams = request.getParameterMap(); log.info("获取支付宝POST过来反馈信息"); for (String name : requestParams.keySet()) { String[] values = requestParams.get(name); String valueStr = ""; for (int i = 0; i < values.length; i++) { valueStr = (i == values.length - 1) ? valueStr + values[i] : valueStr + values[i] + ","; } paramMap.put(name, valueStr); } log.info("通知请求数据:{}", JSONUtil.toJsonStr(paramMap)); if(ObjectUtil.isNotEmpty(paramMap)) { log.info("支付宝回调URL参数:{}", JSONUtil.toJsonStr(paramMap)); boolean signVerified = alipayService.checkSign(paramMap); if (signVerified) { if ("TRADE_SUCCESS".equals(paramMap.get("trade_status"))) { rechargePayService.paid(paramMap.get("out_trade_no"), JSONUtil.toJsonStr(paramMap)); } } // {"gmt_create":["2024-06-25 15:18:10"],"charset":["UTF-8"],"gmt_payment":["2024-06-25 15:18:22"],"notify_time":["2024-06-25 15:18:23"],"subject":["Jacob Have I Loved"],"sign":["CM2qWtZ4rCmvqFyRucgANQJAz2k0SsroaU3uDEK28kgxkcHC29a64jquy4/qRfEiX4VuJKdmxkHG3+hEAC/9/qOgl8mG/GGSPlq+B90fg25aymYlKoM6wYOzEqooOLj2LCtj8Nq1WKaw9pTwYK/GlDdVLsUB8bSpkpjZ6vrhhzjeXK38wDgZuNKle9JdFCQLO/f1vcyM+h4SQpkurg/jTYB7oQQWk/ZsQAqC/XM/laKrPMPrA4SYb8hcC0UIQD8BLlCZiXaEj/+Q6CTJQffGyW2q6trTEhySgb4I3OwTjqtbn1BlafFCTm1OYgMlVLZu5U+iwvhPW2Xmz8A2v3RWIQ=="],"merchant_app_id":["2021004153624250"],"buyer_open_id":["037QDGdQKn6R2z7On4z_OJrBOzaNN0z5Obtjr_T4aftVdU9"],"invoice_amount":["0.10"],"version":["1.0"],"notify_id":["2024062501222151823038371452266751"],"fund_bill_list":["[{\"amount\":\"0.10\",\"fundChannel\":\"ALIPAYACCOUNT\"}]"],"notify_type":["trade_status_sync"],"out_trade_no":["PAY20240625635868"],"total_amount":["0.10"],"trade_status":["TRADE_SUCCESS"],"trade_no":["2024062522001438371427121571"],"auth_app_id":["2021004153624250"],"receipt_amount":["0.10"],"point_amount":["0.00"],"buyer_pay_amount":["0.10"],"app_id":["2021004153624250"],"sign_type":["RSA2"],"seller_id":["2088641848623112"]} } return "success"; }2、核心逻辑说明alipayService.checkSign()这个验签方法在前面的章节已经定义过,这里就不着重介绍了。rechargePayService.paid()是内部业务逻辑,本示例中主要是存储支付宝推送的数据并改变订单状态,在这里就不做代码罗列了。示例工程的几个核心页面效果为更好的展示示例效果,在示例工程开发过程中做了些界面展示,可通过如下链接体验完整功能:https://paydemo.work.pojian.online/相关核心界面截图如下:{gird column="2" gap="10"}{gird-item}{mtitle title="发起支付"/}{/gird-item}{gird-item}{mtitle title="用户使用支付宝完成支付"/}{/gird-item}{gird-item}{mtitle title="支付成功截图"/}{/gird-item}{gird-item}{mtitle title="订单列表"/}{/gird-item}{/gird}
-
提词器工具合集 迅捷提词全能王官网:https://www.xunjiepdf.com/ticiqi点评:题词模式有拍摄、悬浮窗、提词板 3 种模式。除了提词功能外,软件的视频和图片功能也是非常实用的,工具非常齐全。芦笋提词器官网:https://tcq.lusun.com/点评:一款支持智能跟读、隐形提词的应用,支持Windows、Mac、Android、iOS。支持智能跟读、隐形提词、AI 辅助提词,广泛适用于网课、视频拍摄、直播、录口播、 vlog、视频面试、演讲、口才训练等领域。PromptSmart官网:https://www.promptsmart.com/点评:会根据语速自动调整提词速度,同时文本会自动滚动Teleprompter官网:https://cn.teleprompter-online.com/点评:在线工具,平时准备演讲或录视频的时候,可以用这个工具提示。除了支持在线录音、播放暂停外,还支持文本水平、垂直翻转以及镜像,方便录制。提客提词器官网:https://www.tttci.com/点评:有在线版也有客户端,有悬浮、隐形、多彩提词功能,支持 AI 跟随提词。QPrompt - 提词器开源地址:https://github.com/Cuperino/QPrompt-Teleprompter点评:适合所有视频创作者的提词器软件Speakflow — 在线提词器官网:https://www.speakflow.com/点评:同步远程滚动文本、文本调整、集成人工智能和语音识别等Promptr官网:https://promptr.co/点评:基于网络的提词器应用程序无需注册或下载,它有多种格式选项、文本调整、镜像视图和正常视图,让您轻松阅读Free online teleprompter software with voice activated scrolling.官网:https://telepromptermirror.com/telepromptersoftware.htm点评:免费提词器软件,支持语音激活,提供自动滚动、声控滚动、键盘快捷键、字体颜色管理等强大功能。PromptDog官网:https://promptdog.com/点评:一款适用于 Windows 和 macOS 设备的优秀提词器软件
-
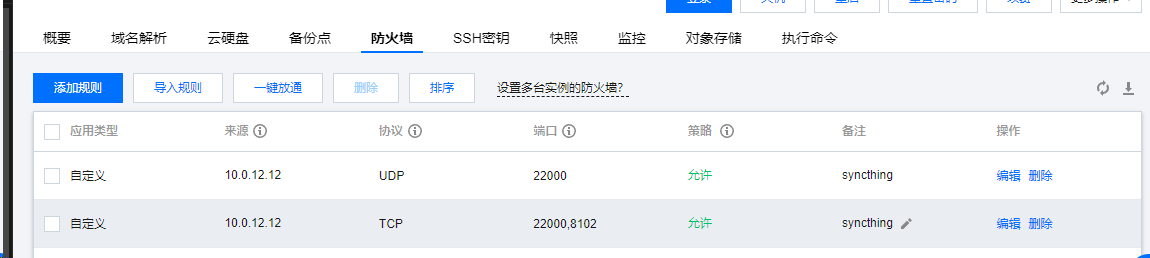
使用 Docker + Syncthing 同步文件 背景介绍很久之前我就用Syncthing 搭建过文件同步服务(见 使用 Syncthing 同步文件 ),只是当初是直接下载的可执行文件,在宿主机启服务实现文件同步的,对宿主机有一定的侵入性,且当时只是记录了怎么把服务跑起来,没有说明清楚服务跑起来后怎么配置,最终实现文件同步的。最近帮朋友使用 ChestnutCMS 搭建了个公司产品网站,正好需要在两台服务器器之间实现文件同步服务,一共有两台服务器:Web 服务器内网IP: 10.0.12.12配置:CPU - 4核 | 内存 - 8GB | 系统盘 - SSD云硬盘 180GB | 流量包 - 2000GB/月(带宽:12Mbps)主要部署 Docker + NginxProxyManager + KKFilePreview应用服务器内网IP: 10.0.16.13配置:CPU - 8核 | 内存 - 16GB | 系统盘 - SSD云硬盘 270GB | 流量包 - 3500GB/月(带宽:18Mbps)主要部署公司的云上业务系统 + ChestnutCMS,由于预算有限,数据库、Redis 等服务也装在这台服务器两台服务器处于相同的内网环境,ChestnutCMS 主要用于内容管理及网站静态发布,然后使用 Syncthing 将静态化的文件同步到 Web 服务器,使用 NginxProxyManager 发布到外网访问。应用部署及配置部署发布端使用 Docker 启动应用我们在应用服务器上部署发布端,由于应用服务器上也提前部署了 Docker, 我们使用 docker来部署,docker-compose.yaml 文件示例如下:services: app: image: syncthing/syncthing container_name: syncthing privileged: true restart: always volumes: - /data:/data - ../po-cms/wwwroot_release:/var/syncthing - ../hosts:/etc/hosts networks: - net-zzl ports: - 8102:8384 - 22000:22000 networks: net-zzl: name: bridge_zzl external: true使用 docker compose up -d 启动服务开放端口从上面的配置文件中,我们开启了 8102 和 22000 两个端口,由于我们的应用服务器不直接对外提供服务,需要使用 Web服务器代理,所以 需要将这两个端口对Web服务器开放:如果你的应用服务器本身启用了防火墙之类的机制,记得也要放行。配置 Syncthing UI界面对外可访问在 NginxProxyManager 中添加对外访问,相关的 DNS 解析请自行提前处理。Syncthing 配置第一次访问的时候系统会通过警告提示来引导用户做一些安全性相关的配置:发送匿名报告数据提示引导配置提示我主要配置的信息如下:Syncthing 常规配置Syncthing 图形用户界面设置至此 应用服务器的配置基本OK了。web服务器配置部署 Syncting我们还是使用 Docker 来部署,基本信息差不多,我只是结合web服务器的环境改了下挂载目录及端口:services: app: image: syncthing/syncthing container_name: syncthing privileged: true restart: always volumes: - /data:/data - ../nginx-proxy-manager/wwwroot_release:/var/syncthing - ../hosts:/etc/hosts networks: - net-zzl ports: - 8013:8384 - 22000:22000 networks: net-zzl: name: bridge_zzl external: true对应用服务器开放端口Syncthing 配置基本配置跟应用服务器保持一致配置同步一、添加远程设备在应用服务器添加web服务器的syncthing在 Web 服务器同意添加:二、应用服务器配置同步文件夹单击主界面的「添加文件夹」按钮:三、WEB服务器同意添加共享web服务器接收到添加共享提示配置信息配置完成后会自动进行同步同步完成后可在指定目录下看到同步后的文件参考链接Syncthing 官网:https://syncthing.net/Syncthing 官网文档:https://docs.syncthing.net/Syncthing Github 开源地址:https://github.com/syncthing/syncthing
-
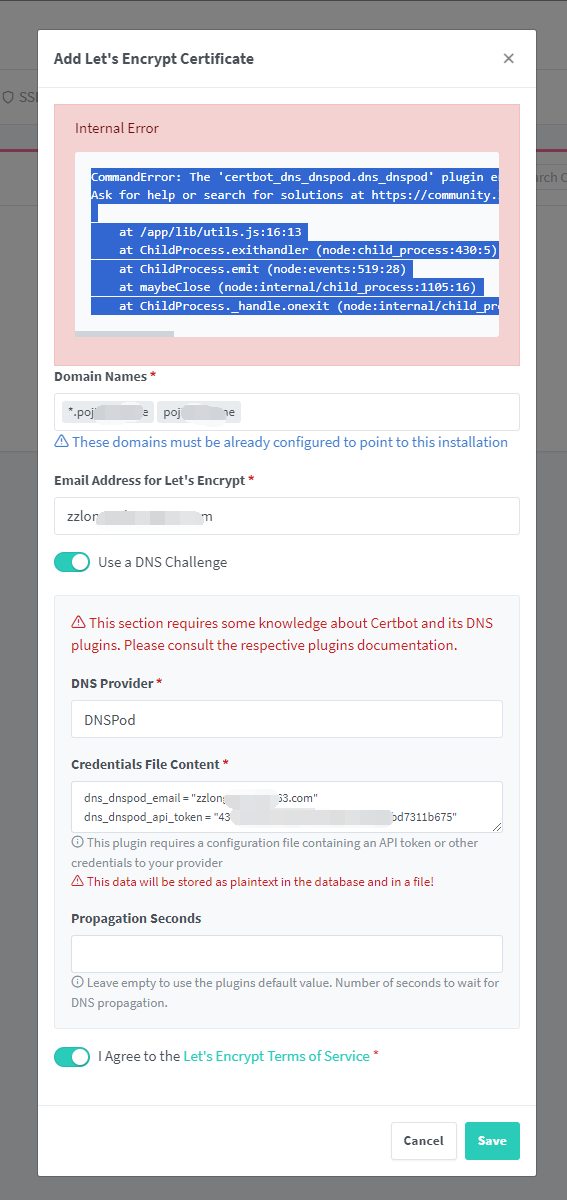
解决 nginxProxyManager 申请证书时的SSL失败问题 背景介绍使用 NginxProxyManager 搭建 Web服务器,添加SSL证书时出错,报错界面如下:异常提示信息如下提示:CommandError: The 'certbot_dns_dnspod.dns_dnspod' plugin errored while loading: No module named 'zope'. You may need to remove or update this plugin. The Certbot log will contain the full error details and this should be reported to the plugin developer. Ask for help or search for solutions at https://community.letsencrypt.org. See the logfile /tmp/certbot-log-pid4c1ie/log or re-run Certbot with -v for more details. at /app/lib/utils.js:16:13 at ChildProcess.exithandler (node:child_process:430:5) at ChildProcess.emit (node:events:519:28) at maybeClose (node:internal/child_process:1105:16) at ChildProcess._handle.onexit (node:internal/child_process:305:5)问题调研该问题在 NginxProxyManager 的github Issue 中有说明,连接为:https://github.com/NginxProxyManager/nginx-proxy-manager/issues/2440其中,该回复直击要害:https://github.com/NginxProxyManager/nginx-proxy-manager/issues/2440#issuecomment-1380036390我们就根据提示,到容器里安装一下缺失的依赖即可。解决步骤一、进入容器:sudo docker exec -it nginxProxyManager /bin/bash进入后显示如下提示信息:ubuntu@VM-12-12-ubuntu:/data/dockerRoot/apps/nginx-proxy-manager$ sudo docker exec -it nginxProxyManager /bin/bash _ _ _ ____ __ __ | \ | | __ _(_)_ __ __ _| _ \ _ __ _____ ___ _| \/ | __ _ _ __ __ _ __ _ ___ _ __ | \| |/ _` | | '_ \\ \/ / |_) | '__/ _ \ \/ / | | | |\/| |/ _` | '_ \ / _` |/ _` |/ _ \ '__| | |\ | (_| | | | | |> <| __/| | | (_) > <| |_| | | | | (_| | | | | (_| | (_| | __/ | |_| \_|\__, |_|_| |_/_/\_\_| |_| \___/_/\_\\__, |_| |_|\__,_|_| |_|\__,_|\__, |\___|_| |___/ |___/ |___/ The 'certbot_dns_dnspod.dns_dnspod' plugin errored while loading: No module named 'zope'. You may need to remove or update this plugin. The Certbot log will contain the full error details and this should be reported to the plugin developer. Ask for help or search for solutions at https://community.letsencrypt.org. See the logfile /tmp/certbot-log-fimx1ahi/log or re-run Certbot with -v for more details. Version 2.11.2 (12d77e3) 2024-05-10 14:36:51 UTC, OpenResty 1.21.4.3, debian 12 (bookworm), Certbot Base: debian:bookworm-slim, linux/amd64 Certbot: nginxproxymanager/nginx-full:latest, linux/amd64 Node: nginxproxymanager/nginx-full:certbot, linux/amd64 [root@docker-1f03724f8d16:/app]二、安装 zopepip install zope安装后由于多次没下载到自动重试了数次,见如下安装日志:[root@docker-1f03724f8d16:/app]# pip install zope Collecting zope Downloading Zope-5.10-py3-none-any.whl.metadata (32 kB) Collecting AccessControl>=5.2 (from zope) Downloading AccessControl-6.3-cp311-cp311-manylinux_2_5_x86_64.manylinux1_x86_64.manylinux_2_17_x86_64.manylinux2014_x86_64.whl.metadata (9.8 kB) Collecting Acquisition (from zope) Downloading Acquisition-5.2-cp311-cp311-manylinux_2_5_x86_64.manylinux1_x86_64.manylinux_2_17_x86_64.manylinux2014_x86_64.whl.metadata (24 kB) Collecting BTrees (from zope) Downloading BTrees-5.2-cp311-cp311-manylinux_2_17_x86_64.manylinux2014_x86_64.whl.metadata (20 kB) Collecting Chameleon>=3.7.0 (from zope) Downloading Chameleon-4.5.4-py3-none-any.whl.metadata (51 kB) ━━━━━━━━━━━━━━━━━━━━━━━━━━━━━━━━━━━━━━━━ 51.3/51.3 kB 7.4 kB/s eta 0:00:00 Collecting DateTime (from zope) Downloading DateTime-5.5-py3-none-any.whl.metadata (33 kB) Collecting DocumentTemplate>=4.0 (from zope) Downloading DocumentTemplate-4.6-py3-none-any.whl.metadata (7.6 kB) Collecting ExtensionClass (from zope) Downloading ExtensionClass-5.1-cp311-cp311-manylinux_2_5_x86_64.manylinux1_x86_64.manylinux_2_17_x86_64.manylinux2014_x86_64.whl.metadata (6.2 kB) Collecting MultiMapping (from zope) Downloading MultiMapping-5.0-py3-none-any.whl.metadata (1.8 kB) Collecting PasteDeploy (from zope) Downloading PasteDeploy-3.1.0-py3-none-any.whl.metadata (2.7 kB) Collecting Persistence (from zope) Downloading Persistence-4.1-cp311-cp311-manylinux_2_5_x86_64.manylinux1_x86_64.manylinux_2_17_x86_64.manylinux2014_x86_64.whl.metadata (4.0 kB) Collecting RestrictedPython (from zope) Downloading RestrictedPython-7.1-py3-none-any.whl.metadata (12 kB) Collecting ZConfig>=2.9.2 (from zope) Downloading ZConfig-4.1-py3-none-any.whl.metadata (17 kB) Collecting ZODB (from zope) Downloading ZODB-6.0-py3-none-any.whl.metadata (24 kB) Requirement already satisfied: setuptools>=36.2 in /opt/certbot/lib/python3.11/site-packages (from zope) (66.1.1) Collecting transaction>=2.4 (from zope) Downloading transaction-4.0-py3-none-any.whl.metadata (14 kB) Collecting waitress (from zope) Downloading waitress-3.0.0-py3-none-any.whl.metadata (4.2 kB) Collecting zExceptions>=3.4 (from zope) Downloading zExceptions-5.0-py3-none-any.whl.metadata (3.4 kB) Collecting z3c.pt (from zope) Downloading z3c.pt-4.3-py3-none-any.whl.metadata (47 kB) ━━━━━━━━━━━━━━━━━━━━━━━━━━━━━━━━━━━━━━━━ 47.6/47.6 kB 42.6 kB/s eta 0:00:00 Collecting zope.browser (from zope) Downloading zope.browser-3.0-py3-none-any.whl.metadata (4.4 kB) Collecting zope.browsermenu (from zope) Downloading zope.browsermenu-5.0-py3-none-any.whl.metadata (4.1 kB) Collecting zope.browserpage>=4.4.0.dev0 (from zope) Downloading zope.browserpage-5.0-py3-none-any.whl.metadata (5.4 kB) Collecting zope.browserresource>=3.11 (from zope) Downloading zope.browserresource-5.1-py3-none-any.whl.metadata (9.3 kB) Collecting zope.component (from zope) Downloading zope.component-6.0-py3-none-any.whl.metadata (18 kB) Collecting zope.configuration (from zope) Downloading zope.configuration-5.0.1-py3-none-any.whl.metadata (11 kB) Collecting zope.container (from zope) Downloading zope.container-5.2-cp311-cp311-manylinux_2_5_x86_64.manylinux1_x86_64.manylinux_2_17_x86_64.manylinux2014_x86_64.whl.metadata (15 kB) Collecting zope.contentprovider (from zope) Downloading zope.contentprovider-5.0-py3-none-any.whl.metadata (5.9 kB) Collecting zope.contenttype (from zope) Downloading zope.contenttype-5.1-py3-none-any.whl.metadata (5.3 kB) Collecting zope.datetime (from zope) Downloading zope.datetime-5.0.0-py3-none-any.whl.metadata (4.3 kB) Collecting zope.deferredimport (from zope) Downloading zope.deferredimport-5.0-py3-none-any.whl.metadata (5.1 kB) Collecting zope.event (from zope) Downloading zope.event-5.0-py3-none-any.whl.metadata (4.4 kB) Collecting zope.exceptions (from zope) Downloading zope.exceptions-5.0.1-py3-none-any.whl.metadata (8.4 kB) Collecting zope.globalrequest (from zope) Downloading zope.globalrequest-2.0-py3-none-any.whl.metadata (3.3 kB) Collecting zope.i18n[zcml] (from zope) Downloading zope.i18n-5.1-py3-none-any.whl.metadata (13 kB) Collecting zope.i18nmessageid (from zope) Downloading zope.i18nmessageid-6.1.0-cp311-cp311-manylinux_2_5_x86_64.manylinux1_x86_64.manylinux_2_17_x86_64.manylinux2014_x86_64.whl.metadata (8.7 kB) Collecting zope.interface>=3.8 (from zope) Downloading zope.interface-6.4-cp311-cp311-manylinux_2_5_x86_64.manylinux1_x86_64.manylinux_2_17_x86_64.manylinux2014_x86_64.whl.metadata (42 kB) ━━━━━━━━━━━━━━━━━━━━━━━━━━━━━━━━━━━━━━━━ 42.2/42.2 kB 25.4 kB/s eta 0:00:00 Collecting zope.lifecycleevent (from zope) Downloading zope.lifecycleevent-5.0-py3-none-any.whl.metadata (6.0 kB) Collecting zope.location (from zope) Downloading zope.location-5.0-py3-none-any.whl.metadata (9.7 kB) Collecting zope.pagetemplate>=4.0.2 (from zope) Downloading zope.pagetemplate-5.1-py3-none-any.whl.metadata (9.6 kB) Collecting zope.processlifetime (from zope) Downloading zope.processlifetime-3.0-py3-none-any.whl.metadata (3.9 kB) Collecting zope.proxy (from zope) Downloading zope.proxy-5.2-cp311-cp311-manylinux_2_5_x86_64.manylinux1_x86_64.manylinux_2_17_x86_64.manylinux2014_x86_64.whl.metadata (11 kB) Collecting zope.ptresource (from zope) Downloading zope.ptresource-5.0-py3-none-any.whl.metadata (4.4 kB) Collecting zope.publisher (from zope) Downloading zope.publisher-7.0-py3-none-any.whl.metadata (21 kB) Collecting zope.schema (from zope) Downloading zope.schema-7.0.1-py3-none-any.whl.metadata (24 kB) Collecting zope.security (from zope) Downloading zope.security-6.2-cp311-cp311-manylinux_2_5_x86_64.manylinux1_x86_64.manylinux_2_17_x86_64.manylinux2014_x86_64.whl.metadata (24 kB) Collecting zope.sequencesort (from zope) Downloading zope.sequencesort-5.0-py3-none-any.whl.metadata (3.9 kB) Collecting zope.site (from zope) Downloading zope.site-5.0-py3-none-any.whl.metadata (20 kB) Collecting zope.size (from zope) Downloading zope.size-5.0-py3-none-any.whl.metadata (4.6 kB) Collecting zope.tal (from zope) Downloading zope.tal-5.0.1-py3-none-any.whl.metadata (7.5 kB) Collecting zope.tales>=5.0.2 (from zope) Downloading zope.tales-6.0-py3-none-any.whl.metadata (6.6 kB) Collecting zope.testbrowser (from zope) Downloading zope.testbrowser-6.0-py3-none-any.whl.metadata (19 kB) Collecting zope.testing (from zope) Downloading zope.testing-5.0.1-py3-none-any.whl.metadata (19 kB) Collecting zope.traversing (from zope) Downloading zope.traversing-5.0-py3-none-any.whl.metadata (12 kB) Collecting zope.viewlet (from zope) Downloading zope.viewlet-5.0-py3-none-any.whl.metadata (5.9 kB) Collecting multipart (from zope) Downloading multipart-0.2.4-py3-none-any.whl.metadata (1.1 kB) Collecting AuthEncoding (from AccessControl>=5.2->zope) Downloading AuthEncoding-5.0-py3-none-any.whl.metadata (2.7 kB) Collecting RestrictedPython (from zope) Downloading RestrictedPython-7.2a1.dev0-py3-none-any.whl.metadata (12 kB) Collecting roman (from DocumentTemplate>=4.0->zope) Downloading roman-4.2-py3-none-any.whl.metadata (3.6 kB) Collecting zope.structuredtext (from DocumentTemplate>=4.0->zope) Downloading zope.structuredtext-5.0-py3-none-any.whl.metadata (4.3 kB) Collecting persistent>=4.1.1 (from Persistence->zope) Downloading persistent-5.2-cp311-cp311-manylinux_2_5_x86_64.manylinux1_x86_64.manylinux_2_17_x86_64.manylinux2014_x86_64.whl.metadata (21 kB) Collecting zope.hookable>=4.2.0 (from zope.component->zope) Downloading zope.hookable-6.0-cp311-cp311-manylinux_2_5_x86_64.manylinux1_x86_64.manylinux_2_17_x86_64.manylinux2014_x86_64.whl.metadata (5.8 kB) Requirement already satisfied: pytz in /opt/certbot/lib/python3.11/site-packages (from DateTime->zope) (2024.1) Collecting zc.lockfile (from ZODB->zope) Downloading zc.lockfile-3.0.post1-py3-none-any.whl.metadata (6.2 kB) Collecting zodbpickle>=1.0.1 (from ZODB->zope) Downloading zodbpickle-3.3-cp311-cp311-manylinux_2_17_x86_64.manylinux2014_x86_64.whl.metadata (13 kB) Collecting zope.cachedescriptors (from zope.container->zope) Downloading zope.cachedescriptors-5.0-py3-none-any.whl.metadata (17 kB) Collecting zope.dottedname (from zope.container->zope) Downloading zope.dottedname-6.0-py3-none-any.whl.metadata (3.4 kB) Collecting zope.filerepresentation (from zope.container->zope) Downloading zope.filerepresentation-6.0-py3-none-any.whl.metadata (4.6 kB) Collecting python-gettext (from zope.i18n[zcml]->zope) Downloading python_gettext-5.0-py3-none-any.whl.metadata (4.6 kB) Collecting zope.deprecation (from zope.i18n[zcml]->zope) Downloading zope.deprecation-5.0-py3-none-any.whl.metadata (5.1 kB) Collecting zope.annotation (from zope.site->zope) Downloading zope.annotation-5.0-py3-none-any.whl.metadata (6.6 kB) WARNING: Retrying (Retry(total=4, connect=None, read=None, redirect=None, status=None)) after connection broken by 'ReadTimeoutError("HTTPSConnectionPool(host='pypi.org', port=443): Read timed out. (read timeout=15)")': /simple/webtest/ Collecting WebTest>=2.0.30 (from zope.testbrowser->zope) Downloading WebTest-3.0.0-py3-none-any.whl.metadata (1.8 kB) Collecting BeautifulSoup4 (from zope.testbrowser->zope) Downloading beautifulsoup4-4.12.3-py3-none-any.whl.metadata (3.8 kB) Collecting SoupSieve>=1.9.0 (from zope.testbrowser->zope) Downloading soupsieve-2.5-py3-none-any.whl.metadata (4.7 kB) Collecting WSGIProxy2 (from zope.testbrowser->zope) Downloading WSGIProxy2-0.5.1-py3-none-any.whl.metadata (2.7 kB) Requirement already satisfied: cffi in /opt/certbot/lib/python3.11/site-packages (from persistent>=4.1.1->Persistence->zope) (1.16.0) Collecting WebOb>=1.2 (from WebTest>=2.0.30->zope.testbrowser->zope) Downloading WebOb-1.8.7-py2.py3-none-any.whl.metadata (10 kB) Requirement already satisfied: pycparser in /opt/certbot/lib/python3.11/site-packages (from cffi->persistent>=4.1.1->Persistence->zope) (2.22) Downloading Zope-5.10-py3-none-any.whl (3.2 MB) ━━━━━━━━━━━━━━━━━━━━━━━━━━━━━━━━━━━━━━━━ 3.2/3.2 MB 99.6 kB/s eta 0:00:00 Downloading AccessControl-6.3-cp311-cp311-manylinux_2_5_x86_64.manylinux1_x86_64.manylinux_2_17_x86_64.manylinux2014_x86_64.whl (193 kB) ━━━━━━━━━━━━━━━━━━━━━━━━━━━━━━━━━━━━━━━━ 193.4/193.4 kB 1.7 MB/s eta 0:00:00 Downloading Chameleon-4.5.4-py3-none-any.whl (88 kB) ━━━━━━━━━━━━━━━━━━━━━━━━━━━━━━━━━━━━━━━━ 88.2/88.2 kB 1.8 MB/s eta 0:00:00 Downloading DocumentTemplate-4.6-py3-none-any.whl (87 kB) ━━━━━━━━━━━━━━━━━━━━━━━━━━━━━━━━━━━━━━━━ 87.0/87.0 kB 1.8 MB/s eta 0:00:00 Downloading ExtensionClass-5.1-cp311-cp311-manylinux_2_5_x86_64.manylinux1_x86_64.manylinux_2_17_x86_64.manylinux2014_x86_64.whl (92 kB) ━━━━━━━━━━━━━━━━━━━━━━━━━━━━━━━━━━━━━━━━ 92.6/92.6 kB 1.8 MB/s eta 0:00:00 Downloading Persistence-4.1-cp311-cp311-manylinux_2_5_x86_64.manylinux1_x86_64.manylinux_2_17_x86_64.manylinux2014_x86_64.whl (24 kB) Downloading RestrictedPython-7.2a1.dev0-py3-none-any.whl (26 kB) Downloading transaction-4.0-py3-none-any.whl (46 kB) ━━━━━━━━━━━━━━━━━━━━━━━━━━━━━━━━━━━━━━━━ 46.6/46.6 kB 1.7 MB/s eta 0:00:00 Downloading ZConfig-4.1-py3-none-any.whl (131 kB) ━━━━━━━━━━━━━━━━━━━━━━━━━━━━━━━━━━━━━━━━ 131.5/131.5 kB 1.8 MB/s eta 0:00:00 Downloading zExceptions-5.0-py3-none-any.whl (17 kB) Downloading zope.browserpage-5.0-py3-none-any.whl (32 kB) Downloading zope.browserresource-5.1-py3-none-any.whl (40 kB) ━━━━━━━━━━━━━━━━━━━━━━━━━━━━━━━━━━━━━━━━ 40.6/40.6 kB 1.7 MB/s eta 0:00:00 Downloading zope.component-6.0-py3-none-any.whl (68 kB) ━━━━━━━━━━━━━━━━━━━━━━━━━━━━━━━━━━━━━━━━ 68.8/68.8 kB 1.8 MB/s eta 0:00:00 Downloading zope.contenttype-5.1-py3-none-any.whl (14 kB) Downloading zope.interface-6.4-cp311-cp311-manylinux_2_5_x86_64.manylinux1_x86_64.manylinux_2_17_x86_64.manylinux2014_x86_64.whl (249 kB) ━━━━━━━━━━━━━━━━━━━━━━━━━━━━━━━━━━━━━━━━ 249.5/249.5 kB 1.5 MB/s eta 0:00:00 Downloading zope.pagetemplate-5.1-py3-none-any.whl (44 kB) ━━━━━━━━━━━━━━━━━━━━━━━━━━━━━━━━━━━━━━━━ 45.0/45.0 kB 2.0 MB/s eta 0:00:00 Downloading zope.publisher-7.0-py3-none-any.whl (119 kB) ━━━━━━━━━━━━━━━━━━━━━━━━━━━━━━━━━━━━━━━━ 119.3/119.3 kB 1.9 MB/s eta 0:00:00 Downloading zope.security-6.2-cp311-cp311-manylinux_2_5_x86_64.manylinux1_x86_64.manylinux_2_17_x86_64.manylinux2014_x86_64.whl (182 kB) ━━━━━━━━━━━━━━━━━━━━━━━━━━━━━━━━━━━━━━━━ 182.7/182.7 kB 2.1 MB/s eta 0:00:00 Downloading zope.proxy-5.2-cp311-cp311-manylinux_2_5_x86_64.manylinux1_x86_64.manylinux_2_17_x86_64.manylinux2014_x86_64.whl (71 kB) ━━━━━━━━━━━━━━━━━━━━━━━━━━━━━━━━━━━━━━━━ 71.9/71.9 kB 2.1 MB/s eta 0:00:00 Downloading zope.schema-7.0.1-py3-none-any.whl (85 kB) ━━━━━━━━━━━━━━━━━━━━━━━━━━━━━━━━━━━━━━━━ 85.9/85.9 kB 2.1 MB/s eta 0:00:00 Downloading zope.tal-5.0.1-py3-none-any.whl (135 kB) ━━━━━━━━━━━━━━━━━━━━━━━━━━━━━━━━━━━━━━━━ 135.9/135.9 kB 2.0 MB/s eta 0:00:00 Downloading zope.tales-6.0-py3-none-any.whl (30 kB) Downloading zope.traversing-5.0-py3-none-any.whl (47 kB) ━━━━━━━━━━━━━━━━━━━━━━━━━━━━━━━━━━━━━━━━ 47.6/47.6 kB 1.9 MB/s eta 0:00:00 Downloading zope.location-5.0-py3-none-any.whl (19 kB) Downloading Acquisition-5.2-cp311-cp311-manylinux_2_5_x86_64.manylinux1_x86_64.manylinux_2_17_x86_64.manylinux2014_x86_64.whl (122 kB) ━━━━━━━━━━━━━━━━━━━━━━━━━━━━━━━━━━━━━━━━ 122.8/122.8 kB 2.1 MB/s eta 0:00:00 Downloading BTrees-5.2-cp311-cp311-manylinux_2_17_x86_64.manylinux2014_x86_64.whl (3.8 MB) ━━━━━━━━━━━━━━━━━━━━━━━━━━━━━━━━━━━━━━━━ 3.8/3.8 MB 2.7 MB/s eta 0:00:00 Downloading DateTime-5.5-py3-none-any.whl (52 kB) ━━━━━━━━━━━━━━━━━━━━━━━━━━━━━━━━━━━━━━━━ 52.6/52.6 kB 3.3 MB/s eta 0:00:00 Downloading MultiMapping-5.0-py3-none-any.whl (4.3 kB) Downloading multipart-0.2.4-py3-none-any.whl (7.4 kB) Downloading PasteDeploy-3.1.0-py3-none-any.whl (16 kB) Downloading waitress-3.0.0-py3-none-any.whl (56 kB) ━━━━━━━━━━━━━━━━━━━━━━━━━━━━━━━━━━━━━━━━ 56.7/56.7 kB 3.1 MB/s eta 0:00:00 Downloading z3c.pt-4.3-py3-none-any.whl (40 kB) ━━━━━━━━━━━━━━━━━━━━━━━━━━━━━━━━━━━━━━━━ 40.2/40.2 kB 3.5 MB/s eta 0:00:00 Downloading ZODB-6.0-py3-none-any.whl (417 kB) ━━━━━━━━━━━━━━━━━━━━━━━━━━━━━━━━━━━━━━━━ 417.8/417.8 kB 4.0 MB/s eta 0:00:00 Downloading zope.browser-3.0-py3-none-any.whl (7.6 kB) Downloading zope.browsermenu-5.0-py3-none-any.whl (30 kB) Downloading zope.configuration-5.0.1-py3-none-any.whl (79 kB) ━━━━━━━━━━━━━━━━━━━━━━━━━━━━━━━━━━━━━━━━ 79.0/79.0 kB 3.7 MB/s eta 0:00:00 Downloading zope.container-5.2-cp311-cp311-manylinux_2_5_x86_64.manylinux1_x86_64.manylinux_2_17_x86_64.manylinux2014_x86_64.whl (114 kB) ━━━━━━━━━━━━━━━━━━━━━━━━━━━━━━━━━━━━━━━━ 114.9/114.9 kB 3.8 MB/s eta 0:00:00 Downloading zope.lifecycleevent-5.0-py3-none-any.whl (18 kB) Downloading zope.contentprovider-5.0-py3-none-any.whl (11 kB) Downloading zope.datetime-5.0.0-py3-none-any.whl (43 kB) ━━━━━━━━━━━━━━━━━━━━━━━━━━━━━━━━━━━━━━━━ 43.4/43.4 kB 3.0 MB/s eta 0:00:00 Downloading zope.deferredimport-5.0-py3-none-any.whl (10.0 kB) Downloading zope.event-5.0-py3-none-any.whl (6.8 kB) Downloading zope.exceptions-5.0.1-py3-none-any.whl (19 kB) Downloading zope.globalrequest-2.0-py3-none-any.whl (5.7 kB) Downloading zope.i18nmessageid-6.1.0-cp311-cp311-manylinux_2_5_x86_64.manylinux1_x86_64.manylinux_2_17_x86_64.manylinux2014_x86_64.whl (28 kB) Downloading zope.processlifetime-3.0-py3-none-any.whl (5.9 kB) Downloading zope.ptresource-5.0-py3-none-any.whl (7.6 kB) Downloading zope.sequencesort-5.0-py3-none-any.whl (11 kB) Downloading zope.site-5.0-py3-none-any.whl (30 kB) Downloading zope.size-5.0-py3-none-any.whl (7.9 kB) Downloading zope.testbrowser-6.0-py3-none-any.whl (63 kB) ━━━━━━━━━━━━━━━━━━━━━━━━━━━━━━━━━━━━━━━━ 63.7/63.7 kB 3.5 MB/s eta 0:00:00 Downloading zope.testing-5.0.1-py3-none-any.whl (37 kB) Downloading zope.viewlet-5.0-py3-none-any.whl (33 kB) Downloading persistent-5.2-cp311-cp311-manylinux_2_5_x86_64.manylinux1_x86_64.manylinux_2_17_x86_64.manylinux2014_x86_64.whl (234 kB) ━━━━━━━━━━━━━━━━━━━━━━━━━━━━━━━━━━━━━━━━ 234.4/234.4 kB 4.0 MB/s eta 0:00:00 Downloading soupsieve-2.5-py3-none-any.whl (36 kB) Downloading WebTest-3.0.0-py3-none-any.whl (31 kB) Downloading zodbpickle-3.3-cp311-cp311-manylinux_2_17_x86_64.manylinux2014_x86_64.whl (299 kB) ━━━━━━━━━━━━━━━━━━━━━━━━━━━━━━━━━━━━━━━━ 299.3/299.3 kB 4.0 MB/s eta 0:00:00 Downloading zope.hookable-6.0-cp311-cp311-manylinux_2_5_x86_64.manylinux1_x86_64.manylinux_2_17_x86_64.manylinux2014_x86_64.whl (23 kB) Downloading zope.i18n-5.1-py3-none-any.whl (798 kB) ━━━━━━━━━━━━━━━━━━━━━━━━━━━━━━━━━━━━━━━━ 798.8/798.8 kB 3.7 MB/s eta 0:00:00 Downloading AuthEncoding-5.0-py3-none-any.whl (8.7 kB) Downloading beautifulsoup4-4.12.3-py3-none-any.whl (147 kB) ━━━━━━━━━━━━━━━━━━━━━━━━━━━━━━━━━━━━━━━━ 147.9/147.9 kB 4.4 MB/s eta 0:00:00 Downloading python_gettext-5.0-py3-none-any.whl (13 kB) Downloading roman-4.2-py3-none-any.whl (5.5 kB) Downloading WSGIProxy2-0.5.1-py3-none-any.whl (9.2 kB) Downloading zc.lockfile-3.0.post1-py3-none-any.whl (9.8 kB) Downloading zope.annotation-5.0-py3-none-any.whl (14 kB) Downloading zope.cachedescriptors-5.0-py3-none-any.whl (13 kB) Downloading zope.deprecation-5.0-py3-none-any.whl (10 kB) Downloading zope.dottedname-6.0-py3-none-any.whl (6.4 kB) Downloading zope.filerepresentation-6.0-py3-none-any.whl (8.3 kB) Downloading zope.structuredtext-5.0-py3-none-any.whl (92 kB) ━━━━━━━━━━━━━━━━━━━━━━━━━━━━━━━━━━━━━━━━ 92.5/92.5 kB 4.0 MB/s eta 0:00:00 Downloading WebOb-1.8.7-py2.py3-none-any.whl (114 kB) ━━━━━━━━━━━━━━━━━━━━━━━━━━━━━━━━━━━━━━━━ 115.0/115.0 kB 4.2 MB/s eta 0:00:00 Installing collected packages: multipart, zope.testing, zope.structuredtext, zope.sequencesort, zope.interface, zope.i18nmessageid, zope.hookable, zope.event, zope.dottedname, zope.deprecation, zope.datetime, zope.contenttype, zope.cachedescriptors, zodbpickle, ZConfig, zc.lockfile, WebOb, waitress, SoupSieve, roman, RestrictedPython, python-gettext, PasteDeploy, ExtensionClass, Chameleon, AuthEncoding, zope.tales, zope.tal, zope.size, zope.schema, zope.proxy, zope.processlifetime, zope.lifecycleevent, zope.exceptions, zope.component, zope.browser, WSGIProxy2, transaction, persistent, MultiMapping, DateTime, BeautifulSoup4, Acquisition, zope.location, zope.i18n, zope.filerepresentation, zope.deferredimport, zope.configuration, WebTest, Persistence, BTrees, zope.testbrowser, zope.security, zope.annotation, ZODB, zope.publisher, zope.traversing, zope.contentprovider, zExceptions, zope.pagetemplate, zope.globalrequest, zope.container, zope.browserresource, z3c.pt, AccessControl, zope.site, zope.ptresource, zope.browserpage, zope.browsermenu, DocumentTemplate, zope.viewlet, zope Successfully installed AccessControl-6.3 Acquisition-5.2 AuthEncoding-5.0 BTrees-5.2 BeautifulSoup4-4.12.3 Chameleon-4.5.4 DateTime-5.5 DocumentTemplate-4.6 ExtensionClass-5.1 MultiMapping-5.0 PasteDeploy-3.1.0 Persistence-4.1 RestrictedPython-7.2a1.dev0 SoupSieve-2.5 WSGIProxy2-0.5.1 WebOb-1.8.7 WebTest-3.0.0 ZConfig-4.1 ZODB-6.0 multipart-0.2.4 persistent-5.2 python-gettext-5.0 roman-4.2 transaction-4.0 waitress-3.0.0 z3c.pt-4.3 zExceptions-5.0 zc.lockfile-3.0.post1 zodbpickle-3.3 zope-5.10 zope.annotation-5.0 zope.browser-3.0 zope.browsermenu-5.0 zope.browserpage-5.0 zope.browserresource-5.1 zope.cachedescriptors-5.0 zope.component-6.0 zope.configuration-5.0.1 zope.container-5.2 zope.contentprovider-5.0 zope.contenttype-5.1 zope.datetime-5.0.0 zope.deferredimport-5.0 zope.deprecation-5.0 zope.dottedname-6.0 zope.event-5.0 zope.exceptions-5.0.1 zope.filerepresentation-6.0 zope.globalrequest-2.0 zope.hookable-6.0 zope.i18n-5.1 zope.i18nmessageid-6.1.0 zope.interface-6.4 zope.lifecycleevent-5.0 zope.location-5.0 zope.pagetemplate-5.1 zope.processlifetime-3.0 zope.proxy-5.2 zope.ptresource-5.0 zope.publisher-7.0 zope.schema-7.0.1 zope.security-6.2 zope.sequencesort-5.0 zope.site-5.0 zope.size-5.0 zope.structuredtext-5.0 zope.tal-5.0.1 zope.tales-6.0 zope.testbrowser-6.0 zope.testing-5.0.1 zope.traversing-5.0 zope.viewlet-5.0 [root@docker-1f03724f8d16:/app]#由于要用到dnspod 申请SSL,我们多安装一下dnspod的依赖,避免这个包没安装成功导致其他问题:pip install certbot-dns-dnspod执行后,提示如下信息表面该依赖之前一安装成功:[root@docker-1f03724f8d16:/app]# pip install certbot-dns-dnspod Requirement already satisfied: certbot-dns-dnspod in /opt/certbot/lib/python3.11/site-packages (0.1.0) Requirement already satisfied: acme>=0.15.0 in /opt/certbot/lib/python3.11/site-packages (from certbot-dns-dnspod) (2.10.0) Requirement already satisfied: certbot>=0.15.0 in /opt/certbot/lib/python3.11/site-packages (from certbot-dns-dnspod) (2.10.0) Requirement already satisfied: cryptography>=3.2.1 in /opt/certbot/lib/python3.11/site-packages (from acme>=0.15.0->certbot-dns-dnspod) (42.0.7) Requirement already satisfied: josepy>=1.13.0 in /opt/certbot/lib/python3.11/site-packages (from acme>=0.15.0->certbot-dns-dnspod) (1.14.0) Requirement already satisfied: PyOpenSSL!=23.1.0,>=17.5.0 in /opt/certbot/lib/python3.11/site-packages (from acme>=0.15.0->certbot-dns-dnspod) (24.1.0) Requirement already satisfied: pyrfc3339 in /opt/certbot/lib/python3.11/site-packages (from acme>=0.15.0->certbot-dns-dnspod) (1.1) Requirement already satisfied: pytz>=2019.3 in /opt/certbot/lib/python3.11/site-packages (from acme>=0.15.0->certbot-dns-dnspod) (2024.1) Requirement already satisfied: requests>=2.20.0 in /opt/certbot/lib/python3.11/site-packages (from acme>=0.15.0->certbot-dns-dnspod) (2.31.0) Requirement already satisfied: setuptools>=41.6.0 in /opt/certbot/lib/python3.11/site-packages (from acme>=0.15.0->certbot-dns-dnspod) (66.1.1) Requirement already satisfied: ConfigArgParse>=1.5.3 in /opt/certbot/lib/python3.11/site-packages (from certbot>=0.15.0->certbot-dns-dnspod) (1.7) Requirement already satisfied: configobj>=5.0.6 in /opt/certbot/lib/python3.11/site-packages (from certbot>=0.15.0->certbot-dns-dnspod) (5.0.8) Requirement already satisfied: distro>=1.0.1 in /opt/certbot/lib/python3.11/site-packages (from certbot>=0.15.0->certbot-dns-dnspod) (1.9.0) Requirement already satisfied: parsedatetime>=2.4 in /opt/certbot/lib/python3.11/site-packages (from certbot>=0.15.0->certbot-dns-dnspod) (2.6) Requirement already satisfied: six in /opt/certbot/lib/python3.11/site-packages (from configobj>=5.0.6->certbot>=0.15.0->certbot-dns-dnspod) (1.16.0) Requirement already satisfied: cffi>=1.12 in /opt/certbot/lib/python3.11/site-packages (from cryptography>=3.2.1->acme>=0.15.0->certbot-dns-dnspod) (1.16.0) Requirement already satisfied: charset-normalizer<4,>=2 in /opt/certbot/lib/python3.11/site-packages (from requests>=2.20.0->acme>=0.15.0->certbot-dns-dnspod) (3.3.2) Requirement already satisfied: idna<4,>=2.5 in /opt/certbot/lib/python3.11/site-packages (from requests>=2.20.0->acme>=0.15.0->certbot-dns-dnspod) (3.7) Requirement already satisfied: urllib3<3,>=1.21.1 in /opt/certbot/lib/python3.11/site-packages (from requests>=2.20.0->acme>=0.15.0->certbot-dns-dnspod) (2.2.1) Requirement already satisfied: certifi>=2017.4.17 in /opt/certbot/lib/python3.11/site-packages (from requests>=2.20.0->acme>=0.15.0->certbot-dns-dnspod) (2024.2.2) Requirement already satisfied: pycparser in /opt/certbot/lib/python3.11/site-packages (from cffi>=1.12->cryptography>=3.2.1->acme>=0.15.0->certbot-dns-dnspod) (2.22) [root@docker-1f03724f8d16:/app]#三、功能验证安装依赖后,我们再次安装就没有异常错误提示信息了:loading完后申请成功:四、后记为保证后续能稳定的使用修复后的功能,避免出现容器删除后再次运行出现同样的问题,将修正后的容器另存为一个镜像并修改 docker-compose 的镜像:sudo docker commit nginxProxyManager zhuzl/nginx-proxy-manager:2.11.1-ssl
-
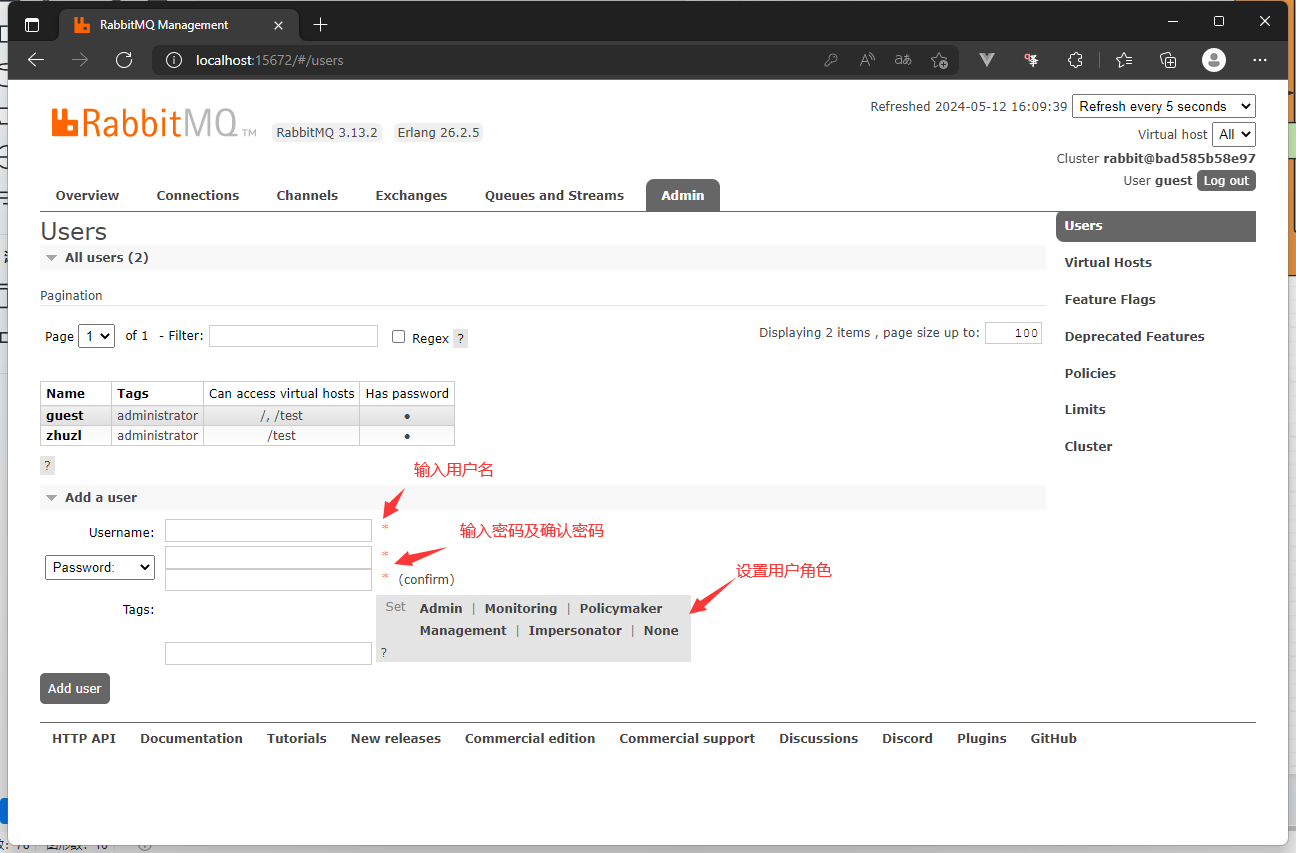
RabbitMQ学习:③基本使用 初始配置添加用户使用默认的 guest 账号登录后,可以在 Admin → Users中添加用户:添加 Virtual Host在Admin → Virtual Hosts 中添加虚拟机:给用户授权点击 Virtual Host 的名称,进入详情界面,可在Permissions中给新建的用户设置权限:建立连接1、新建Maven 项目2、导入依赖<?xml version="1.0" encoding="UTF-8"?> <project xmlns="http://maven.apache.org/POM/4.0.0" xmlns:xsi="http://www.w3.org/2001/XMLSchema-instance" xsi:schemaLocation="http://maven.apache.org/POM/4.0.0 http://maven.apache.org/xsd/maven-4.0.0.xsd"> <modelVersion>4.0.0</modelVersion> <groupId>net.x2m</groupId> <artifactId>rabbitmq</artifactId> <version>1.0-SNAPSHOT</version> <properties> <maven.compiler.source>17</maven.compiler.source> <maven.compiler.target>17</maven.compiler.target> <project.build.sourceEncoding>UTF-8</project.build.sourceEncoding> </properties> <dependencies> <dependency> <groupId>com.rabbitmq</groupId> <artifactId>amqp-client</artifactId> <version>5.21.0</version> </dependency> <dependency> <groupId>junit</groupId> <artifactId>junit</artifactId> <version>4.13.2</version> <scope>test</scope> </dependency> </dependencies> </project>3、创建工具类连接 RabbitMQpublic static Connection getConnection() { ConnectionFactory factory = new ConnectionFactory(); factory.setHost("localhost"); factory.setPort(5672); factory.setUsername("zhuzl"); factory.setPassword("123456"); factory.setVirtualHost("/test"); Connection conn = null; try { conn = factory.newConnection(); } catch (IOException e) { throw new RuntimeException(e); } catch (TimeoutException e) { throw new RuntimeException(e); } return conn; }4、代码层面获取连接后,在管理界面可以看到如下连接信息:5、点击Name 可查看连接详情如下:6、调试界面的连接信息:
-
-
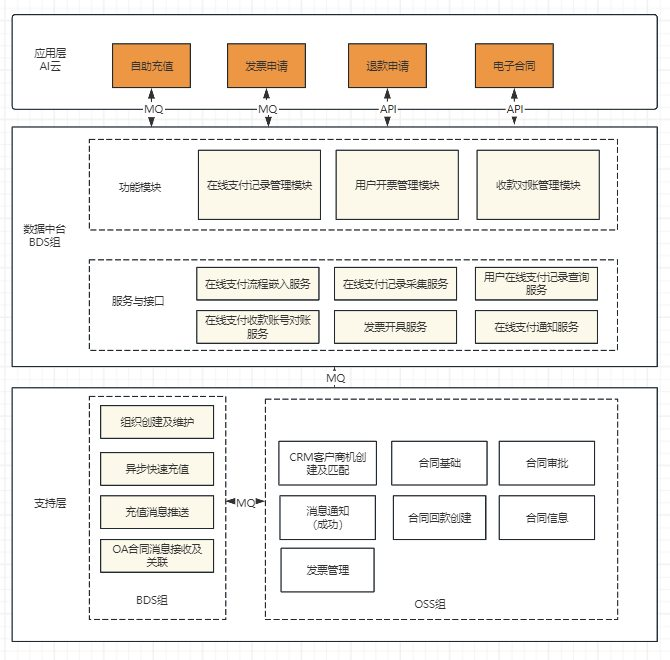
RabbitMQ学习:①安装 背景近期参与公司的在线充值业务的功能开发,该业务涉及多个系统交互,采用MQ的方式实现跨系统通讯:而在我既往的项目经验中还未使用过 MQ,便利用工作之余对相关的知识点进行补充学习。本系列内容即是我的一个0基础入门学习记录,仅做参考。RabbitMQ 基本介绍RabbitMQ 是一个由 Erlang 语言开发的 AMQP 的开源实现。Erlang是为电话交换机编写的语言,天然对分布式和高并发支持良好。常用MQ对比比较项RabbitMQActiveMQRocketMQKafka公司/社区Broadcom Inc.Apache阿里Apache开发语言ErlangJavaJavaScala&Java协议支持AMQP,XMPP,SMTP,STOMPoPENwIRE,stomp,REST,XMPP,AMQP自定义自定义协议,社区封装了http协议支持客户端支持语言官方支持Erlang,Java,Ruby,PHP,.NET,GO,JS等,社区产出多种API,几乎支持所有语言Java,C,C++,Python,PHP,Perl,.NET等Java,C++官方支持Java,社区产出多种API,如PHP,Python等单机吞吐量万级(其次)万级(最差)十万级(最好)十万级(次之)消息延迟微秒级毫秒级毫秒级毫秒以内功能特性并发能力强,性能极其好,延时低,社区活跃,管理界面丰富老牌产品,成熟度高,文档较多MQ功能必要完备,扩展性佳只支持主要的MQ功能,主要为大数据领域场景安装 RabbitMQ为快速安装部署,使用 docker compose 方式运行,docker-compose.yaml文件内容如下:services: rabbitmq: image: rabbitmq:management restart: always container_name: rabbitmq ports: - 5672:5672 - 15672:15672 volumes: - ./data:/var/lib/rabbitmq使用 docker compose up -d 启动后,使用浏览器访问如下地址:http://localhost:15672/,显示如下界面则表示 RabbitMQ 运行成功:在上面的登录界面使用 guest 作为用户名和密码登录,打开如下图所示的主界面:
-
-
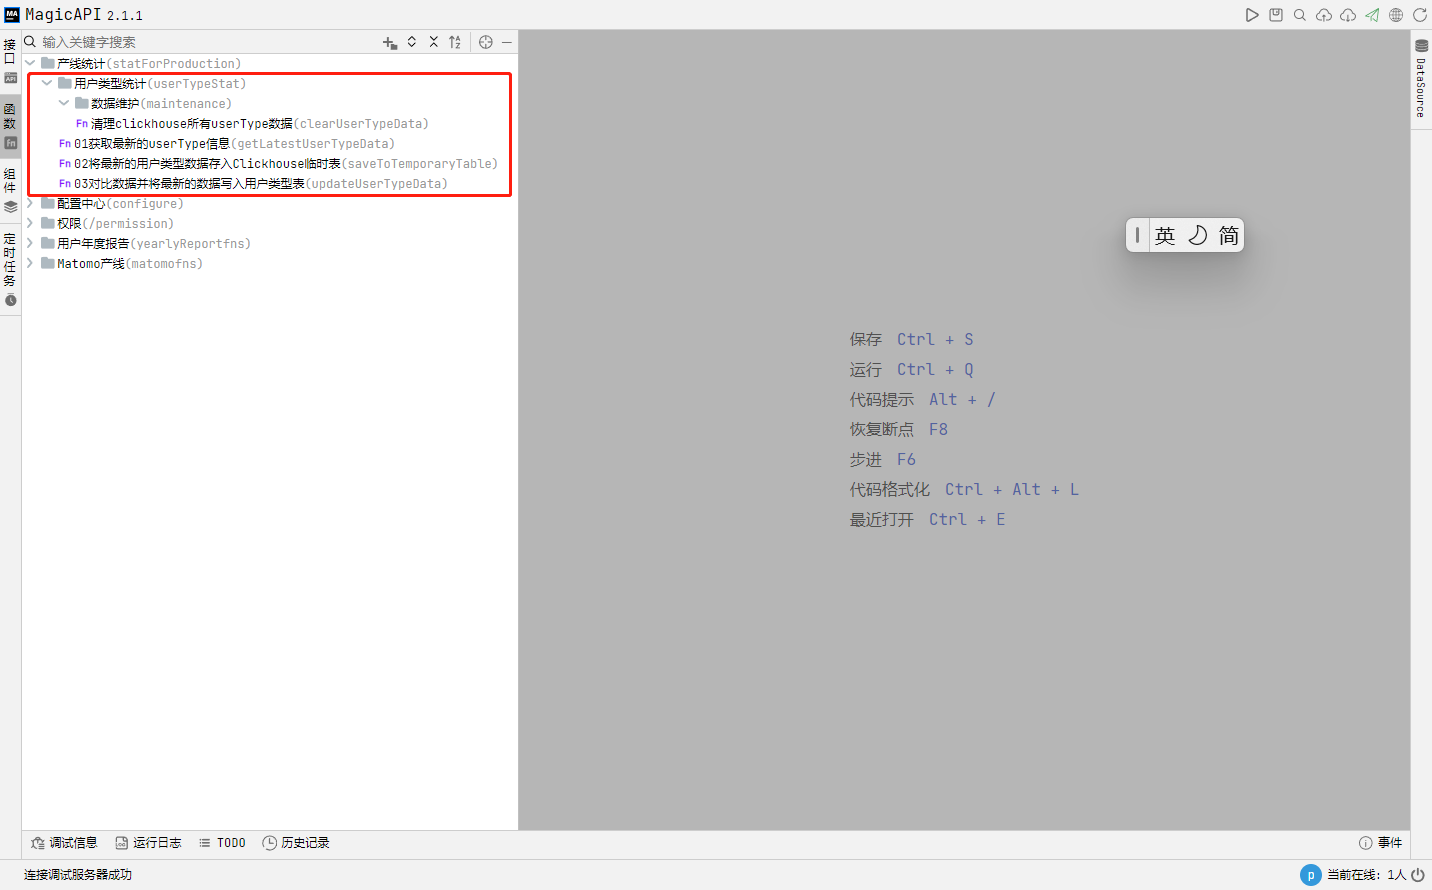
基于 Magic-api + Clickhouse 实现业务数据更新的项目记录 背景介绍项目有用到 Clickhouse 作为数仓,存储一些用户日常业务产生的大数据,下面先简单介绍一下我们这个任务的需求背景:我们的每个用户都会归属于某个用户组,并基于用户所在的计费组织实现产品使用过程中的消费等情况。而按照系统的设定用户初始注册时是没有归属用户组的,计费组织的主账号可以在控制台将用户绑定到该计费组下,也可以解绑,解绑后也可以绑定到其他用户组。为了更好的这个变更情况,我们在 Clickhouse 添加了一张名为 user_type 的表,每次该数据变更都会新增一条记录,该表的结构如下:CREATE TABLE user_type ( `user_id` Nullable(String), `present_type` Nullable(String), `pay_type` Nullable(String), `group_type` Nullable(String), `start_date` Nullable(Date), `end_date` Nullable(Date), `uni_key` Nullable(String) ) ENGINE = Log;实现方案本项目初期由使用 dbt + Clickhouse 的方式来实现,但是经实践运行一段时间后发现 dbt 做数据同步很方便,但是要添加一些业务逻辑就显得很棘手。为了解决 dbt 的问题,我们使用已搭建的 magic-api 来实现这个数据的更新,由于相关数据仅需一天一更新即可,所以我们可以直接利用 magic-api 自带的定时任务机制来实现更新。技术细节为便于相关业务逻辑在接口和定时任务中复用,我们将核心代码写在函数模块中:相关步骤核心代码如下步骤:1、从计费系统获取最新的userType信息var statSQL = `select e.*, CONCAT(e.user_id,'-',e.present_type,'-',e.pay_type,'-',e.group_type,'-',date_format(e.start_date,'%Y-%m-%d')) as uni_key FROM( SELECT a.user_id, CASE WHEN EXISTS ( SELECT 1 FROM ( SELECT t1.user_id user_id from b_contract t1 LEFT JOIN b_contract_item t2 ON t1.id = t2.contract_id WHERE t2.is_present = 0 and t2.received_payments > 0 GROUP BY t1.user_id UNION SELECT u2.user_id user_id from b_user as u1, b_user as u2 where u1.group_id=u2.group_id AND u1.user_id != u2.user_id AND EXISTS( SELECT 1 FROM (SELECT t1.user_id from b_contract t1 LEFT JOIN b_contract_item t2 ON t1.id = t2.contract_id WHERE t2.is_present = 0 and t2.received_payments > 0 GROUP BY t1.user_id) c WHERE c.user_id = u1.user_id ) ) d WHERE a.user_id = d.user_id ) then 'pay' else 'no pay' END as present_type, CASE WHEN EXISTS( SELECT 1 FROM( SELECT t1.user_id FROM b_user t1 , b_group t2 WHERE t1.user_id=t2.pay_user_id AND t2.pay_user_id IS NOT NULL )b WHERE a.user_id = b.user_id ) THEN 'master' ELSE 'slave' END as pay_type, CASE WHEN EXISTS(SELECT 1 FROM(SELECT t1.user_id FROM b_user t1 WHERE t1.group_id IS NOT NULL)b WHERE a.user_id = b.user_id) THEN 'group' ELSE 'no group' END as group_type, CURRENT_DATE as start_date, DATE(null) as end_date FROM b_user a )e` return db['NB'].select(statSQL)2、将上一步获取到的信息存储到Clickhouse 的一张临时表import log; import cn.hutool.core.date.DateUtil; import '@/statForProduction/userTypeStat/getLatestUserTypeData' as getLatestUserType; // ------------------- 一、创建临时表 ------------------- const TEMP_TABLE_NAME = 'user_type_temp' var checkExistRes = db['CH'].select(`SELECT 1 FROM system.tables WHERE database = 'dw' AND name = '${TEMP_TABLE_NAME}'`) log.info(checkExistRes.size() + '') // 不存在表的话就基于 user_type 表创建一张临时表 if (checkExistRes.size() === 0) { var initTemporaryTableSQL = `CREATE TABLE ${TEMP_TABLE_NAME} as user_type` db['CH'].update(initTemporaryTableSQL) } else { // 临时表存在则先清空临时表的数据,便于下一步将输入存入临时表 var truncateTemporaryTableSQL = `truncate table ${TEMP_TABLE_NAME}` db['CH'].update(truncateTemporaryTableSQL) } // ------------------- 二、获取最新的用户类型数据 ------------------- log.info(`============ 开始从计费系统获取最新的用户类型数据,该操作耗时较长,请耐心等待 ============`) var timer = DateUtil.timer() const userTypeList = getLatestUserType() log.info(`getLatestUserType cost time: ${timer.intervalPretty()}.`) // ------------------- 三、将数据存入临时表 ------------------- const BATCH_INSERT_COUNT = 1000 // 分批次入临时表,一次插入记录条数 var timer = DateUtil.timer() const allDataCount = userTypeList.size() if (allDataCount > 0) { log.info(`开始导入数据到临时表,待导入的总记录数为:${allDataCount},预计分${Math.ceil(allDataCount/BATCH_INSERT_COUNT)::int}批导入。`) const willInsertArr = [] var insertSQL = `insert into ${TEMP_TABLE_NAME}(user_id,present_type,pay_type,group_type,start_date,end_date,uni_key)` // 分批次插入临时表 for (index,userTypeItem in userTypeList) { willInsertArr.push(`('${userTypeItem.userId}','${userTypeItem.presentType}','${userTypeItem.payType}','${userTypeItem.groupType}','${userTypeItem.startDate}', null,'${userTypeItem.uniKey}')`) if (willInsertArr.size() === BATCH_INSERT_COUNT) { db['CH'].update(`${insertSQL} values${willInsertArr.join(',')}`) // 清空数据 willInsertArr.clear() log.info('Batch insert:' + index) } } // 不满整批次数据单独处理 if (willInsertArr.size() > 0) { db['CH'].update(`${insertSQL} values${willInsertArr.join(',')}`) // 清空数据 willInsertArr.clear() } } log.info(`insert latest user type to Temporary Table cost time: ${timer.intervalPretty()}.`) return true3、将临时表数据跟前一次最新的用户数据对比后,将有变更和新增的数据写入user_type表import log; import cn.hutool.core.date.DateUtil; const LATEST_TABLE_NAME = 'user_type_latest' // 用户最新类型数据表 const TEMP_TABLE_NAME = 'user_type_temp' // 该表存储从计费表获取到用户当前的用户类型数据,已在上一步获取数据完毕 // 一、从user_type表获取所有用户最新的用户类型数据并插入到用于计算的临时表 // 1.1 新建临时表,用于存储每个用户user_type 表中最新的用户类型数据 var checkExistRes = db['CH'].select(`SELECT 1 FROM system.tables WHERE database = 'dw' AND name = '${LATEST_TABLE_NAME}'`) log.info(checkExistRes.size() + '') // 不存在表的话就基于 user_type 表创建一张临时表 if (checkExistRes.size() === 0) { var initTemporaryTableSQL = `CREATE TABLE ${LATEST_TABLE_NAME} as user_type` db['CH'].update(initTemporaryTableSQL) } else { // 临时表存在则先清空临时表的数据,便于下一步将输入存入临时表 var truncateTemporaryTableSQL = `truncate table ${LATEST_TABLE_NAME}` db['CH'].update(truncateTemporaryTableSQL) } // 1.2 将最新数据写入临时表 // 该方式在数据量较大的情况下极有可能导致内存溢出,拟采取其他方案:在user_type 数据初始化的时候,将最新的用户类型数据存储到user_type_latest表,对比更新完成后将临时表的数据更新到user_type_latest便于下次对比 // const insertLatestDataSQL = `insert into ${LATEST_TABLE_NAME} SELECT user_type.user_id uid,user_type.present_type ,user_type.pay_type ,user_type.group_type,user_type.start_date,user_type.end_date,user_type.uni_key // FROM user_type, (SELECT user_type.user_id uid2,max(user_type.start_date) AS latestDate FROM user_type GROUP BY user_type.user_id) AS temp // WHERE user_type.start_date = temp.latestDate and uid = temp.uid2` // db['CH'].update(insertLatestDataSQL) // 二、两个临时表的数据做对比,并将最新数据更新到 user_type var timer = DateUtil.timer() // 2.1 更新有变更的数据 const changedInsertSQL = `insert into user_type select tuts.* from ${LATEST_TABLE_NAME} tutl left join ${TEMP_TABLE_NAME} tuts on tutl.user_id =tuts.user_id where tutl.present_type != tuts.present_type or tutl.pay_type != tuts.pay_type or tutl.group_type != tuts.group_type` timer.start("insertChangeData") db['CH'].update(changedInsertSQL) // 2.2 新增用户数据直接插入 timer.start("insertNewData") const insertNewUserSQL = `insert into user_type select * from ${TEMP_TABLE_NAME} tuts where tuts.user_id not in (select tutl.user_id from ${LATEST_TABLE_NAME} tutl) ` db['CH'].update(insertNewUserSQL) // 三、如果有数据更新,则将临时表的数据替换latest表 // 3.1 清理已有的数据 const truncateLatestTableSQL = `truncate table ${LATEST_TABLE_NAME}` db['CH'].update(truncateLatestTableSQL) // 3.2 从临时表导入最新的数据 const initialLatestTableDataSQL = `insert into ${LATEST_TABLE_NAME} select * from ${TEMP_TABLE_NAME}` db['CH'].update(initialLatestTableDataSQL) log.info(`insertChangeData cost time: ${timer.intervalPretty('insertChangeData')}`) log.info(`insertNewUser cost time: ${timer.intervalPretty('insertNewData')}`) // 四、清理临时表 const dropTempTableSQL = `drop table ${TEMP_TABLE_NAME}` db['CH'].update(dropTempTableSQL) return true 定义好相关函数后,我们可以直接在接口中用起来了,为此我定义了两个接口,一个接口用于数据初始化,一个接口用于手动更新数据:接口定义01数据初始化import log; import '@/statForProduction/userTypeStat/maintenance/clearUserTypeData' as clearUserTypeData import '@/statForProduction/userTypeStat/saveToTemporaryTable' as saveToTemporaryTable const LATEST_TABLE_NAME = 'user_type_latest' // 用户最新类型数据表 const TEMP_TABLE_NAME = 'user_type_temp' // 该表存储从计费表获取到用户当前的用户类型数据 // 一、清空所有user_type表的数据 clearUserTypeData() // 二、一次性写入所有 saveToTemporaryTable() // 三、将临时表的所有数据一次性写入user_type 表作为初始数据 const initialUserTypeDataSQL = `insert into user_type select * from ${TEMP_TABLE_NAME}` db['CH'].update(initialUserTypeDataSQL) // 四、将数据写入最新用户类型表,便于下一次做数据比对 // 4.1 基于 user_type 表 创建 user_type_latest 表 var checkExistRes = db['CH'].select(`SELECT 1 FROM system.tables WHERE database = 'dw' AND name = '${LATEST_TABLE_NAME}'`) log.info(checkExistRes.size() + '') // 不存在表的话就基于 user_type 表创建一张 if (checkExistRes.size() === 0) { var createLatestTableSQL = `CREATE TABLE ${LATEST_TABLE_NAME} as user_type` db['CH'].update(createLatestTableSQL) } else { // 表存在则先清空表的数据,便于下一步将最新的用户类型数据存入该表 var truncateLatestTableSQL = `truncate table ${LATEST_TABLE_NAME}` db['CH'].update(truncateLatestTableSQL) } // 4.2 插入该表的初始数据 const initialLatestTableDataSQL = `insert into ${LATEST_TABLE_NAME} select * from ${TEMP_TABLE_NAME}` db['CH'].update(initialLatestTableDataSQL) // 五、清理临时表 const dropTempTableSQL = `drop table ${TEMP_TABLE_NAME}` db['CH'].update(dropTempTableSQL) 02手工同步用户类型数据/** * 本接口用于手工临时同步数据用,日常使用定时任务自动同步操作即可 */ import '@/statForProduction/userTypeStat/saveToTemporaryTable' as saveToTemporaryTable import '@/statForProduction/userTypeStat/updateUserTypeData' as updateUserTypeData saveToTemporaryTable() updateUserTypeData()添加定时任务本任务用到的部分 Clickhouse SQL-- 判断数据表是否存在 SELECT 1 FROM system.tables WHERE database = 'dw' AND name = 'temp_user_type_session' -- 根据user_type 表创建一张名为 temp_user_type_session 的临时表 CREATE TABLE temp_user_type_session as user_type; -- 清空某数据表中的所有内容 truncate table temp_user_type_session; -- 查询所有用户最新的用户类型数据 SELECT user_type.user_id uid,user_type.present_type ,user_type.pay_type ,user_type.group_type,user_type.start_date,user_type.end_date,user_type.uni_key FROM user_type, (SELECT user_type.user_id uid2,max(user_type.start_date) AS latestDate FROM user_type GROUP BY user_type.user_id) AS temp WHERE user_type.start_date = temp.latestDate and uid = temp.uid2; -- 获取有差异的数据 select tutl.*,tuts.user_id user_id2, tuts.present_type present_type2, tuts.pay_type pay_type2, tuts.group_type group_type2, tuts.start_date start_date2,tuts.uni_key uni_key2 from temp_user_type_latest tutl left join temp_user_type_session tuts on tutl.user_id =tuts.user_id where tutl.present_type != tuts.present_type or tutl.pay_type != tuts.pay_type or tutl.group_type != tuts.group_type;
-
用户年度报告项目复盘 成果展示一图胜千言,我们先用视频来看实现好的最终效果,如果感兴趣我们再往下面了解技术实现细节。{gird column="2" gap="15"}{gird-item}{dplayer src="/usr/uploads/2024/07/1631300825.mp4"/}{mtitle title="并行版年度计算报告"/}预览网址(未对接接口版本,PC端直接访问会调整到扫码页面):http://para-yearly-report.work.zhuzhilong.com/{/gird-item}{gird-item}{dplayer src="/usr/uploads/2024/07/1449014954.mp4"/}{mtitle title="北龙版年度报告"/}预览网址(未对接接口版本,PC端直接访问会调整到扫码页面):http://blsc-yearly-report.work.zhuzhilong.com/{/gird-item}{/gird}缘起2023 年 12 月 20 日,网易云音乐 2023 年度听歌报告正式上线,一些是年度报告的部分截图:体验完网易云音乐的年度听歌报告后,感觉咱们也可以推出一款类似的报告,以下是跟运营同事的沟通截图:运营同事效率也是相当的高,第二天一早便梳理了我们年度报告的脑图:做好基础的准备工作后,当天跟领导确认了本项目的可行性:得到了领导的认可,就可以开展下一步的工作了。接着运营同事针对脑图的数据做了进一步的细化,梳理了需求文档:运营同事在需求文档中规划了每页展示的内容,下一步就可以交给设计的同事开展相关页面的设计工作了,为此专门拉了个小群沟通相关设计细节:不得不说负责设计的同事也是超级给力,很快就提供了高质量的设计稿:而且超级专业地提供了相关页面的动效设计说明:开干编写设计文档需求有了,设计也有了,我们就可以开工干活了。编码工作之前,我们需要根据需求和设计稿,进行技术相关的详细设计文档编写工作,这样才能更好的指导后续的编码开发工作,为此我详细编写了40页超过4000字的详细设计文档:规划年报数据在上面的详设文档中详细的规划了每一页所需的数据,每一页数据的来源,以及每个用户年报数据的组织形式、存储方式。有了这些数据做支撑后,就是怎么将这些数据按运营要求收集起来,由于数据分散在不同的业务系统里,如用户系统、计费系统、用户行为系统。需要将相关的数据收集后并归总,为此,我们设计了数据合并机制。用户年报页面实现现在需要的数据也有了,只需要将年报页面按照 UI 效果进行实施即可。由于整体项目采用前后端分离的机制,用户看到的年报页面也采用独立的 git 工程进行维护,完成代码后单独打包部署即可。整个前端页面,使用 vite 进行工程构建,使用 vue3 进行界面驱动,使用 swiper + vant-ui 实现基本页面布局,使用 echarts + vue-echarts 实现工程的图表效果,使用 animate.css 实现界面动效,工程的package.json 信息如下:{ "name": "console-yearlyreport-ui", "private": true, "version": "0.0.0", "type": "module", "scripts": { "dev": "vite", "dev:blsc": "vite --mode blsc.development", "devIstio": "vite build --mode devIstio", "devIstio:blsc": "vite build --mode blsc.devIstio", "stage": "vite build --mode stage", "stage:blsc": "vite build --mode blsc.stage", "build": "vite build", "build:report": "vite build", "build:blsc": "vite build --mode blsc.production" }, "dependencies": { "animate.css": "^4.1.1", "axios": "0.21.4", "dayjs": "^1.11.10", "echarts": "^5.4.3", "lodash": "^4.17.21", "pinia": "^2.1.7", "swiper": "^11.0.5", "vant": "^4.8.3", "vue": "^3.3.11", "vue-echarts": "^6.6.8" }, "devDependencies": { "@vitejs/plugin-vue": "^4.5.2", "rollup-plugin-visualizer": "^5.12.0", "sass": "^1.70.0", "terser": "^5.27.0", "vite": "^5.0.8", "vite-plugin-compression": "^0.5.1" } }前端工程的整体目录结构:下面就一些核心代码做一些梳理main.js该文件为项目入口文件,主要对环境做了些特殊处理,如未登录则跳转到登录页;PC端访问则跳转到扫码页面,引导用户使用手机扫码访问等。import { createApp } from 'vue' import { createPinia } from 'pinia' import 'animate.css' import './style.css' import '@/styles/index.scss' import { registerComponents } from './components/index' import initMatomo from './core/matomo/index.js' import App from './App.vue' const { VITE_APP_DIST_MODE: distMode } = import.meta.env /** * 检测浏览器环境,如果是PC端浏览器访问活动页则直接重定向到二维码扫码页面 */ const checkBrowser = () => { // 根据user-agent 判断是否跳转到pc页面 if (window.matchMedia && window.matchMedia("(min-width: 768px)").matches) { window.location.href = `pc_${distMode}.html` return false } return true } /** * 检测用户登录情况,如果localStorage 中不包含 token 则自动重定向到移动端授权页面 */ const checkLogin = () => { const token = localStorage.getItem('token') if (!token) { localStorage.setItem('authForExternalPage', `/yearly-report-2023/` + location.search) location.href='/auth' return false } return true } const checkEnv = async () => { if (!checkBrowser()) { return } // // 检测用户登录情况 if (!checkLogin()) { return } const pinia = createPinia() const app = createApp(App) // 注册全局组件 registerComponents(app) app.use(pinia) app.mount('#app') initMatomo(app, null) // 根节点添加样式名,便于对部分样式根据主题进行灵活控制 $('html').addClass(`theme-${distMode}`) } checkEnv() App.vue这是页面入口的核心文件,在这个文件里使用swiper组织了所有页面,并根据各种不同的条件做了不同展示处理(未登录、资源预加载时显示加载中、加载完成后展示封面页;封面页未勾选协议则无法滑动等); 并从整体上收集用户行为数据,完整代码如下:<template> <div v-if="existReportData === false"> <not-exist-data-page /> </div> <div v-else-if="pageResourceLoading" class="page-loading"> <van-circle v-model:current-rate="resourceLoadPercent" :rate="100" :speed="100" size="180px" :layer-color="themeColors.themeLight6" :color="gradientColor" :stroke-width="50" :text="resourceLoadPercent + '%'" /> <p class="loading-tips-text">页面加载中,请稍候</p> <!-- <van-progress :stroke-width="8" style="width: 90%" color="linear-gradient(to right, #be99ff, #7232dd)" :percentage="resourceLoadPercent" /> --> </div> <swiper v-else :slides-per-view="1" :direction="'vertical'" :space-between="0" effect="fade" @swiper="onSwiper" @slideChange="onSlideChange" @slideChangeTransitionEnd="onSlideChangeTransitionEnd" > <swiper-slide class="swiper-page0" data-page-name="封面页"><enter-page /></swiper-slide> <swiper-slide class="swiper-page1" data-page-name="第一页"><page1 /></swiper-slide> <swiper-slide class="swiper-page2" data-page-name="第二页"><page2 /></swiper-slide> <!-- <swiper-slide class="swiper-page3" data-page-name="第三页"><page3 /></swiper-slide> --> <swiper-slide class="swiper-page4" data-page-name="第四页"><page4 /></swiper-slide> <swiper-slide class="swiper-page5" data-page-name="第五页"><page5 /></swiper-slide> <swiper-slide class="swiper-page6" data-page-name="第六页"><page6 /></swiper-slide> </swiper> <img v-show="showUpArrow" src="/images/icon_arrow_up.png" class="arrow-up animate__animated animate__infinite animate__fadeInUp animate__slower" alt="提示上划" /> </template> <script setup> import { defineComponent, onMounted, ref, watch } from "vue"; import { Swiper, SwiperSlide } from "swiper/vue"; import "swiper/css"; import { checkReportData } from './api/yearlyReportAPI' import EnterPage from "./pages/EnterPage.vue"; import NotExistDataPage from "./pages/NotExistDataPage.vue"; import Page1 from "./pages/Page1.vue"; import Page2 from "./pages/Page2.vue"; // import Page3 from "./pages/Page3.vue"; import Page4 from "./pages/Page4.vue"; import Page5 from "./pages/Page5.vue"; import Page6 from "./pages/Page6.vue"; import { imagesLoad } from './core/imgLoad.min.js' import resourceImgs from './assets/imgResources.json' import themeColors from '@/core/themeColors.js' import { getShortUserId, getQueryString } from './core/utils.js' defineComponent({ components: { Swiper, SwiperSlide, }, }); const existReportData = ref() // 页面资源加载 const pageResourceLoading = ref(true) const resourceLoadPercent = ref(0) const gradientColor = { '0%': themeColors.themeLight3, '100%': themeColors.theme, } window.currentSwiper = null; const currentSwiperIndex = ref(0); const showUpArrow = ref(false); watch(currentSwiperIndex, () => { if (window.currentSwiper === null) { return; } if (currentSwiperIndex.value === 0) { window.currentSwiper.disable(); } // 封面页和最后一页不显示向上箭头 if (currentSwiperIndex.value === 0 || currentSwiperIndex.value === window.currentSwiper.slides.length - 1) { showUpArrow.value = false; return; } showUpArrow.value = true; }); const clearAnimation = () => { const prevSlideEl = window.currentSwiper.slides[window.currentSwiper.previousIndex]; $(prevSlideEl) .find(".js-animation") .each(function (idx, item) { const $this = $(item); const animation = $this.attr("data-animation"); $this .removeClass("animate__animated") .removeClass("animate__" + animation) .removeAttr("style"); }); }; const addAnimation = () => { clearAnimation(); const currentSlideEl = window.currentSwiper.slides[window.currentSwiper.activeIndex]; $(currentSlideEl) .find(".js-animation") .each(function (index, item) { var $this = $(item); var animation = $this.attr("data-animation"); var duration = $this.attr("data-duration"); var delay = $this.attr("data-delay"); $this .addClass("animate__animated") .addClass("animate__" + animation) .css({ "animation-duration": duration + "s", "animation-delay": delay + "s" }); }); // 入口页灯效单独处理 if (currentSwiperIndex.value === 0) { const $el = $('.swiper-page0 .bg-light') if ($el.hasClass('hide')) { setTimeout(() => { $el.removeClass('hide') }, 1500) } } }; /** * 添加Matomo 事件埋点 */ const addMatomoEvent = () => { const pageName = $('.swiper-slide-active').attr('data-page-name') if (pageName) { window._paq && window._paq.push(['trackEvent', '2023年度报告', '查看', pageName]) } } /** * 根据URL参数添加用户来源埋点 */ const addSourceEvent = () => { const sourceMap = { direct: '直接访问', cloud: '云桌面', console: 'PC端控制台', mconsole: '移动端控制台', kbs: 'KBS内容页', email: '邮件海报' } const sourceInQuery = getQueryString('utm_source') let fromLabel = '直接访问' if (sourceInQuery) { const sourceLabel = sourceMap[sourceInQuery] if (sourceLabel) { fromLabel = sourceLabel } } window._paq && window._paq.push(['trackEvent', '2023年度报告', '来源', fromLabel]) } const onSwiper = (s) => { addMatomoEvent() addSourceEvent() // 默认不允许用户滑动,仅同意协议并单击「点击回顾」按钮后才可滑动 s.disable(); if (window.currentSwiper === null) { window.currentSwiper = s; } addAnimation(); }; const onSlideChange = () => { currentSwiperIndex.value = window.currentSwiper.activeIndex; addAnimation(); if (currentSwiperIndex.value === 1) { $('.swiper-page0 .bg-light').addClass('hide') } }; const onSlideChangeTransitionEnd = () => { addMatomoEvent() } onMounted(async () => { // 检测用户数据 const checkRes = await checkReportData() if (checkRes.exist === false) { existReportData.value = false window._paq && window._paq.push(['trackEvent', '2023年度报告', '查看', '无数据页']) return } if (checkRes.lastUpdateTime) { localStorage.setItem('yearlyReportDataUpdateTime_' + getShortUserId(), checkRes.lastUpdateTime) } new imagesLoad(resourceImgs, function (num) { resourceLoadPercent.value = num }, function () { resourceLoadPercent.value = 100 setTimeout(() => { pageResourceLoading.value = false }, 300) }) }) </script> <style lang="scss" scoped> .page-loading { width: 100%; height: 100vh; padding-bottom: 20vh; box-sizing: border-box; display: flex; flex-direction: column; align-items: center; justify-content: center; background: $theme-light-8; // background-color: #F8FDFF; } .loading-tips-text { font-size: 16px; color:$theme-light-6; font-weight: bold; text-align: center; } .swiper { width: 100%; height: 100vh; } .swiper-slide { height: 100vh; } .arrow-up { position: absolute; width: 30px; margin-left: -15px; left: 50%; bottom: 30px; z-index: 100; pointer-events: none; } </style> 优先从本地缓存获取用户年报数据用户年度计算报告的数据属于生成后基本上不会怎么变化的数据,而这种活动一般也是短期的,为减少活动推广期间可能出现的高并发场景对服务器资源的损耗,拟将用户指标数据在第一次获取后缓存在客户端,客户端存在用户缓存数据的情况下将直接使用缓存数据进行界面展示,流程如下图所示:核心代码如下:/** * 截取部分userId用于作为用户特征串 */ export function getShortUserId() { const userId = localStorage.getItem('userid') if (userId) { if (userId.length > 40) { return userId.substring(0, 40) } return userId } } /** * 获取用户年报数据,优先从缓存里取 */ export async function getUserReportData() { const shortUserId = getShortUserId() const reportDataInLocal = localStorage.getItem('yearlyReportData_' + shortUserId) if (reportDataInLocal) { const reportDataObj = JSON.parse(reportDataInLocal) const lastUpdateTimeInLocal = reportDataObj.lastUpdateTime const lastUpdateTimeFromServer = localStorage.getItem('yearlyReportDataUpdateTime_' + shortUserId) if(lastUpdateTimeInLocal === lastUpdateTimeFromServer) { return reportDataObj.reportData } } const res = await getReportData() if (res.reportData) { res.reportData = JSON.parse(res.reportData) localStorage.setItem('yearlyReportData_' + shortUserId, JSON.stringify(res)) } return res.reportData }UI 效果以下图片为实际实现好的界面截图并行版本{gird column="4" gap="15"}{gird-item}{mtitle title="资源预加载"/}{/gird-item}{gird-item}{mtitle title="封面页"/}{/gird-item}{gird-item}{mtitle title="第一页"/}{/gird-item}{gird-item}{mtitle title="第二页"/}{/gird-item}{gird-item}{mtitle title="第二页查看机时"/}{/gird-item}{gird-item}{mtitle title="第三页"/}{/gird-item}{gird-item}{mtitle title="第四页(0点-6点)"/}{/gird-item}{gird-item}{mtitle title="第四页(6点-12点)"/}{/gird-item}{gird-item}{mtitle title="第四页(12点-18点)"/}{/gird-item}{gird-item}{mtitle title="第四页(18点-24点)"/}{/gird-item}{gird-item}{mtitle title="第五页"/}{/gird-item}{gird-item}{mtitle title="第六页"/}{/gird-item}{/gird}北龙版本{gird column="4" gap="15"}{gird-item}{mtitle title="资源预加载"/}{/gird-item}{gird-item}{mtitle title="封面页"/}{/gird-item}{gird-item}{mtitle title="第一页"/}{/gird-item}{gird-item}{mtitle title="第二页"/}{/gird-item}{gird-item}{mtitle title="第二页查看机时"/}{/gird-item}{gird-item} {mtitle title="第三页"/}{/gird-item}{gird-item}{mtitle title="第四页(0点-6点)"/}{/gird-item}{gird-item}{mtitle title="第四页(6点-12点)"/}{/gird-item}{gird-item}{mtitle title="第四页(12点-18点)"/}{/gird-item}{gird-item}{mtitle title="第四页(18点-24点)"/}{/gird-item}{gird-item} {mtitle title="第五页"/}{/gird-item}{gird-item} {mtitle title="第六页"/}{/gird-item}{/gird}运营后台为了便于运营人员核对用户指标数据及预览用户年报效果,我们使用 MagicBoot 快速开发了一个运营后台,相关界面效果如下:{gird column="2" gap="15"}{gird-item}{mtitle title="活动用户列表界面"/}{/gird-item}{gird-item}{mtitle title="查看用户指标数据,供运营核对指标数据"/}{/gird-item}{gird-item}{mtitle title="运营人员可扫码预览用户年度计算报告"/}{/gird-item}{gird-item}{mtitle title="后台年度报告预览效果"/}{/gird-item}{/gird}运营大屏为了便于运营人员及时了解用户访问大屏情况,我们使用 DataGear 制作了一个运营大屏,界面效果如下:详设文档本活动的技术开发工作能顺利开展,前期的详细设计是重中之重,详细设计中把方方面面的问题都考虑到了,在开发和上线阶段才能做到从容不迫,以下是详设文档附件(由于部分材料涉密,该文档仅部分人员可访问): 以下内容已加密,请输入密码查看:
-
-
-
-
-
-
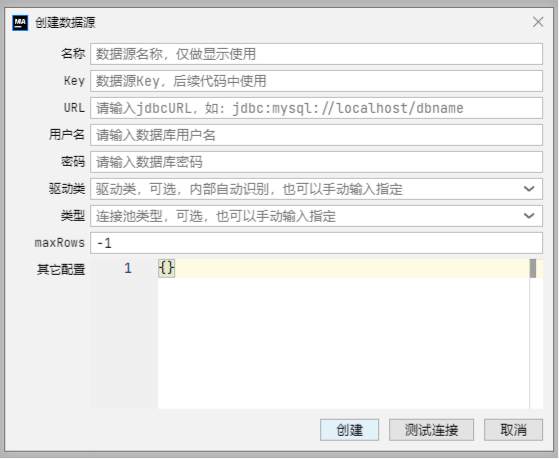
magic-boot 整合 Clickhouse 及在 magic-api 中的基本使用 项目有用到 Clickhouse 作为数仓, magic-boot 作为万金油般的存在,肯定是需要整合 Clickhouse 获取数据的,下面我们就开始吧。一、整合 clickhouse-jdbc 驱动根据clickhouse 官方文档的指引,在项目的 Maven 依赖管理文件(pom.xml)中的 dependencies 节点添加如下依赖项: <dependency> <groupId>com.clickhouse</groupId> <artifactId>clickhouse-jdbc</artifactId> <classifier>all</classifier> <version>0.6.0</version> </dependency>注:dependency 中一定要添加 <classifier>all</classifier>,否则会出现找不到依赖的className的异常二、magic-api 中添加数据源在 magic-api 主界面右侧的 DataSource 面板中,单击「+」按钮,打开「创建数据源」弹出层,如下图所示:相关表单项填写如下:名称:任意,只要自己能区别数据源即可Key:为便于在代码中引用,尽量采用简写URL:jdbc:(ch|clickhouse)[:<protocol>]://endpoint1,endpoint2,...?param1=value1¶m2=value2用户名:用户名密码:密码驱动类:com.clickhouse.jdbc.ClickHouseDriver类型:com.zaxxer.hikari.HikariDataSource。用Hikari 和 Druid 连接池测试都没碰到问题。本次测试填写后的连接池示例如下图所示:在 magic-api 中写测试代码进行功能验证创建数据表db['CH'].update(""" CREATE TABLE test_for_magic_boot ( `id` UUID, `user_name` String, `real_name` String, `birthday` Date, `gender` String ) ENGINE = MergeTree ORDER BY birthday SETTINGS index_granularity = 8192; """);添加测试数据// 添加数据要使用 update方法,使用insert 方法会报错。 // https://gitee.com/ssssssss-team/magic-api/issues/I4SQYW db['CH'].update(`insert into test_for_magic_boot(id,user_name,real_name,birthday,gender) values(#{uuid()},'shiyu', '时羽','1991-12-15', 'F'),(#{uuid()},'lint', '李宁涛','1985-11-19', 'M'),(#{uuid()},'gaowz', '高文中','1968-01-23', 'M')`)修改测试数据db['CH'].update(`update test_no_index set real_name='时大款' where user_name='shiyu'`) Clickhouse 更新操作有一些限制索引列不能进行更新分布式表不能进行更新不适合频繁更新或point更新查询数据return db['CH'].select('select * from test_for_magic_boot')删除数据db['CH'].update(`delete from test_for_magic_boot where user_name='lint'`)删除测试数据表db['CH'].update('drop table test_for_magic_boot');
-


![[转载]你写文档吗?你为什么应该写文档?](https://github.elemecdn.com/typecho-joe-latest/assets/thumb/15.jpg)