本系列文章生成的镜像站已上传到 Gitee Pages 托管平台,可通过如下地址查看完成后的效果:https://jhlxge.gitee.io/coolshell-mirror/
2024年6月5日更新 :Gitee Pages服务已停止提供服务,可通过本机托管的如下地址访问:https://coolshell-mirror.work.zhuzhilong.com/
通过前面的操作,我们已经得到了原站点所有的信息,为了能保障镜像站能永久提供服务,不依赖于后端的数据库及中间件,我们需要将爬取到的正文内容做静态化发布,静态化发布后,我们可以将内容托管到 Gitee 或 Github。
为了满足上面的使用场景,春节期间我调研试用了市面上大部分静态网站软件:Jekyll、Hugo、Hexo、VitePress。经过多方对比,我选择了让我上手最快的 Hexo + hexo-theme-butterfly主题。主要是Butterfly 主题的颜值确实没法说,而且功能也很齐全,通过简单的折腾也可以完全定义成我们想要的任何效果,算是能满足我对制作镜像站的所有需求。下面我们就开工。
安装 Hexo
根据 Hexo 的官方文档(链接为:https://hexo.io/zh-cn/index.html)的指引,我本地已经安装了 Node.js,我们直接通过下面的命令全局安装 Hexo。
npm install -g hexo-cli安装完 Hexo 后,我们需要使用 Hexo 的指令,初始化一个最原始的 Hexo 工程:
hexo init coolshell-mirror初始化后我们得到了一个基于 Node.js 的基础工程。
安装 hexo-theme-butterfly 主题
根据 hexo-theme-butterfly 主题的说明,我们需要在 hexo 工程的 themes 文件夹下克隆 https://github.com/jerryc127/hexo-theme-butterfly 的所有文件。命令如下:
git clone -b master https://github.com/jerryc127/hexo-theme-butterfly.git themes/butterfly克隆完后我们调整工程根目录下 _config.yml 中的 theme 值为 hexo-theme-butterfly。重启服务,我们就可以看到新主题的效果
Hexo 功能验证
做完上面的操作后,我们根据 Hexo 的规范,在 source/_posts 目录下,添加一篇 markdown 文档,验证一下相关的内容结构,经过验证我们可以得到如下结论:
1、内容元数据在 markdown 顶部的以--- 开头和结尾的中间,可以定义任意元数据,核心的元数据是 title、cover、date,tags、categories,也可以在这些元数据的基础上扩展其他的属性,新加的属性在模板中通过属性名获取数据。然后元数据后面是正文内容。
2、正文内容支持常规的 markdown 格式,同时也支持 html,可以使用 {% raw %}将内容包裹起来进行原生展示。
3、 添加内容后,可以使用 hexo generate 将整站内容静态化
生成博文内容
Hexo 功能验证完后,我们得到了正文内容的基本格式,然后我们可以使用 magic-api 根据格式生成对应的 markdown 文档,然后拷贝到 source/_posts 目录即可。以下是完整代码:
import cn.hutool.core.util.ObjectUtil
import cn.hutool.core.util.StrUtil
import org.jsoup.Jsoup
import cn.hutool.core.date.DateUtil
import cn.hutool.json.JSONUtil
import cn.hutool.core.io.FileUtil
import log
var timer = DateUtil.timer(); // 定义计时器,用于记录时间
var pageList = db['MDC'].select('select * from crawler_article where md_html is not null')
log.info("待处理记录数据:" + pageList.size())
// 对正文呢日哦那个做一些替换,提供为新站点的地址
var dealContent = (content) => {
    content = StrUtil.replace(content,'https://coolshell.cn/articles/','/articles/')
    content = StrUtil.replace(content,'https://coolshell.cn/wp-content/','/wp-content/')
    content = StrUtil.replace(content,'https://coolshell.cn/?tag=','/tags/')
    return content
}
for (item in pageList) {
    // 定义内容相关的元数据信息
    var mdHtml = item.mdHtml
    mdHtml = dealContent(mdHtml)
    var tags = item.tags
    // 生成符合 Hexo 规范的Tag词数据
    var tagList = []
    if (ObjectUtil.isNotEmpty(tags)) {
        tagList = tags.split(',')
    }
    // 生成符合 Hexo 规范的内容分类数据
    var category = item.categories
    var categoryList = []
    if (ObjectUtil.isNotEmpty(category)) {
        categoryList = JSONUtil.parseArray(category).map(item => item.name)
    }
    // 得到内容id,这里加上内容id主要是为了保障跟原站URL路径保持一致
    var articleId = item.pageUrl.substring(item.pageUrl.lastIndexOf('/') + 1, item.pageUrl.lastIndexOf('.html'))
    // 选取正文内容中的第一张图片作为内容封面图
    var coverImg = ''
    var contentImages = Jsoup.parse(mdHtml).select('img[src]')
    if (ObjectUtil.isNotEmpty(contentImages)) {
        coverImg = contentImages.get(0).attr('src')
    }
    // 文件内容
    var fileContent = `
---
id: ${articleId}
cover: '${coverImg}'
author: ${item.author}
title: "${item.articleTitle}"
originPageURL: '${item.pageUrl}'
voteCount: ${item.voteCount}
clickCount: ${item.clickCount}
wordCount: ${StrUtil.toString(item.articleText).length()}
date: ${DateUtil.formatLocalDateTime(item.publishDate)}
updated: ${DateUtil.formatLocalDateTime(item.crawlerTime)}
tags: ${JSONUtil.toJsonStr(tagList)}
categories: ${JSONUtil.toJsonStr(categoryList)}
---
{% raw %}
${mdHtml}
{% endraw %}
`
    // 写入到自定目录
    FileUtil.writeString(fileContent,FileUtil.file(`/MDC_DATA/coolshell/${articleId}.md`), "UTF-8")
}

log.info(`Cost Time: ${timer.intervalPretty()}.`);
执行上面的代码后,会在服务器上的制定目录得到所需的 markdown 文件列表,将生成的文件直接拷贝到 hexo 工程的 source/_posts 目录,将前面步骤爬取到的所有资源文件拷贝到source目录下,即大功告成。
全站搜索
通过 Hexo 和 hexo-theme-butterfly 官网的介绍,系统有自带的全站搜索插件,实现过程记录如下:
1、安装 hexo-generator-search 依赖
2、根目录的 _config.yml 文件夹下添加如下配置项:
search:
  path: search.json
  field: post
  content: true
  format: html
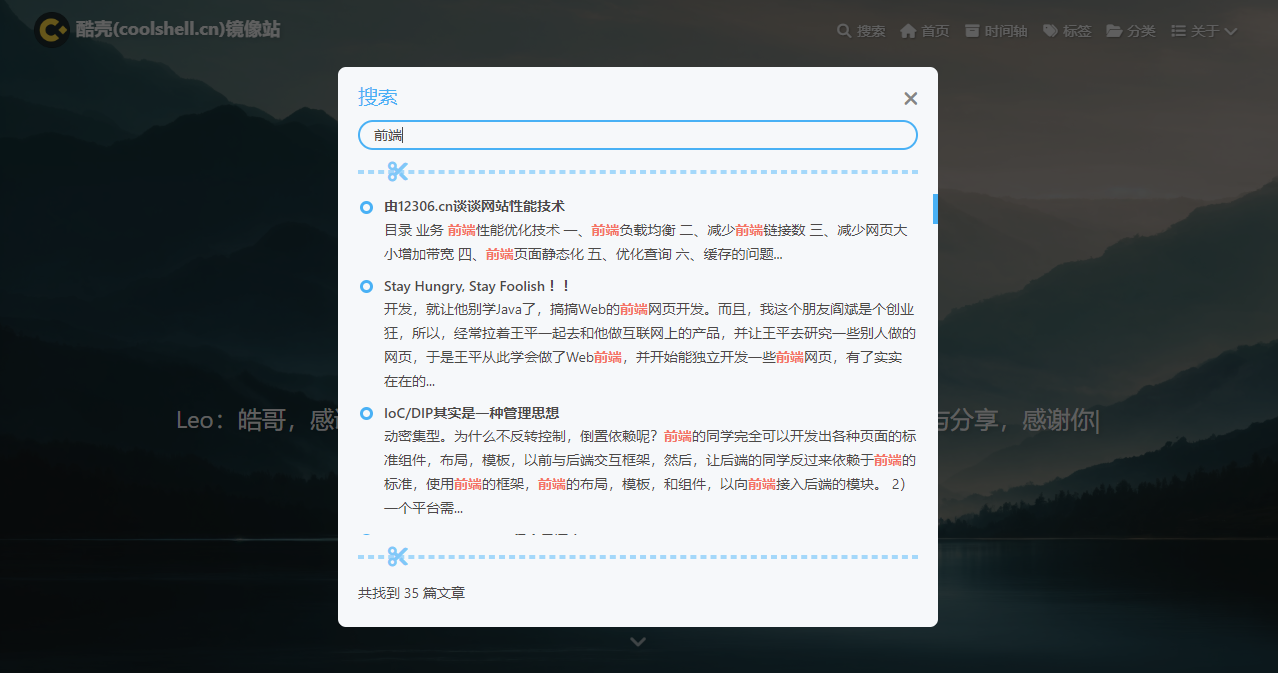
配置好后,在主题顶部出现检索入口,单击后会加载一个名为 search.json 的静态化文件,加载完成后可输入关键词进行全站检索:


评论 (0)