搜索到
156
篇与
朱治龙
的结果
-
 常用K8s命令 内容来自:https://github.com/maryamtb/rook/blob/main/community-notes/kubectl.mdkubectl quick referenceCommands for contexts, pods, deployments, debugging.AuthenticationGetting a kubeconfig entry depends on where the cluster lives.Local (kind). kind create cluster writes the entry automatically. Verify with kubectl cluster-info --context kind-kind.AWS EKS. aws eks update-kubeconfig --name <cluster-name> --region <region>.ContextsSwitch between clusters and namespaces.kubectl config get-contexts kubectl config use-context <name> kubectl config current-context kubectl config set-context --current --namespace=<namespace> # set default namespaceEvery namespaced command below accepts -n <namespace>. Set a default on your context (last command above) or pass -n explicitly.Resource docskubectl explain <resource> # docs for a resource type (e.g., kubectl explain pod) kubectl explain <resource>.<field> # drill into a specific field (e.g., pod.spec.containers) kubectl explain <resource> --recursive # full nested schema kubectl api-resources # list every resource type in the clusterPodskubectl get pods -n <namespace> kubectl get pods -n <namespace> -o wide # includes node + IP kubectl describe pod <pod-name> -n <namespace> kubectl logs <pod-name> -n <namespace> --tail=100 -f # tail and follow kubectl logs <pod-name> -n <namespace> -c <container> # specific container kubectl logs <pod-name> -n <namespace> --previous # previous crashed container kubectl exec -it <pod-name> -n <namespace> -- /bin/sh kubectl port-forward <pod-name> -n <namespace> 8080:80 kubectl cp <pod-name>:<remote-path> <local-path> -n <namespace> # copy from pod to local kubectl cp <local-path> <pod-name>:<remote-path> -n <namespace> # copy from local to podWatchingkubectl get pods -n <namespace> -w # watch pod state in real time watch kubectl get pods -n <namespace> # equivalent, via the `watch` utilityDeploymentskubectl get deployments -n <namespace> kubectl rollout status deployment <name> -n <namespace> kubectl rollout restart deployment <name> -n <namespace> kubectl rollout undo deployment <name> -n <namespace> kubectl scale deployment <name> -n <namespace> --replicas=3 kubectl set image deployment/<name> <container>=<image>:<tag> -n <namespace>Services & networkingkubectl get svc -n <namespace> kubectl describe svc <name> -n <namespace> kubectl get endpoints <name> -n <namespace> # what pods a service is routing to kubectl port-forward svc/<name> -n <namespace> 8080:80ConfigMaps & Secretskubectl get configmap <name> -n <namespace> -o yaml kubectl create configmap <name> -n <namespace> --from-file=./config.yaml kubectl create secret generic <name> -n <namespace> --from-literal=key=value kubectl get secret <name> -n <namespace> -o jsonpath='{.data.key}' | base64 -dDebuggingkubectl get events -n <namespace> --sort-by=.lastTimestamp kubectl describe pod <pod-name> -n <namespace> # look at Events at the bottom kubectl top pod -n <namespace> # CPU/memory (requires metrics-server) kubectl top node # cluster-scoped, no -n kubectl get pod <pod-name> -n <namespace> -o jsonpath='{.spec.containers[*].image}' # Open a shell in a new pod on the same node as a target pod kubectl debug <pod-name> -n <namespace> -it --image=busybox --target=<container> # Fetch kubelet logs directly from the API server (no SSH to the node) kubectl get --raw "/api/v1/nodes/<node-name>/proxy/logs/?query=kubelet"Delete thingskubectl delete pod <pod-name> -n <namespace> # pod controller will recreate if managed kubectl delete pod <pod-name> -n <namespace> --grace-period=0 --force # stuck pods only kubectl delete deployment <name> -n <namespace> kubectl delete -f manifest.yaml # namespace taken from the manifestApply & diffkubectl apply -f manifest.yaml kubectl diff -f manifest.yaml # preview changes before apply kubectl apply -k ./overlays/prod # kustomizekindkind create cluster --name <name> kind get clusters kind delete cluster --name <name> kind load docker-image <image>:<tag> # make a local Docker image available to the cluster kind load docker-image <image>:<tag> --name <cluster-name> # target a specific kind clusterAWS EKSaws eks list-clusters --region <region> aws eks describe-cluster --name <cluster> --region <region> aws eks update-kubeconfig --name <cluster> --region <region> # add or refresh the kubeconfig entry aws eks list-nodegroups --cluster-name <cluster> --region <region> # IAM Roles for Service Accounts (IRSA): pod-level AWS auth without mounting credentials eksctl create iamserviceaccount \ --cluster <cluster> \ --namespace <namespace> \ --name <sa-name> \ --attach-policy-arn <policy-arn> \ --approve
 -
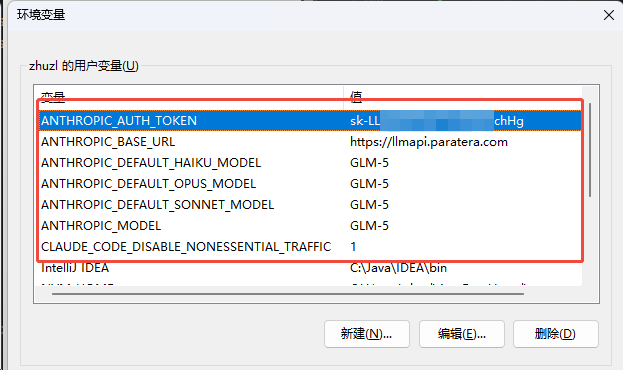
Claude Code 使用记录 安装及配置安装执行下面命令前,需提前安装好Node.jsnpm install -g @anthropic-ai/claude-code配置我本地使用的是 Windows 作为开发机,需要连接公司的大模型服务,需要根据 Claude Code 的说明配置环境变量:相关变量整理如下:变量值说明ANTHROPIC_AUTH_TOKENsk-xxxxxhHgAuthorization 标头的自定义值(您在此处设置的值将以 Bearer 为前缀)ANTHROPIC_BASE_URLhttps://llmapi.paratera.comMaaS 提供商的BaseURLANTHROPIC_DEFAULT_HAIKU_MODELGLM-5用于 haiku 的模型,或后台功能ANTHROPIC_DEFAULT_OPUS_MODELGLM-5用于 opus 的模型,或在 Plan Mode 活跃时用于 opusplan 的模型。ANTHROPIC_DEFAULT_SONNET_MODELGLM-5用于 sonnet 的模型,或在 Plan Mode 不活跃时用于 opusplan 的模型。ANTHROPIC_MODELGLM-5要使用的模型设置的名称CLAUDE_CODE_DISABLE_NONESSENTIAL_TRAFFIC1等同于设置 DISABLE_AUTOUPDATER(禁用自动更新)、DISABLE_BUG_COMMAND(禁用 /bug 命令)、DISABLE_ERROR_REPORTING(退出 Sentry 错误报告) 和 DISABLE_TELEMETRY(退出 Statsig 遥测)更多环境变量参考 Claude 官网:https://code.claude.com/docs/zh-CN/settings#%E7%8E%AF%E5%A2%83%E5%8F%98%E9%87%8F常用命令# 开启 YOLO 模式 claude --dangerously-skip-permissions # 升级 claude update # 继续上次会话 claude -c实用小技巧使用!前缀直接执行Bash命令 :无需通过 Claude 解释,直接运行系统命令如!git status、! git log,节省 token 且结果自动加入上下文Ctrl+R搜索历史提示词 :复杂的 prompt 很难记?按Ctrl+R可交互式搜索之前用过的提示词,按 Tab 编辑,Enter 执行Ctrl+S暂存当前草稿 :写 prompt 到一半需要查资料?按 Ctrl+S 暂存,处理完其他事情后草稿自动恢复/sandbox沙盒模式预授权:预先定义权限范围(如允许npm test,禁止rm -rf),在此范围内无需每次点击“允许”ultrathink深度思考模式 :在prompt中加入ultrathink关键词,Claude会分配最多32K tokens进行内部推理,适合架构设计、难缠bug等复杂问题常用快捷键! for bash modedouble tap esc to clear inputctrl + shift + - to undo/ for commandsshift + Tab to auto-accept editsalt + v to paste images@ for file pathsctrl + o for verbose outputmeta + p to switch model& for backgroundctrl + t to show todosctrl + s to stash prompt\⏎ for newline引用文件的方法直接拖拽文件到对话框输入 @ 选择当前目录文件输入 @/ + 文件名进行全局搜索使用 @src/auth.js 引用单个文件,@src/components/引用整个目录,支持模糊匹配直接键入关键词后按 Tab 触发全局搜索自动检测激活文件:编辑器中当前打开文件自动加入上下文选中代码行后 Claude 仅解析选区常用 Skill 推荐Superpowers开源:https://github.com/obra/superpowers简单使用# 1、安装应用市场 /plugin marketplace add obra/superpowers-marketplace # 2、安装插件 /plugin install superpowers@superpowers-marketplaceUI UX Pro Max官网:https://uupm.cc/开源:https://github.com/nextlevelbuilder/ui-ux-pro-max-skill简单使用# 1、安装全局cli命令行工具 npm install -g uipro-cli # 2、针对不同的AI工具初始化skill uipro init --ai claude # Claude Code uipro init --ai cursor # Cursor uipro init --ai windsurf # Windsurf uipro init --ai antigravity # Antigravity uipro init --ai copilot # GitHub Copilot uipro init --ai kiro # Kiro uipro init --ai codex # Codex CLI uipro init --ai qoder # Qoder uipro init --ai roocode # Roo Code uipro init --ai gemini # Gemini CLI uipro init --ai trae # Trae uipro init --ai opencode # OpenCode uipro init --ai continue # Continue uipro init --ai codebuddy # CodeBuddy uipro init --ai droid # Droid (Factory) uipro init --ai kilocode # KiloCode uipro init --ai warp # Warp uipro init --ai augment # Augment uipro init --ai all # All assistants # 其他 cli 命令 uipro versions # List available versions uipro update # Update to latest version uipro init --offline # Skip GitHub download, use bundled assets uipro uninstall # Remove skill (auto-detect platform) uipro uninstall --ai claude # Remove specific platform uipro uninstall --global # Remove from global install
-
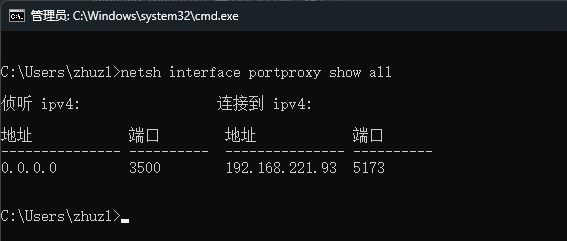
WSL2环境端口映射 背景介绍近期在开展 ClaudeCodeUI 二开相关的工作,在本地 Windows11 环境折腾一圈后,发现项目依赖环境依然没搞好的情况下,便转战到 WSL 环境进行开发,经过一段时间的开发工作,逐渐适应。在对接 Ora Hydra 实现用户单点登录时,本地开发环境需使用localhost访问,否则需使用https协议进行对接,所以就想着将WSL环境中的端口映射到本地环境,然后进行对接。常规来讲无所不能的 Nginx 肯定是OK的,但是WSL环境对外做端口映射应该是非常普遍的需求,有没有更轻量的解决方案呢?解决方案经过对官网文档的快速浏览,还真发现了有关wsl 环境做本地端口映射的说明:https://learn.microsoft.com/en-us/windows/wsl/networking#accessing-a-wsl-2-distribution-from-your-local-area-network-lan中文版链接:https://learn.microsoft.com/zh-cn/windows/wsl/networking#accessing-a-wsl-2-distribution-from-your-local-area-network-lan经过对文档简单的梳理,可以使用类似下面的命令添加端口映射:netsh interface portproxy add v4tov4 listenport=3500 listenaddress=0.0.0.0 connectport=5173 connectaddress=192.168.221.93其中:listenport = 对应本机端口connectport = WSL环境的端口listenaddress = 本地监听地址,使用 listenaddress=0.0.0.0 将侦听所有 IPv4 端口connectaddress = WSL环境的IP地址,可以使用wsl hostname -I获取扩展阅读netsh 网络命令行工具官网文档:https://learn.microsoft.com/zh-cn/windows-server/administration/windows-commands/netsh查看代理列表netsh interface portproxy show all删除端口代理netsh interface portproxy delete v4tov4 listenport=3500 listenaddress=0.0.0.0
-
一个收费图标网站的整站png图标爬取过程记录 近期发现一个还不错的3D图标库(https://www.thiings.co/things)图标偏写实风格,都是png格式,也便于在其他项目中引用,看项目的介绍,有1900个图标,都是偏日常生活物品,可以考虑下载下来,打印给崽做干预训练。官网提供了下载全部的功能,但下载的时候提示需要29美元,且不支持我仅有的国内的银行卡及在线支付方式,又不得不让我望而却步了。所以不得不祭出国内程序员的大杀器:白嫖。以下便是白嫖全过程。页面分析经过对页面源码的分析,发现该网页为使用 Next 开发的单页应用,页面使用 Webpack 打包,滚动页面过程中没有发起异步请求,那相关的文件路径应该是打包在工程里的。经浏览一个图标,发现如下规律:可通过如下URL下载到原始图片:https://lftz25oez4aqbxpq.public.blob.vercel-storage.com/image-UnbACooeDKA5ggSg36Zi8JizoYINpv.png,经过进一步分析,URL 中的 UnbACooeDKA5ggSg36Zi8JizoYINpv 对应的图片的ID。经过进一步分析,我们在源码底部找到了相关资源定义的json数据,经过清洗得到如下精简后的json格式的定义数据:{ "currentPage": "COLLECTION", "shouldShuffle": true, "rootPath": "/things", "canDownload": true, "categories": ["Everyday", "Nature", "Technology", "Sponsors"], "forceLength": 1900, "items": [ { "id": "amphitheater", "name": "Amphitheater", "categories": ["places \u0026 structures", "entertainment", "urban"], "fileId": "oS7mN2q1OPFw7HHZGO30XoFqCjQJba", "shareUrl": "https://www.thiings.co/things/amphitheater" }, { "id": "sofa", "name": "Sofa", "categories": ["everyday life", "furniture", "seating"], "fileId": "cRuokpRSq9ekpqqbJA3w5Tg4DWOyLv", "shareUrl": "https://www.thiings.co/things/sofa" }, { "id": "toaster", "name": "Toaster", "categories": ["everyday life", "appliance", "kitchen"], "fileId": "UnbACooeDKA5ggSg36Zi8JizoYINpv", "shareUrl": "https://www.thiings.co/things/toaster" }, { "id": "bookshelf", "name": "Bookshelf", "categories": ["everyday life", "furniture", "storage"], "fileId": "4r2tNFAParX1lIOupxBEg3fPYP7GuT", "shareUrl": "https://www.thiings.co/things/bookshelf" } ] }由此我们可以遍历json中的items数组获取所有资源,然后拼凑图片URL并逐个下载对应的png原图即可。资源下载这种数据爬取方面的操作,还是采用我最熟练的 magic-api 来实现,主要分两个步骤:1、解析json文件并将文件入库为了便于后续资源利用,我们将上面的json数据保存到MySQL中,建表语句如下:-- zzl_resources.things_icons definition CREATE TABLE `things_icons` ( `id` bigint NOT NULL AUTO_INCREMENT COMMENT '自增ID', `oid` varchar(200) COLLATE utf8mb4_general_ci DEFAULT NULL COMMENT '原始id', `name` varchar(200) COLLATE utf8mb4_general_ci NOT NULL COMMENT '名称', `categories` varchar(500) COLLATE utf8mb4_general_ci DEFAULT NULL COMMENT 'json数组', `categories_str` varchar(500) COLLATE utf8mb4_general_ci DEFAULT NULL COMMENT '便于按类别搜索的字符串', `file_id` varchar(100) CHARACTER SET utf8mb4 COLLATE utf8mb4_general_ci DEFAULT NULL COMMENT '文件Id', `share_url` varchar(200) COLLATE utf8mb4_general_ci DEFAULT NULL COMMENT '详情URL', `note` varchar(2000) COLLATE utf8mb4_general_ci DEFAULT NULL COMMENT '详情页的描述信息', `add_time` datetime NOT NULL DEFAULT CURRENT_TIMESTAMP COMMENT '创建时间', PRIMARY KEY (`id`) ) ENGINE=InnoDB DEFAULT CHARSET=utf8mb4 COLLATE=utf8mb4_general_ci COMMENT='https://www.thiings.co/things 网站的图标爬取专用';由于json数据较大,我们将数据保存在磁盘文件中(things_resources.json),然后读取解析保存入库,代码如下:import cn.hutool.core.io.FileUtil import cn.hutool.core.date.DateTime import cn.hutool.core.date.DateUtil import org.jsoup.helper.DataUtil import cn.hutool.json.JSONUtil import cn.hutool.core.util.ObjectUtil import cn.hutool.core.util.StrUtil import log var timer = DateUtil.timer(); var jsonStr = FileUtil.readString("/cosmos/apps/uploads/things_resources.json","UTF-8"); var things = JSONUtil.parseArray(jsonStr) // log.info('jsonStr:' + jsonStr) for (thingItem in things) { var categoriesStr = '' if (thingItem.categories && thingItem.categories.length > 0) { categoriesStr = "," + thingItem.categories.join(',') + "," } if (!thingItem.shareUrl) { log.info('跳过入库:' + thingItem.fileId) continue } var data = { oid: thingItem.id, name: thingItem.name, categories: JSONUtil.toJsonStr(thingItem.categories), categoriesStr: categoriesStr, fileId: thingItem.fileId, shareUrl: thingItem.shareUrl } log.info(JSONUtil.toJsonStr(data)) db['ZR'].table('things_icons').insert(data) } log.info(`Cost Time: ${timer.intervalPretty()}.`); return '操作成功'2、下载相关的原图数据保存入库后,我们可以遍历记录,然后下载到指定目录,一下是下载代码:import cn.hutool.http.HttpUtil import cn.hutool.core.io.FileUtil import cn.hutool.core.date.DateTime import cn.hutool.core.date.DateUtil import org.jsoup.helper.DataUtil import cn.hutool.json.JSONUtil import log import http var list = db['ZR'].table('things_icons').select() var index = 0 var size = list.size() var timer = DateUtil.timer(); for ( item in list) { var fileId = item.fileId var url = `https://lftz25oez4aqbxpq.public.blob.vercel-storage.com/image-${fileId}.png` try { HttpUtil.downloadFileFromUrl(url, `/cosmos/apps/uploads/things-icons/${item.name}__${fileId}.png`) } catch(e) { log.info(`something error:${item.fileId}`) } index++ log.info(`index/size:${index}/${size}`) } log.info(`Cost Time: ${timer.intervalPretty()}.`); return 'success'执行该方法后,耗时 1小时46分。下载了 1908 张图片,共计 2.78G通过对下载的图片进行统计,发现所有png图片均为1024*1024的分辨率,每张图片基本上都在1M以上,只要不涉及商用版权纠纷的场景,这样规范的图片可以直接用在很多地方。
-
AIGC 场景对话UI库推荐 Ant Design X介绍Ant Design X 提供了一个专注于 React 生态的 AI 组件库,帮助开发者轻松地将对话 AI 集成到应用中。该库包括以下主要功能:高度定制化的 AI 组件:允许开发者轻松地将对话 AI 集成到应用中,例如 Bubble 对话气泡、Conversations 管理对话、Welcome 欢迎界面、Prompts 提示集、Attachment 输入附件、Sender 输入框、Suggestion 快捷指令、ThoughtChain 思维链等。API 解决方案:支持开发者通过令牌认证直接接入现有 AI 服务,无缝衔接与 AI 的对话和交互。例如,useXAgent 模型调度、useXChat 数据管理、XStream 流处理、XRequest 请求管理和 XProvider 全局化配置等工具,帮助开发者高效管理数据流和模型推理服务。按需加载:默认支持基于 ES modules 的 tree shaking,确保代码的高效性和模块化。TypeScript 支持:使用 TypeScript 编写并提供了完整的定义文件,增强了类型安全性和开发体验。链接:官网:https://x.ant.design/Github:https://github.com/ant-design/xTD Chat for AITDesign AI Chat 是 腾讯 TDesign 为 AIGC 场景开发的 UI 系列组件中的一部分,主要用于开发目前非常流行的 ChatBot 对话交互场景。最近 TDesign AI Chat 发布了 0.2 的版本,增加了思考过程、增强版的可扩展输入框和配套加载动画等相关组件,同时配套内置支持了多语言能力,让我们开发者可以快速构建具有 AI ChatBot 对话交互功能的项目。链接官网:https://tdesign.tencent.com/chat/getting-startedMateChat介绍华为 DevUI 团队推出的AI对话场景的UI库,基于 Vue3 开发官网介绍:MateChat是一款基于GenAI语言交流系统的对话组件库,可用于构建不同业务场景下的高一致性的AI应用。MateChat提供了多种组件和案例,支持协作式、沉浸式、情境式等交互模式,适用于研发工具、IDE等领域。链接官网:https://matechat.gitcode.com/开源地址:https://gitcode.com/DevCloudFE/MateChat
-
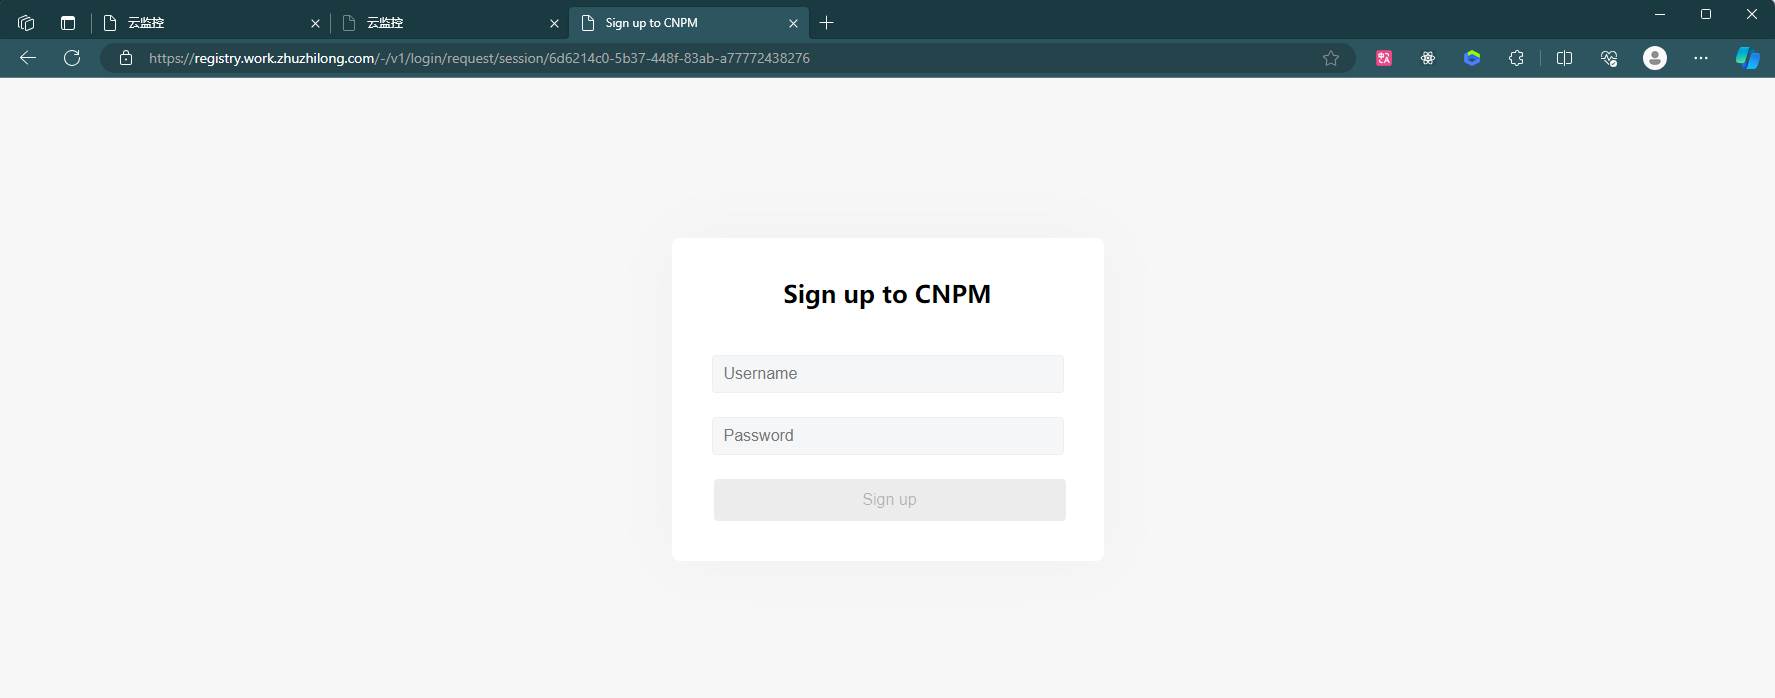
使用 cnpmcore 部署 npm 私服 近期有一些内部项目需要用到 npm 私服服务,经过一些简单了解后,发现日常使用的淘宝国内镜像(https://npmmirror.com)就是使用开源的 cnpmcore 搭建的,部署部署前可详细查看 cnpmcore 工程( https://github.com/cnpm/cnpmcore )docs目录下的 deploy-in-docker.md 文件。本工程使用 docker compose 进行部署,部署前需要提前准备好如下环境:数据库服务:MySQL 或 PostgreSQL使用工程db目录中的sql文件初始化表结构数据缓存服务:Redis文件存储服务:目前支持的文件存储服务有阿里云 OSS、AWS S3,以及兼容 S3 的 minio。本案例使用 MinIOdocker-compose.yaml 文件内容如下:services: cnpmcore: image: fengmk2/cnpmcore:latest-alpine container_name: cnpmcore restart: unless-stopped volumes: #- ./config.prod.js:/usr/src/app/config/config.prod.js environment: - TZ=Asia/Shanghai - CNPMCORE_CONFIG_REGISTRY=https://registryx.work.zhuzhilong.com - CNPMCORE_CONFIG_SOURCE_REGISTRY=https://registry.npmmirror.com - CNPMCORE_CONFIG_SOURCE_REGISTRY_IS_CNPM=true - CNPMCORE_DATABASE_TYPE=MySQL - CNPMCORE_DATABASE_NAME=cnpmcore - CNPMCORE_DATABASE_HOST=local.work.zhuzhilong.com - CNPMCORE_DATABASE_PORT=3306 - CNPMCORE_DATABASE_USER=zhuzl - CNPMCORE_DATABASE_PASSWORD=20xxxxxxxx - CNPMCORE_NFS_TYPE=s3 - CNPMCORE_NFS_S3_CLIENT_ENDPOINT=http://minio-api.work.zhuzhilong.com - CNPMCORE_NFS_S3_CLIENT_REGION=cs - CNPMCORE_NFS_S3_CLIENT_BUCKET=cnpmcore - CNPMCORE_NFS_S3_CLIENT_ID=gfUiTxxxxxxxxlThJ6H - CNPMCORE_NFS_S3_CLIENT_SECRET=LgpUK32qfxxxxxxxxplyH4XVoB - CNPMCORE_NFS_S3_CLIENT_FORCE_PATH_STYLE=true - CNPMCORE_NFS_S3_CLIENT_DISABLE_URL=true - CNPMCORE_REDIS_HOST=local.work.zhuzhilong.com - CNPMCORE_REDIS_PORT=6379 - CNPMCORE_REDIS_PASSWORD=88888888 - CNPMCORE_REDIS_DB=1 networks: - net-zzl ports: - 8140:7001 networks: net-zzl: name: bridge_zzl external: true使用 docker compose up -d 命令启动后,使用docker logs -f cnpmcore命令查看启动日志,如果相关连接没问题的话,显示如下所示的示例内容即表示启动成功:2025-05-08 15:35:11,803 INFO 59 [@eggjs/core/lifecycle:ready_stat] end ready task /usr/src/app/node_modules/@eggjs/tegg-orm-plugin/app.js:didLoad, remain [] 2025-05-08 15:35:11,811 INFO 34 [master] app_worker#4:59 started at 7001, remain 0 (5825ms) 2025-05-08 15:35:11,811 INFO 34 [master] egg started on http://127.0.0.1:7001 (7275ms)生成管理员账号执行如下命令创建用户:npm adduser --registry=https://registry.work.zhuzhilong.com执行后展示如下所示内容:C:\Users\zhuzl>npm adduser --registry=https://registry.work.zhuzhilong.com npm notice Log in on https://registry.work.zhuzhilong.com/ Create your account at: https://registry.work.zhuzhilong.com/-/v1/login/request/session/6d6214c0-5b37-448f-83ab-a77772438276 Press ENTER to open in the browser...根据提示,打开注册连接,如下图所示:如果没有开放注册功能的话,貌似仅可注册名为 cnpmcore_admin 的账号,其他账号名均提示Public registration is not allowed注册成功后可使用如下命令登录:npm login --registry=https://registry.work.zhuzhilong.com登录成功后可以使用如下命令查看登录的用户:npm whoami --registry=https://registry.work.zhuzhilong.com执行后显示如下:发布npm包到私服打包后,可以使用如下命令将打包后的文件发布到我们部署的npm 私服:npm publish --registry=https://registry.work.zhuzhilong.com一般发布前,我们需要指定发布哪些文件,可以通过 package.json 的 files 指定,示例package.json 完整内容如下:{ "name": "cms", "version": "0.1.1", "private": false, "files": [ "dist" ], "main": "dist/cms.js", "module": "dist/cms.mjs", "exports": { ".": { "import": "./dist/cms.mjs", "require": "./dist/cms.js" }, "./style.less": "./dist/style.less" }, "repository": { "type": "git", "url": "git@git.paratera.net:aicloud/frontend/cms.git" }, "scripts": { "dev": "vite", "dev:blsc": "vite --mode blsc", "build": "vite build", "preview": "vite preview", "build:lib": "vite build --config vite.lib.config.mjs" }, "dependencies": { "@ant-design/compatible": "^5.1.1", "@ant-design/pro-layout": "7.21.2", "@ant-design/icons": "^4.0.0", "@babel/plugin-transform-react-jsx": "^7.25.9", "@reduxjs/toolkit": "^2.5.0", "antd": "^5.11.0", "axios": "^1.8.4", "big.js": "^6.2.2", "dayjs": "^1.11.13", "echarts": "^5.6.0", "echarts-for-react": "^3.0.2", "history": "^5.3.0", "js-cookie": "^2.2.1", "lodash-es": "^4.17.21", "prop-types": "^15.8.1", "qs": "^6.13.0", "react": "^18.2.0", "react-copy-to-clipboard": "^5.1.0", "react-dom": "^18.2.0", "react-redux": "^9.0.0", "react-router-dom": "^6.20.0", "redux-logger": "^3.0.6", "remixicon": "^4.6.0", "spark-md5": "^3.0.2" }, "devDependencies": { "@vitejs/plugin-legacy": "^5.2.0", "@vitejs/plugin-react": "^4.2.0", "autoprefixer": "^10.4.16", "dotenv": "^16.3.1", "less": "^4.2.0", "less-loader": "7", "msw": "^2.0.0", "postcss": "^8.4.31", "postcss-preset-env": "^9.3.0", "vite": "^5.0.10", "vite-plugin-html": "^3.2.0", "vite-plugin-node-polyfills": "^0.19.0" } }一下是使用 npm publish 命令成功发布到私服的过程发布成功后,我们可以在数据库中看到相关的包及版本信息:在 MinIO 中也可以看到相关的文件:相关链接cnpm github 开源地址:https://github.com/cnpm/cnpmcore
-
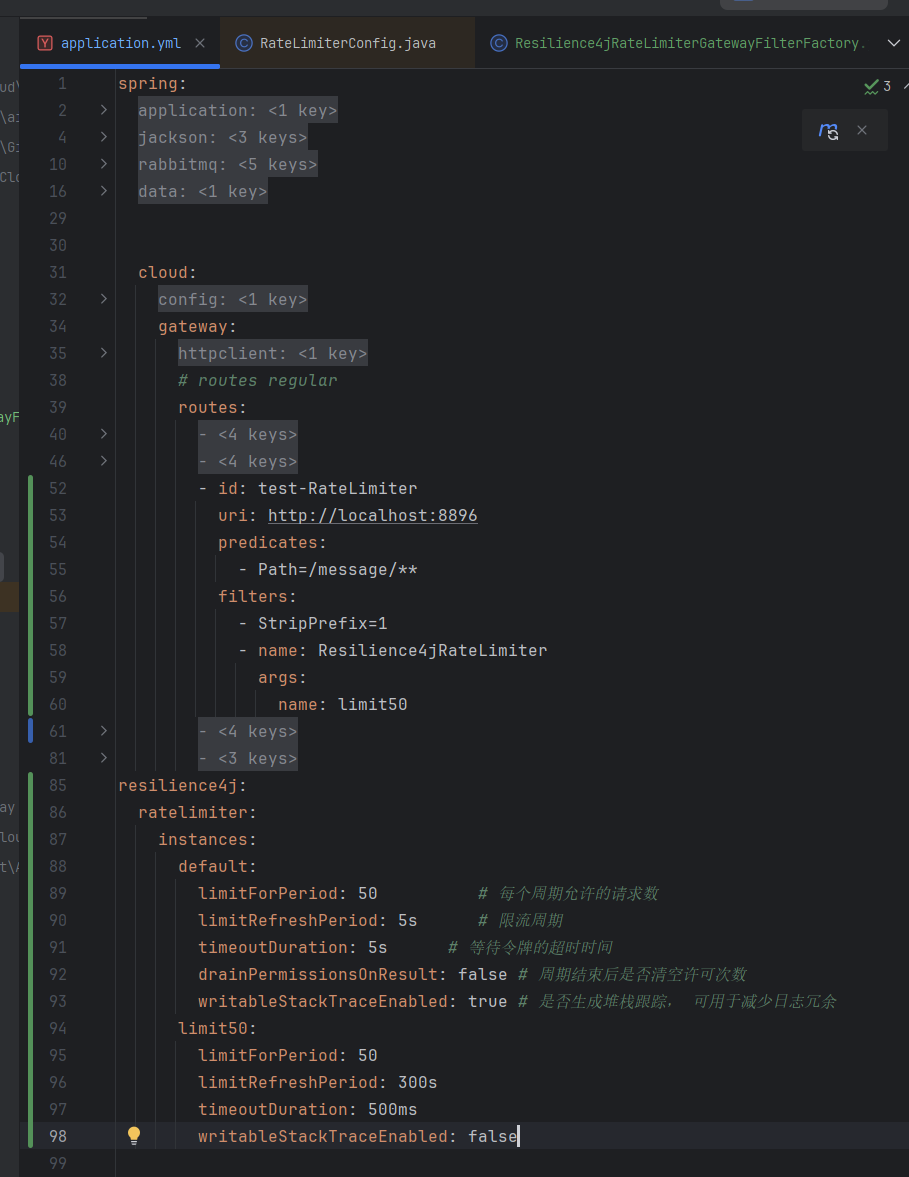
Spring Gateway 使用 Resilience4j 实现限流 背景说明近期接触到公司一个使用 Spring GateWay 搭建的网关服务,为了保障下游服务,防止用户恶意刷接口造成系统过载崩溃等情况,需要在网关层面引入限流机制。经过初步调研,不少大佬都推荐使用 Resilience4j 这款轻量级的 Java 容错库来做,但是网上能找到的实践层面的资料比较少,针对特定场景官网的文档也显得捉襟见肘,所以在边学习边实践过程种便有了这篇流水账式的文章。初体验1.添加依赖公司项目使用 Maven 进行依赖管理,在工程的 pom.xml 的 dependencies 节点中添加如下依赖项: <dependency> <groupId>io.github.resilience4j</groupId> <artifactId>resilience4j-spring-cloud2</artifactId> <version>2.3.0</version> </dependency>2.创建限流器工厂类package com.paratera.aicloud.gateway.filter; import io.github.resilience4j.ratelimiter.RateLimiter; import io.github.resilience4j.ratelimiter.RateLimiterRegistry; import org.springframework.cloud.gateway.filter.GatewayFilter; import org.springframework.cloud.gateway.filter.factory.AbstractGatewayFilterFactory; import org.springframework.http.HttpStatus; import org.springframework.stereotype.Component; import reactor.core.publisher.Mono; @Component public class Resilience4jRateLimiterGatewayFilterFactory extends AbstractGatewayFilterFactory<Resilience4jRateLimiterGatewayFilterFactory.Config> { private final RateLimiterRegistry rateLimiterRegistry; public Resilience4jRateLimiterGatewayFilterFactory(RateLimiterRegistry rateLimiterRegistry) { super(Config.class); this.rateLimiterRegistry = rateLimiterRegistry; } @Override public GatewayFilter apply(Config config) { return (exchange, chain) -> { RateLimiter rateLimiter = rateLimiterRegistry.rateLimiter(config.getName()); return Mono.fromCallable(() -> { boolean permitted = rateLimiter.acquirePermission(); if (!permitted) { throw new RuntimeException("Rate limit exceeded"); } return permitted; }).then(chain.filter(exchange)) .onErrorResume(RuntimeException.class, e -> { exchange.getResponse().setStatusCode(HttpStatus.TOO_MANY_REQUESTS); return exchange.getResponse().setComplete(); }); }; } public static class Config { private String name; public String getName() { return name; } public void setName(String name) { this.name = name; } } }3.添加限流相关配置resilience4j: ratelimiter: instances: default: limitForPeriod: 50 # 每个周期允许的请求数 limitRefreshPeriod: 5s # 限流周期 timeoutDuration: 5s # 等待令牌的超时时间 drainPermissionsOnResult: false # 周期结束后是否清空许可次数 writableStackTraceEnabled: true # 是否生成堆栈跟踪, 可用于减少日志冗余 limit50: limitForPeriod: 50 limitRefreshPeriod: 300s timeoutDuration: 500ms writableStackTraceEnabled: false4. 路由信息中关联限流配置在 spring.cloud.gateway.routes 对应的实例节点中添加过滤器,示例如下:spring: cloud: gateway: routes: - id: test-RateLimiter uri: http://localhost:8896 predicates: - Path=/message/** filters: - StripPrefix=1 - name: Resilience4jRateLimiter args: name: limit50本示例核心配置信息如下:5. 验证Apifox 自带的自动化测试功能可以很方面的进行并发测试,我们的测试配置如下:点击 运行 按钮后,得到如下图所示的测试结果,从结果来看式符合限流预期的:查看请求详情,可以看到请求周期内达到限流场景时,接口是响应的预期内的429状态码:LinksResilience4j 官网文档:https://resilience4j.readme.io/
-
常见文件共享访问协议 这里简单聊一下常见的文件共享协议 —— NFS、FTP、SMB、WebDAV,它们的优缺点以及各自的适用场景。由于归纳整理的内容可能篇幅较长,若你希望快速了解重点,可以直接查看最后的总结部分。NFSNFS(Network File System)即网络文件系统,主要用于在 Unix/Linux 系统之间实现文件共享。优点高效性:在 Unix/Linux 系统之间共享文件时,性能较高,尤其在大规模环境中。透明性:用户可以像访问本地文件系统一样访问远程文件,操作方便。稳定性:经过长时间的发展和实践检验,在合适的环境下较为稳定。缺点平台局限性:主要适用于 Unix/Linux 系统,在其他操作系统上的支持相对较弱。配置复杂:对于不熟悉 Unix/Linux 系统的用户来说,配置和管理可能较为困难。安全性问题:安全性的实现较为复杂,需要仔细配置以防止未经授权的访问。适用场景适用于大型企业或科研机构的服务器环境,特别是在 Unix/Linux 系统为主的网络中。对于需要高性能文件共享的场景,如大数据处理、高性能计算等非常适用。FTPFTP(File Transfer Protocol)是文件传输协议,用于在不同的计算机之间传输文件。优点广泛支持:几乎所有操作系统都支持 FTP 协议,通用性强。简单易用:对于基本的文件上传和下载操作,用户容易掌握。成熟稳定:是一种较为古老但非常成熟的文件传输方式。缺点安全性较低:传输过程中可能存在数据被窃取的风险,尤其是在使用明文传输时。不适合实时访问:主要用于文件的上传和下载,不适合对文件进行实时的读写操作。传输模式单一:相对其他协议,在文件管理和协作方面功能较为有限。适用场景非常适合网站管理员上传和下载文件至服务器。可用于向公众提供文件下载服务,例如软件分发、文档共享等场景。SMBSMB(Server Message Block)主要用于在 Windows 系统之间以及 Windows 与其他操作系统之间共享文件和打印机等资源。优点易于使用:在 Windows 系统中集成度高,用户无需复杂的配置即可实现文件和打印机共享。- 功能丰富:支持用户认证和权限管理,可以精细地控制资源访问。跨平台性较好:虽然主要用于 Windows 系统,但也有一些其他操作系统的实现。缺点性能问题:在大规模网络环境中,可能会出现性能瓶颈。安全风险:如果配置不当,可能会存在安全漏洞,被攻击者利用。兼容性问题:不同版本的 SMB 协议可能存在兼容性问题。适用场景在办公室环境中,是多台 Windows 电脑之间共享文件和打印机的首选。家庭网络中,也能方便不同设备之间共享文件和媒体资源。WebDavWebDav(Web-based Distributed Authoring and Versioning)是基于 HTTP 协议的扩展,用于在网络上进行文件管理和协作。优点跨平台性强:可以通过标准的 Web 浏览器进行文件操作,几乎适用于所有操作系统和设备。- 支持协作:适合多人在线协作编辑和管理文件,具有版本控制等功能。安全性较高:可以通过 HTTPS 进行加密传输,保障数据安全。缺点依赖网络:对网络连接的稳定性要求较高,网络不稳定时可能影响使用体验。性能受限:与本地文件系统相比,性能可能会有所下降。配置复杂:对于一些高级功能的配置可能需要一定的技术知识。适用场景在线文档协作平台中,方便多人同时编辑和管理文件。远程办公场景下,用户可以通过网络便捷地访问和管理文件。总结个人首推还是 SMB 和 WebDav,内部局域网用 SMB 虽然性能和稳定性会差一点,但对各类系统平台兼容性都很不错;外网访问的话用 WebDav,它本身就是基于 HTTP 协议的扩展,外网访问也只需要更改外部访问的端口即可,同时有些会适配网页端可以在浏览器上直接浏览,比较方便快捷。
-
PUID 和 PGID 有些 Docker 容器需要配置 PUID 和 PGID ,以保证 Docker 容器有适当的权限来访问宿主机上的文件{alert type="info"}在部署 Docker 配置时,UID 和 GID 一定要根据实际情况进行配置,不要上来无脑就填 root 或者 nobody 的权限,这样很有可能会出现各种权限问题。比如:部署的应用不能正常工作,配合联动的应用文件没办法修改,SMB 的文件没有权限读写等等。{/alert}PUID 和 PGID 是什么PUID(用户标识符)是用于唯一标识用户的数字编号,常见于多用户系统和容器环境中以确保用户权限和文件访问的一致性。PGID(组标识符)是用于唯一标识用户组的数字编号,用于方便管理一组用户的权限和访问控制,在各类共享资源管理场景中广泛应用。其中,在部署 Docker 应用时,PUID 和 PGID 也有可能被命名为 UID 和 GID。PUID 和 PGID 有什么用PUID 和 PGID 用于指定用户和组的身份信息,以确保在不同的运行环境中,对文件和目录的访问权限能够保持一致和正确。通过设置合适的 PUID 和 PGID,可以实现容器内的用户与主机系统或其他容器之间的权限协调和数据隔离。PUID 和 PGID 怎么获取可以使用命令行工具来查看当前用户的 UID 和 GID,在终端中输入 id 用户名 就会显示对应用户的详细信息:id zhuzl这样就可以看到用户(zhuzl)的 UID 和 GIDPUID 和 PGID 怎么使用首先不一定所有的 Docker 容器应用这两个参数需要填写的,只有明确说明有才需要填写。以 Emby 为例,这里就需要用到 UID 和 GID以 EasyImage 为例,这里就需要用到 PUID 和 PGID
-
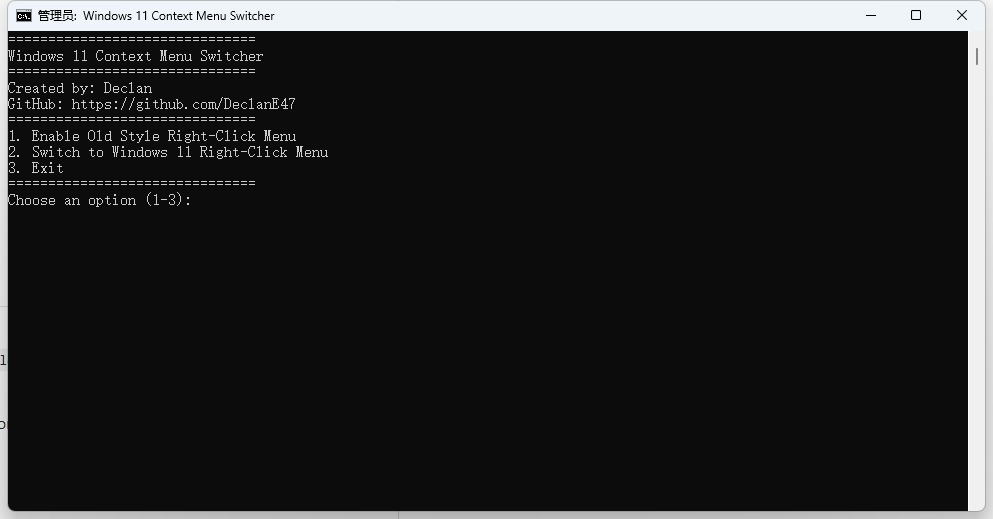
【软件推荐】一键切换Windows11 右键菜单工具:Windows 11 Context Menu Switcher 使用 Windows 11 两年多了,一直不怎么习惯 Windows 11 默认的右键菜单,感觉提供的右键菜单都是基本上不会用到的,每次都要点击底部的「显示更多选项」,然后再选择要使用的菜单项,每次这样都这样操作,确实极大的影响心情及工作效率。之前通过一些教程通过修改注册表的方式处理过一次,但是手工修改注册表的方式操作起来还是略显繁琐。软件介绍今天偶然在 Github 找到了一个针对这种场景的小工具:Windows 11 Context Menu Switcher。顾名思义,他是一款专门用于 Windows11 右键菜单切换的小工具。他是一个简单的 CMD 脚本,可让您在旧式右键上下文菜单和默认 Windows 11 上下文菜单之间轻松切换。此脚本提供了一个用户友好的界面,并自动重新启动 Windows 资源管理器以立即应用更改。软件特征在 Windows 11 上启用旧式右键上下文菜单。支持切换回 Windows 11 右键单击上下文菜单。切换后自动重新启动 Windows 资源管理器以应用更改。提供基于 cmd 的易于使用的菜单交互界面。使用方式1、下载 bat 脚本文件下载地址:https://github.com/DeclanE47/Windows11-Context-Menu-Switcher若访问 Github 不便,可将如下内容保存为 .bat 格式的文件:@echo off title Windows 11 Context Menu Switcher :menu cls echo =============================== echo Windows 11 Context Menu Switcher echo =============================== echo Created by: Declan echo GitHub: https://github.com/DeclanE47 echo =============================== echo 1. Enable Old Style Right-Click Menu echo 2. Switch to Windows 11 Right-Click Menu echo 3. Exit echo =============================== set /p choice=Choose an option (1-3): if "%choice%"=="1" goto oldmenu if "%choice%"=="2" goto newmenu if "%choice%"=="3" exit :oldmenu reg add "HKCU\Software\Classes\CLSID\{86ca1aa0-34aa-4e8b-a509-50c905bae2a2}\InprocServer32" /f /ve echo Old style right-click menu enabled. goto restart :newmenu reg delete "HKCU\Software\Classes\CLSID\{86ca1aa0-34aa-4e8b-a509-50c905bae2a2}" /f echo Windows 11 right-click menu restored. goto restart :restart echo Restarting Windows Explorer to apply changes... taskkill /f /im explorer.exe >nul 2>&1 start explorer.exe echo Restart complete. pause goto menu 2、右键 bat 文件,以管理员身份运行3、根据提示选择操作项选项1:启用旧式右键菜单选项2:恢复 Windows 11 右键菜单选项3:退出脚本4、重启 Windows 资源管理器执行完脚本后将自动重启 Explorer 进程以应用更改
-
FRP升级记录 背景介绍FRP 是一款非常优秀的内网穿透和反向代理软件,它允许用户通过公网访问内网资源,无需复杂的网络配置,极大地提高了工作效率。程序员的电脑基本上不关机,偶尔需要从其他电脑取些文件或远程处理点工作上的事,就非常需要这样的软件。2023年部署的时候 FRP 最新版本是 FRP 0.51.2,使用 docker 部署,从 0.52.0 开始,FRP 将配置文件由 ini 格式改为 toml 格式了,格式变更后,导致原来的配置文件不能复用,便一直未升级到最新版。年底趁手头紧要工作处理完了,便想着顺带升级一下。服务端升级服务端部署在腾讯云一台国内服务器上,使用 docker compose 编排,升级后的 docker-compose.yaml 文件内容如下:services: frps_work: restart: always network_mode: host volumes: - ./frps.toml:/etc/frp/frps.toml - ./logs:/etc/frp/logs container_name: frps_work image: snowdreamtech/frps:0.61.1frps.toml 文件内容如下:bindPort = 7200 auth.method = "token" auth.token = "admin" vhostHTTPPort = 89 vhostHTTPSPort = 4444 subDomainHost = "work.zhuzhilong.com" enablePrometheus = true webServer.addr = "0.0.0.0" webServer.port = 7202 # 由于使用nginx代理的时候开启了基于 webauth 的认证,这里我就不开启了 #webServer.user = "zzl" #webServer.password = "password"上面的配置中,我们配置了一个89端口的http服务,并使用 .work.zhuzhilong.com 的泛域名作为二级域名后缀。我们需要使用nginxProxyManager 配置一个代理,将 .work.zhuzhilong.com 的请求都代理到 89 端口:开启 SSL,这样代理的服务可以同时启用 http 服务及 https 服务访问:客户端升级之前买了一台迷你主机放在公司,作为开发服务器使用,使用的 Ubuntu 操作系统,使用 docker 部署的frpc客户端,修改后的 docker-compose.yaml 文件内容如下:services: frpczzl: restart: always network_mode: host volumes: # - ./frpc.ini:/etc/frp/frpc.ini - ./frpc.toml:/etc/frp/frpc.toml - ./logs/:/etc/frp/logs/ container_name: frpczzl # image: snowdreamtech/frpc:0.51.2 image: snowdreamtech/frpc:0.61.1frpc.toml 核心内容如下:user = "work" serverAddr = "119.29.149.159" serverPort = 7200 auth.token = "admin" # for tcp [[proxies]] name = "work-mysql-3306" type = "tcp" localIP = "127.0.0.1" localPort = 3306 remotePort = 3402 # for web [[proxies]] name = "work-http-123" httpUser = "zhuzl" httpPassword = "zhuzl" type = "http" localIP = "127.0.0.1" localPort = 80 subdomain = "123" [[proxies]] name = "work-http-spug" type = "http" localIP = "127.0.0.1" localPort = 80 subdomain = "spug" dashboardfrps中我们开启的webServer,可以通过 7202 端口查看 dashboard,界面截图如下:相关链接:Github:https://github.com/fatedier/frp官网:https://gofrp.org/
-
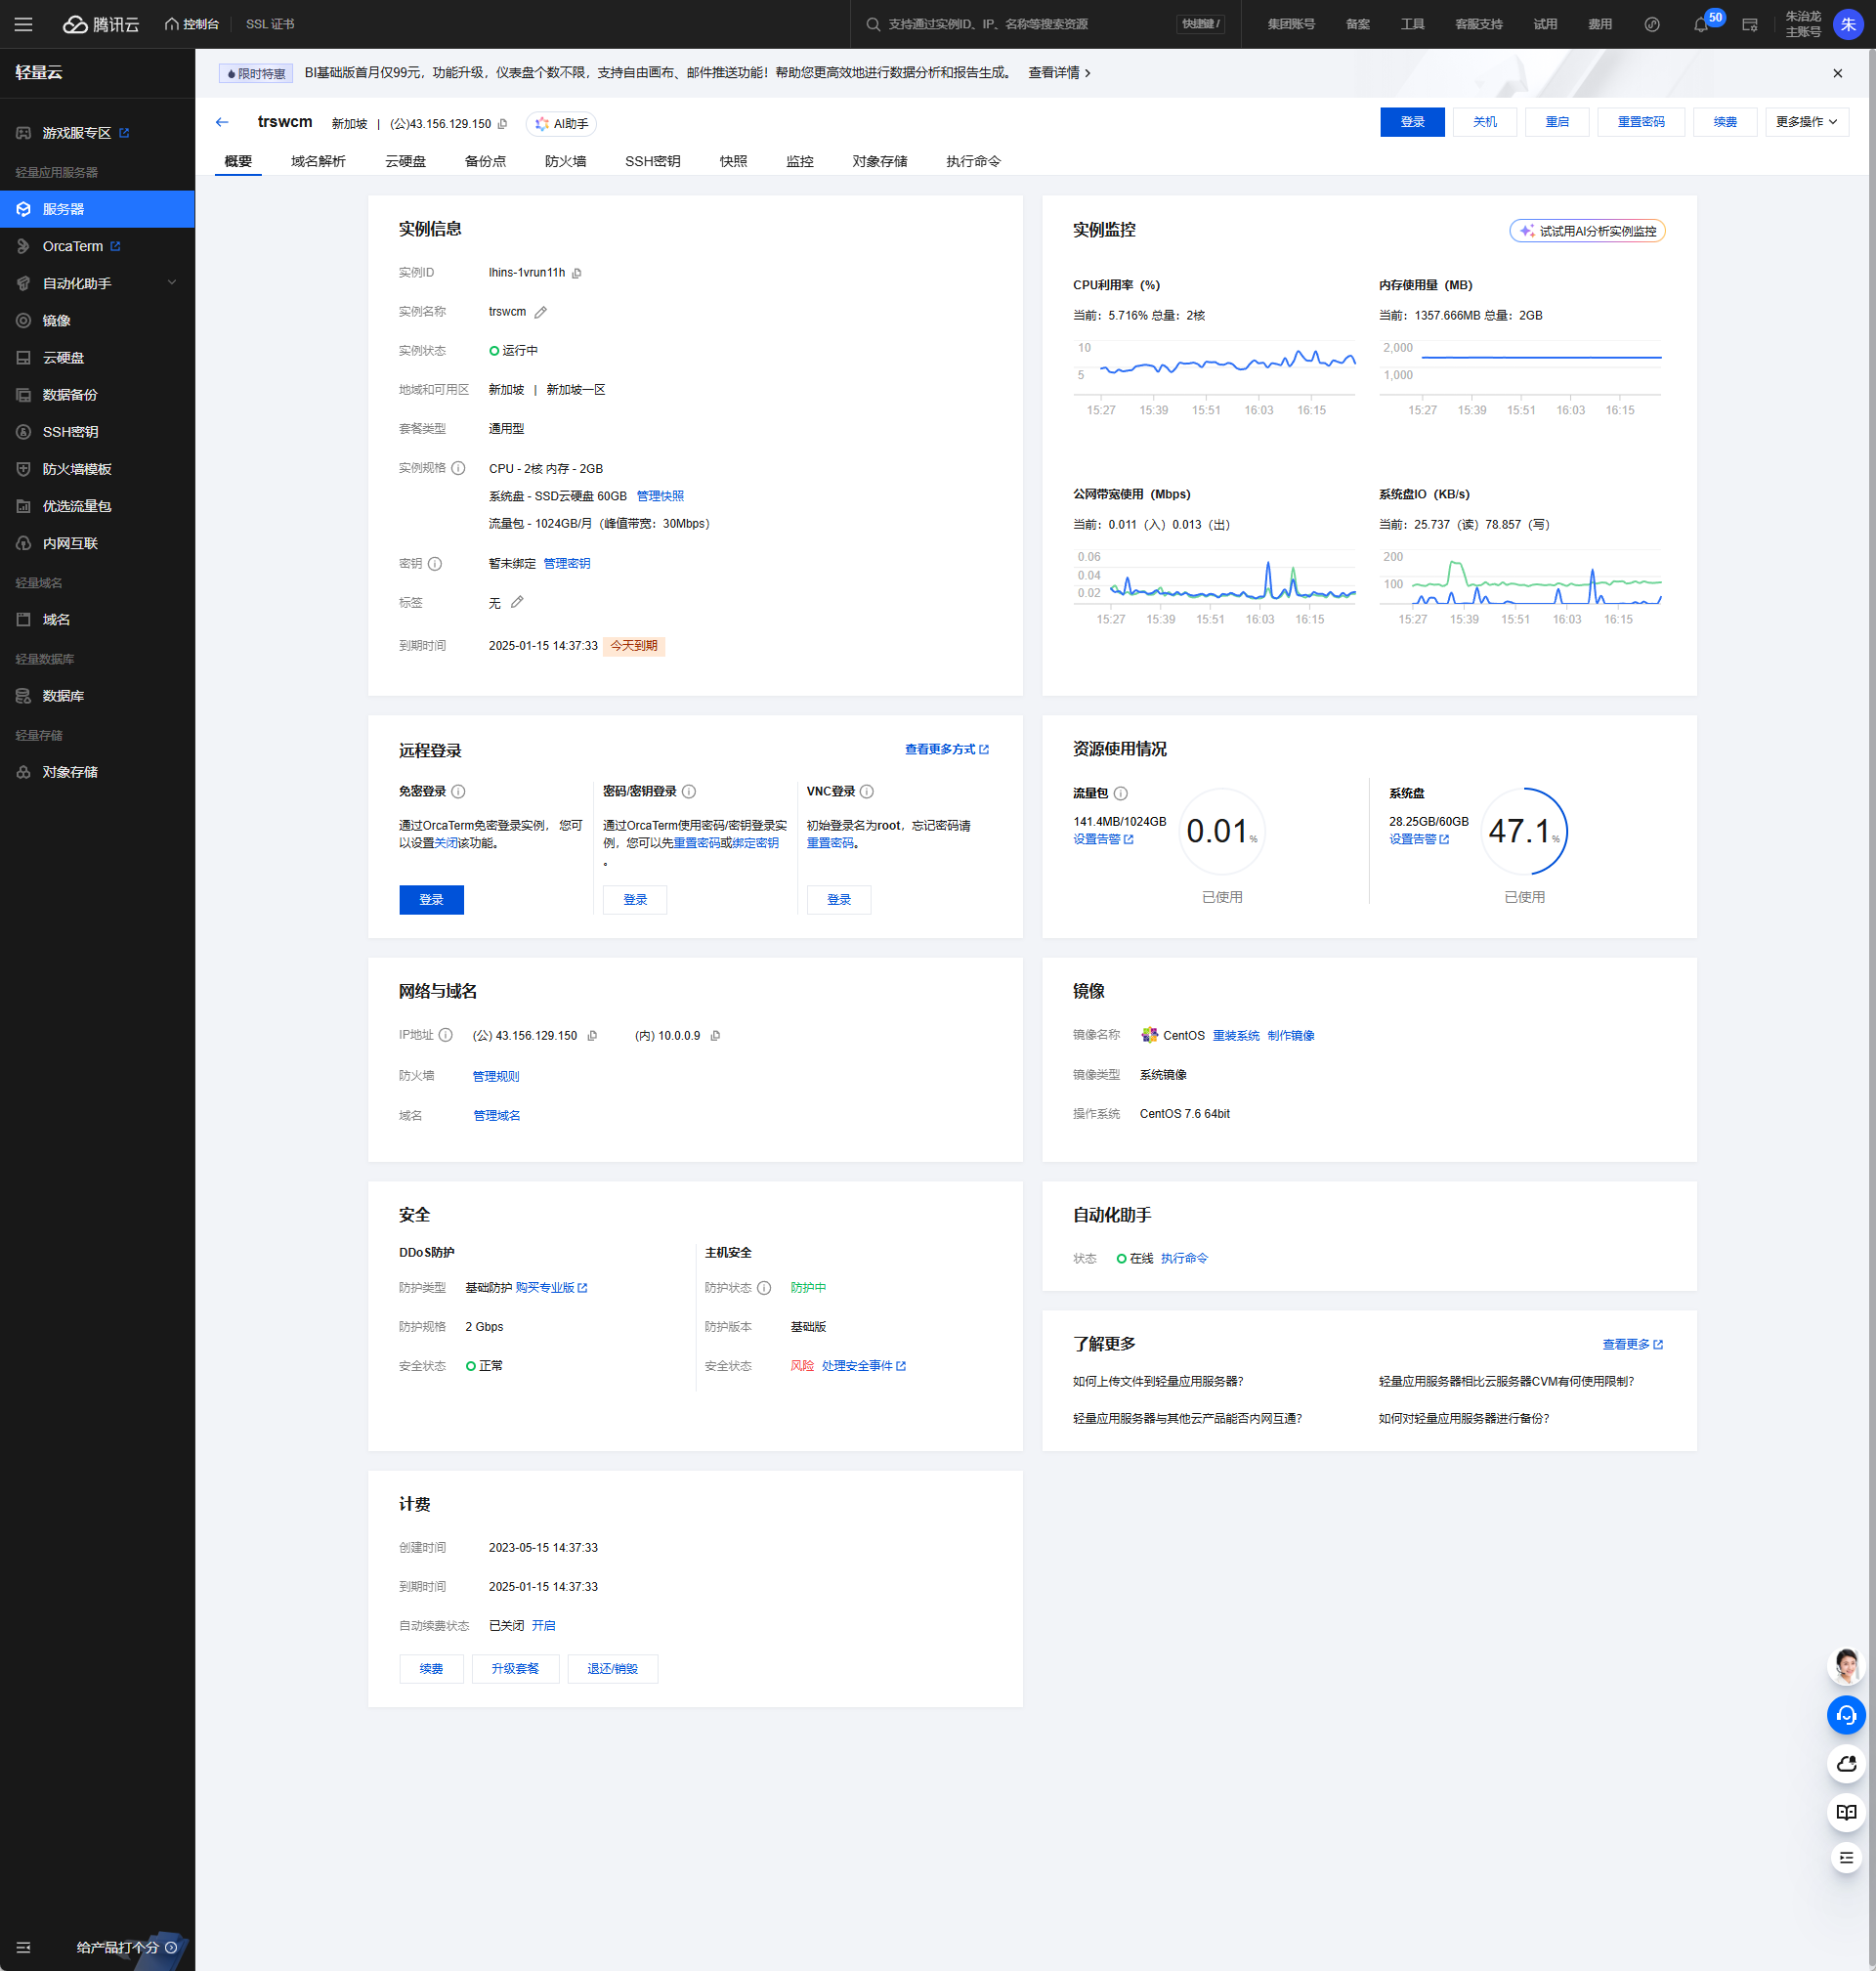
个人博客服务器迁移记录 背景说明由于 zhuzhilong.cn 域名未备案,在国内不能直接访问,于2023年5月15日,在腾讯云买了台轻量应用服务器(配置:2H2G60G30M)来部署未备案的网站,我的个人博客也迁移到了这个服务器上,服务器35元/月,价格也不算贵,一年的服务器费用大概35*12=420元,服务器基本信息如下:去年腾讯云搞活动,有一款配置差不多的轻量应用服务器只需要99元一年,并且可以续费两年:便新购了另外一台轻量应用服务器(配置:2H2G50G30M):这样算下来 3 年只需要 99+99+59.4=257.4 元,也就是3年的费用相当于原服务器一年费用的一半多一点,作为非营运网站,也没有较高的负载,能省一点是一点吧。服务器环境说明原服务器上部署了如下环境:宝塔面板MySQL 5.7php 5.6php 7.3以上环境都是基于宝塔面板进行集成安装的,宝塔面板在管理上挺方便,但是占用资源较多,且存在服务器信息泄露的风险,新服务器便计划采用如下环境:Dockerdocker compose + NginxProxyManagerdocker compose + php 5.6 Z + www.trswcm.comdocker compose + php 7.3 + blog.zhuzhilong.cn新服务器部署记录1、安装 DockerDocker 的安装参考 官网的安装文档(https://docs.docker.com/engine/install/)进行安装即可,如果是国内环境的话,推荐使用阿里云镜像2、添加 Docker 桥接网络推荐使用自定义 Docker 桥接网络,之前有服务器跑的容器多了,到后面会报创建网络失败的情况docker network create --subnet=172.66.0.0/16 --gateway=172.66.0.1 --opt "com.docker.network.bridge.default_bridge"="false" --opt "com.docker.network.bridge.name"="bridge_zzl" --opt "com.docker.network.bridge.enable_icc"="true" --opt "com.docker.network.bridge.enable_ip_masquerade"="true" --opt "com.docker.network.bridge.host_binding_ipv4"="0.0.0.0" --opt "com.docker.network.driver.mtu"="1500" bridge_zzl3、使用docker compose 部署 MySQL 5.7services: mysql: image: mysql:5.7 container_name: mysql-5.7 #使用该参数,container内的root拥有真正的root权限,否则,container内的root只是外部的一个普通用户权限 #设置为true,不然数据卷可能挂载不了,启动不起 privileged: true restart: always networks: - net-zzl ports: - "3316:3306" environment: MYSQL_ROOT_PASSWORD: PASSWORD123 MYSQL_USER: zhuzl MYSQL_PASSWORD: PASSWORD123 TZ: Asia/Shanghai command: --wait_timeout=31536000 --interactive_timeout=31536000 --max_connections=1000 --default-authentication-plugin=mysql_native_password volumes: #映射mysql的数据目录到宿主机,保存数据 #- ./data:/var/lib/mysql - ./data:/www/server/data #根据宿主机下的配置文件创建容器 - ./config/my.cnf:/etc/mysql/my.cnf - ../hosts:/etc/hosts networks: net-zzl: name: bridge_zzl external: true config/my.cnf 内容:[client] #password = your_password port = 3306 socket = /tmp/mysql.sock default-character-set=utf8mb4 [mysqld] port = 3306 socket = /tmp/mysql.sock datadir = /www/server/data default_storage_engine = InnoDB character-set-server=utf8mb4 collation-server=utf8mb4_unicode_ci performance_schema_max_table_instances = 400 table_definition_cache = 400 skip-external-locking key_buffer_size = 64M max_allowed_packet = 1G table_open_cache = 128 sort_buffer_size = 16M net_buffer_length = 4K read_buffer_size = 16M read_rnd_buffer_size = 256K myisam_sort_buffer_size = 256M thread_cache_size = 512 tmp_table_size = 32M default_authentication_plugin = mysql_native_password lower_case_table_names = 1 sql-mode=NO_ENGINE_SUBSTITUTION,STRICT_TRANS_TABLES explicit_defaults_for_timestamp = true #skip-name-resolve max_connections = 500 max_connect_errors = 100 open_files_limit = 65535 log-bin=mysql-bin binlog_format=mixed server-id = 1 # binlog_expire_logs_seconds = 600000 slow_query_log=1 slow-query-log-file=/www/server/data/mysql-slow.log long_query_time=3 #log_queries_not_using_indexes=on early-plugin-load = "" innodb_data_home_dir = /www/server/data innodb_data_file_path = ibdata1:10M:autoextend innodb_log_group_home_dir = /www/server/data innodb_buffer_pool_size = 4096M innodb_log_file_size = 2048M innodb_log_buffer_size = 512M innodb_flush_log_at_trx_commit = 1 innodb_lock_wait_timeout = 50 innodb_max_dirty_pages_pct = 90 innodb_read_io_threads = 16 innodb_write_io_threads = 16 [mysqldump] quick max_allowed_packet = 500M [mysql] no-auto-rehash default-character-set=utf8mb4 [myisamchk] key_buffer_size = 64M sort_buffer_size = 16M read_buffer = 2M write_buffer = 2M [mysqlhotcopy] interactive-timeout 4、使用docker compose 部署 nginxProxyManager官网部署文档:https://nginxproxymanager.com/guide/#quick-setupdocker-compose.yml 文件内容如下:services: npm: image: jc21/nginx-proxy-manager:latest container_name: npm restart: unless-stopped networks: - net-zzl environment: - ACME_AGREE=true - TZ=Asia/Shanghai ports: - 80:80 - 443:443 - 81:81 volumes: - ./data:/data - ./letsencrypt:/etc/letsencrypt - ../hosts:/etc/hosts networks: net-zzl: name: bridge_zzl external: true5、使用docker compose 部署 blog.zhuzhilong.cn 个人博客我的个人博客(blog.zhuzhilong.cn)使用 Typecho 搭建,核心需要的环境 是 php 7.x + mysql.docker-compose.yml 内容如下:services: zzlblog: image: nginx:latest container_name: zzlblog networks: - net-zzl ports: - 8100:80 environment: - TZ=Asia/Shanghai restart: always volumes: - ./www:/var/www/html - ./logs:/var/log/nginx - ./nginx:/etc/nginx/conf.d - ../hosts:/etc/hosts depends_on: - php73 php73: image: yearnfar/typecho-php:latest #image: tsund/php:7.2-fpm-alpine container_name: php73 restart: unless-stopped networks: - net-zzl ports: - 9073:9000 environment: - TZ=Asia/Shanghai volumes: - ./www:/var/www/html - ../hosts:/etc/hosts networks: net-zzl: name: bridge_zzl external: trueyearnfar/typecho-php:latest 镜像主要是参考 https://github.com/yearnfar/typecho-docker 在服务器上直接 build 生成的的镜像。nginx/default.conf 文件内容如下:server { listen 80; server_name localhost; root /var/www/html; index index.php; access_log /var/log/nginx/zzlblog_access.log main; error_log /var/log/nginx/zzlblog_error.log; if (!-e $request_filename) { rewrite ^(.*)$ /index.php$1 last; } location ~ [^/]\.php(/|$) { root /var/www/html; fastcgi_pass php73:9000; proxy_set_header Host $host; #fastcgi_pass hostserver:9073; fastcgi_index index.php; #ifastcgi_param PATH_INFO $fastcgi_path_info; #fastcgi_param PATH_TRANSLATED $document_root$fastcgi_path_info; #fastcgi_param SCRIPT_NAME $fastcgi_script_name; # fastcgi_param SCRIPT_FILENAME $document_root$fastcgi_script_name; fastcgi_param SCRIPT_FILENAME /var/www/html$fastcgi_script_name; include fastcgi_params; } }5、使用docker compose 部署 www.trswcm.comwww.trswcm.com 是我维护了十多年的一个小众网站,主要是十多年前做TRS产品实施的时候分享一些项目实施经验,十多年过去已经很少更新了,不过一天还是有十多 UV 的访问量,还能帮助到一小部分特定人群,使用 QYKCMS 搭建,核心需要的环境 是 php 5.x+ mysql.docker-compose.yml 文件内容如下:services: trswcm: image: nginx container_name: trswcm networks: - net-zzl ports: - 8101:80 environment: - TZ=Asia/Shanghai restart: always volumes: - ./www:/var/www/html - ./logs:/var/log/nginx - ./nginx:/etc/nginx/conf.d - ../hosts:/etc/hosts depends_on: - php56 php56: image: raccourci/php56:latest container_name: php56 restart: unless-stopped networks: - net-zzl ports: - 9056:9000 environment: - TZ=Asia/Shanghai volumes: - ./www:/var/www/html - ../hosts:/etc/hosts networks: net-zzl: name: bridge_zzl external: truenginx/default.conf 文件内容如下:server { listen 80; server_name www.trswcm.com localhost; root /var/www/html; index index.html index.htm index.php default.php default.htm default.html; access_log /var/log/nginx/trswcm_access.log main; error_log /var/log/nginx/trswcm_error.log; #if (!-e $request_filename) { # rewrite ^(.*)$ /index.php$1 last; #} location ~ [^/]\.php(/|$) { root /var/www/html; fastcgi_pass php56:9000; proxy_set_header Host www.trswcm.com; #fastcgi_pass hostserver:9073; fastcgi_index index.php; #ifastcgi_param PATH_INFO $fastcgi_path_info; #fastcgi_param PATH_TRANSLATED $document_root$fastcgi_path_info; #fastcgi_param SCRIPT_NAME $fastcgi_script_name; # fastcgi_param SCRIPT_FILENAME $document_root$fastcgi_script_name; fastcgi_param SCRIPT_FILENAME /var/www/html$fastcgi_script_name; include fastcgi_params; } }NginxProxyManager 配置Nginx Proxy Manager (NPM) 是一个基于 Nginx 的反向代理管理工具,旨在简化 Nginx 的配置和管理。它提供了一个直观的 Web 界面,使用户可以轻松地设置和管理反向代理、SSL 证书、访问控制等功能。在上面的章节中,我们使用 docker compose 的方式运行了 NginxProxyManager,我们可以通过UI界面进行可视化配置,最重要的是SSL证书配置及代理配置,以下是部分界面截图:
-
docker 版 gitlab 配置邮件推送 背景介绍作为一个老派程序员,偶尔能接到一些私单,不少私单涉及到代码安全问题,就不是很适合用Gitlab、Gitee 等在线代码托管服务了,于是在我的开发服务器上自己搭建了一个 git 服务,可选的git 服务有很多,如::Gitea、Gogs、Gitlab 等,由于公司环境基本上用 Gitlab,且Gitlab 功能足够强大,所以便选择了 Gitlab 作为服务端,Gitlab 在国内成立了极狐公司(https://gitlab.cn/)专门运营国内的 Gitlab,在部署的时候也就选择了 Gitlab 的极狐版本,部署的完整 docker-compose.yml 如下:services: gitlab: image: 'registry.gitlab.cn/omnibus/gitlab-jh:latest' # image: 'registry.gitlab.cn/omnibus/gitlab-jh:16.11.3' #image: 'registry.gitlab.cn/omnibus/gitlab-jh:16.7.7' restart: always container_name: gitlab hostname: 'git.work.zhuzhilong.com' environment: GITLAB_OMNIBUS_CONFIG: | external_url 'http://git.work.zhuzhilong.com' # Add any other gitlab.rb configuration here, each on its own line alertmanager['enable']=false networks: - net-zzl ports: - '8007:80' - '2223:22' volumes: - './config:/etc/gitlab' - './logs:/var/log/gitlab' - './data:/var/opt/gitlab' - ../hosts:/etc/hosts - /etc/timezone:/etc/timezone:ro - /etc/localtime:/etc/localtime:ro shm_size: '256m' networks: net-zzl: name: bridge_zzl external: true在开发过程中,涉及多成员协作,而 Gitlab 自带的邮件服务还是很有必要的,所以本次我们就将我们的 gitlab 服务搭上邮件的快车。配置过程如下:1、进入 docker 容器docker exec -it gitlab /bin/bash2、编辑 /etc/gitlab/gitlab.rb 文件{alert type="info"}为避免出错,可在更改配置前备份系统,备份命令为:gitlab-rake gitlab:backup:create{/alert}修改涉及邮件发送相关的服务,主要配置信息如下:### GitLab email server settings ###! Docs: https://docs.gitlab.com/omnibus/settings/smtp.html ###! **Use smtp instead of sendmail/postfix.** gitlab_rails['smtp_enable'] = true gitlab_rails['smtp_address'] = "smtp.feishu.cn" gitlab_rails['smtp_port'] = 465 gitlab_rails['smtp_user_name'] = "sender@zhuzhilong.com" gitlab_rails['smtp_password'] = "xxxxxxxx" gitlab_rails['smtp_domain'] = "mail.feishu.cn" gitlab_rails['smtp_authentication'] = "login" # gitlab_rails['smtp_enable_starttls_auto'] = true gitlab_rails['smtp_tls'] = true gitlab_rails['smtp_pool'] = false ###! **Can be: 'none', 'peer', 'client_once', 'fail_if_no_peer_cert'** ###! Docs: http://api.rubyonrails.org/classes/ActionMailer/Base.html # gitlab_rails['smtp_openssl_verify_mode'] = 'none' # gitlab_rails['smtp_ca_path'] = "/etc/ssl/certs" # gitlab_rails['smtp_ca_file'] = "/etc/ssl/certs/ca-certificates.crt" ### Email Settings gitlab_rails['gitlab_email_enabled'] = true ##! If your SMTP server does not like the default 'From: gitlab@gitlab.example.com' ##! can change the 'From' with this setting. gitlab_rails['gitlab_email_from'] = 'xxxx@zhuzhilong.com' gitlab_rails['gitlab_email_display_name'] = '朱治龙git' gitlab_rails['gitlab_email_reply_to'] = 'reply@zhuzhilong.com' # gitlab_rails['gitlab_email_subject_suffix'] = '' # gitlab_rails['gitlab_email_smime_enabled'] = false # gitlab_rails['gitlab_email_smime_key_file'] = '/etc/gitlab/ssl/gitlab_smime.key' # gitlab_rails['gitlab_email_smime_cert_file'] = '/etc/gitlab/ssl/gitlab_smime.crt' # gitlab_rails['gitlab_email_smime_ca_certs_file'] = '/etc/gitlab/ssl/gitlab_smime_cas.crt' 3、使配置生效并重启服务gitlab-ctl reconfigure && gitlab-ctl restart4、验证邮件发送服务可在个人资料 -> 电子邮件 中添加新的邮件地址:添加后,对应的邮箱会收到如下验证邮件即表示配置成功了:
-
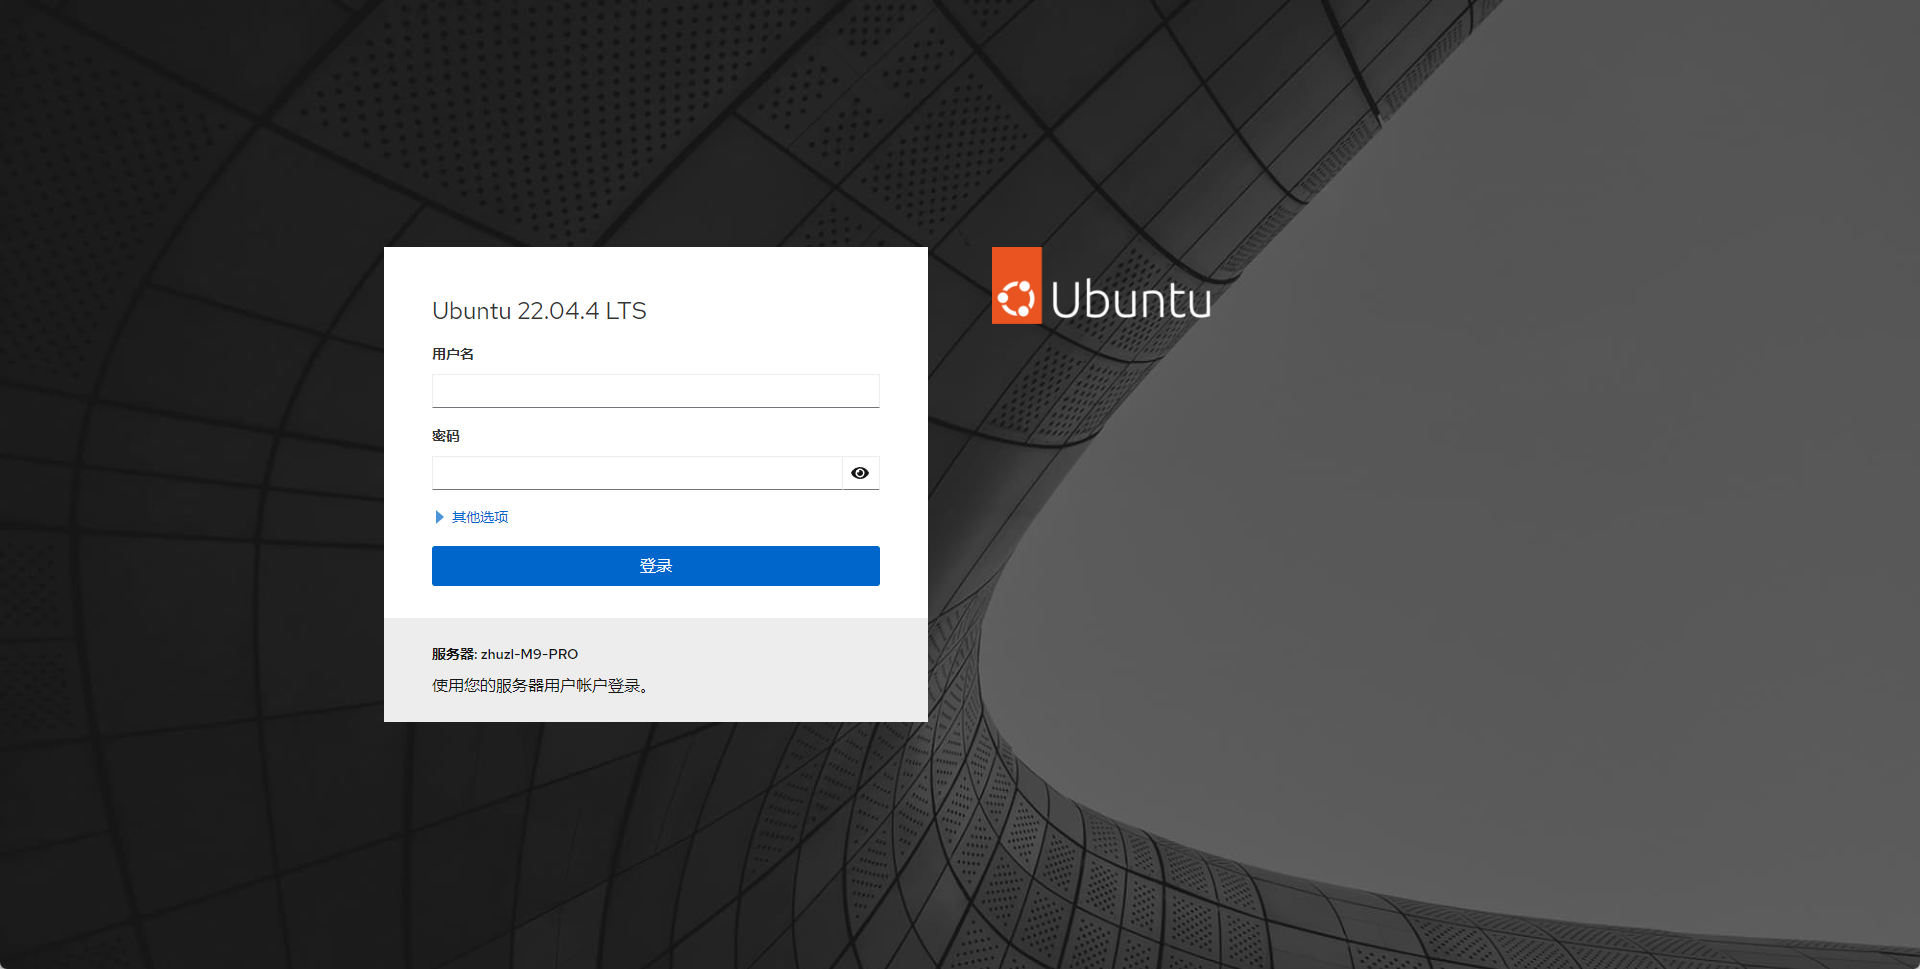
推荐一款好用的Linux Web 可视化管理工具——Cockpit 软件介绍Cockpit是一个易于使用、集成、易于浏览和开放的基于 Web 的服务器界面。支持多种linux发行版软件常用功能系统日志信息查看系统存储信息查看仪表盘系统配置与系统基本操作Docker容器监控系统网络监控Web命令行终端软件部署Cockpit 支持多种 Linux 发行版,各类型安装命令参见官网链接:https://cockpit-project.org/running.html。根据官网的安装说明,下面以 Ubuntu 为例进行简单讲解。安装命令如下:. /etc/os-release sudo apt install -t ${VERSION_CODENAME}-backports cockpit上面的命令执行效果如下:zhuzl@zhuzl-M9-PRO:~$ . /etc/os-release zhuzl@zhuzl-M9-PRO:~$ sudo apt install -t ${VERSION_CODENAME}-backports cockpit 正在读取软件包列表... 完成 正在分析软件包的依赖关系树... 完成 正在读取状态信息... 完成 将会同时安装下列软件: cockpit-bridge cockpit-networkmanager cockpit-packagekit cockpit-storaged cockpit-system cockpit-ws finalrd libblockdev-mdraid2 libbytesize-common libbytesize1 libpwquality-tools mdadm 建议安装: cockpit-doc cockpit-sosreport udisks2-btrfs udisks2-lvm2 sssd-dbus dracut-core 下列【新】软件包将被安装: cockpit cockpit-bridge cockpit-networkmanager cockpit-packagekit cockpit-storaged cockpit-system cockpit-ws finalrd libblockdev-mdraid2 libbytesize-common libbytesize1 libpwquality-tools mdadm 升级了 0 个软件包,新安装了 13 个软件包,要卸载 0 个软件包,有 122 个软件包未被升级。 需要下载 7,490 kB 的归档。 解压缩后会消耗 10.4 MB 的额外空间。 您希望继续执行吗? [Y/n] y 获取:1 http://cn.archive.ubuntu.com/ubuntu jammy-backports/universe amd64 cockpit-bridge amd64 324-1~bpo22.04.1 [393 kB] 获取:2 http://cn.archive.ubuntu.com/ubuntu jammy-backports/universe amd64 cockpit-ws amd64 324-1~bpo22.04.1 [882 kB] 获取:3 http://mirrors.tuna.tsinghua.edu.cn/ubuntu jammy/universe amd64 libpwquality-tools amd64 1.4.4-1build2 [9,752 B] 获取:4 http://cn.archive.ubuntu.com/ubuntu jammy-backports/universe amd64 cockpit-system all 324-1~bpo22.04.1 [3,204 kB] 获取:5 http://cn.archive.ubuntu.com/ubuntu jammy-backports/universe amd64 cockpit all 324-1~bpo22.04.1 [20.1 kB] 获取:6 http://cn.archive.ubuntu.com/ubuntu jammy-backports/universe amd64 cockpit-networkmanager all 324-1~bpo22.04.1 [846 kB] 获取:7 http://cn.archive.ubuntu.com/ubuntu jammy-backports/universe amd64 cockpit-packagekit all 324-1~bpo22.04.1 [844 kB] 获取:8 http://mirrors.tuna.tsinghua.edu.cn/ubuntu jammy/universe amd64 libbytesize-common all 2.6-1 [7,454 B] 获取:9 http://mirrors.tuna.tsinghua.edu.cn/ubuntu jammy/universe amd64 libbytesize1 amd64 2.6-1 [12.1 kB] 获取:10 http://mirrors.tuna.tsinghua.edu.cn/ubuntu jammy-updates/main amd64 mdadm amd64 4.2-0ubuntu2 [464 kB] 获取:11 http://mirrors.tuna.tsinghua.edu.cn/ubuntu jammy/universe amd64 libblockdev-mdraid2 amd64 2.26-1 [11.8 kB] 获取:12 http://cn.archive.ubuntu.com/ubuntu jammy-backports/universe amd64 cockpit-storaged all 324-1~bpo22.04.1 [789 kB] 获取:13 http://mirrors.tuna.tsinghua.edu.cn/ubuntu jammy/main amd64 finalrd all 9build1 [7,306 B] 已下载 7,490 kB,耗时 13秒 (577 kB/s) 正在预设定软件包 ... 正在选中未选择的软件包 cockpit-bridge。 (正在读取数据库 ... 系统当前共安装有 262830 个文件和目录。) 准备解压 .../00-cockpit-bridge_324-1~bpo22.04.1_amd64.deb ... 正在解压 cockpit-bridge (324-1~bpo22.04.1) ... 正在选中未选择的软件包 cockpit-ws。 准备解压 .../01-cockpit-ws_324-1~bpo22.04.1_amd64.deb ... 正在解压 cockpit-ws (324-1~bpo22.04.1) ... 正在选中未选择的软件包 libpwquality-tools。 准备解压 .../02-libpwquality-tools_1.4.4-1build2_amd64.deb ... 正在解压 libpwquality-tools (1.4.4-1build2) ... 正在选中未选择的软件包 cockpit-system。 准备解压 .../03-cockpit-system_324-1~bpo22.04.1_all.deb ... 正在解压 cockpit-system (324-1~bpo22.04.1) ... 正在选中未选择的软件包 cockpit。 准备解压 .../04-cockpit_324-1~bpo22.04.1_all.deb ... 正在解压 cockpit (324-1~bpo22.04.1) ... 正在选中未选择的软件包 cockpit-networkmanager。 准备解压 .../05-cockpit-networkmanager_324-1~bpo22.04.1_all.deb ... 正在解压 cockpit-networkmanager (324-1~bpo22.04.1) ... 正在选中未选择的软件包 cockpit-packagekit。 准备解压 .../06-cockpit-packagekit_324-1~bpo22.04.1_all.deb ... 正在解压 cockpit-packagekit (324-1~bpo22.04.1) ... 正在选中未选择的软件包 libbytesize-common。 准备解压 .../07-libbytesize-common_2.6-1_all.deb ... 正在解压 libbytesize-common (2.6-1) ... 正在选中未选择的软件包 libbytesize1:amd64。 准备解压 .../08-libbytesize1_2.6-1_amd64.deb ... 正在解压 libbytesize1:amd64 (2.6-1) ... 正在选中未选择的软件包 mdadm。 准备解压 .../09-mdadm_4.2-0ubuntu2_amd64.deb ... 正在解压 mdadm (4.2-0ubuntu2) ... 正在选中未选择的软件包 libblockdev-mdraid2:amd64。 准备解压 .../10-libblockdev-mdraid2_2.26-1_amd64.deb ... 正在解压 libblockdev-mdraid2:amd64 (2.26-1) ... 正在选中未选择的软件包 cockpit-storaged。 准备解压 .../11-cockpit-storaged_324-1~bpo22.04.1_all.deb ... 正在解压 cockpit-storaged (324-1~bpo22.04.1) ... 正在选中未选择的软件包 finalrd。 准备解压 .../12-finalrd_9build1_all.deb ... 正在解压 finalrd (9build1) ... 正在设置 libpwquality-tools (1.4.4-1build2) ... 正在设置 finalrd (9build1) ... Created symlink /etc/systemd/system/sysinit.target.wants/finalrd.service → /lib/systemd/system/finalrd.service. 正在设置 libbytesize-common (2.6-1) ... 正在设置 cockpit-bridge (324-1~bpo22.04.1) ... 正在设置 libbytesize1:amd64 (2.6-1) ... 正在设置 cockpit-ws (324-1~bpo22.04.1) ... Creating group cockpit-wsinstance with gid 998. Creating user cockpit-wsinstance (User for cockpit-ws instances) with uid 998 and gid 998. Created symlink /etc/systemd/system/sockets.target.wants/cockpit.socket → /lib/systemd/system/cockpit.socket. 正在设置 mdadm (4.2-0ubuntu2) ... Generating mdadm.conf... done. update-initramfs: deferring update (trigger activated) Sourcing file `/etc/default/grub' Sourcing file `/etc/default/grub.d/init-select.cfg' Generating grub configuration file ... File descriptor 3 (pipe:[363435355]) leaked on vgs invocation. Parent PID 1007874: grub-probe File descriptor 3 (pipe:[363435355]) leaked on vgs invocation. Parent PID 1007874: grub-probe File descriptor 3 (pipe:[363435355]) leaked on vgs invocation. Parent PID 1007902: /usr/sbin/grub-probe File descriptor 3 (pipe:[363435355]) leaked on vgs invocation. Parent PID 1007902: /usr/sbin/grub-probe File descriptor 3 (pipe:[363435355]) leaked on vgs invocation. Parent PID 1007914: /usr/sbin/grub-probe File descriptor 3 (pipe:[363435355]) leaked on vgs invocation. Parent PID 1007914: /usr/sbin/grub-probe File descriptor 3 (pipe:[363435355]) leaked on vgs invocation. Parent PID 1007924: /usr/sbin/grub-probe File descriptor 3 (pipe:[363435355]) leaked on vgs invocation. Parent PID 1007924: /usr/sbin/grub-probe File descriptor 3 (pipe:[363435355]) leaked on vgs invocation. Parent PID 1007934: /usr/sbin/grub-probe File descriptor 3 (pipe:[363435355]) leaked on vgs invocation. Parent PID 1007934: /usr/sbin/grub-probe File descriptor 3 (pipe:[363435355]) leaked on vgs invocation. Parent PID 1007944: /usr/sbin/grub-probe File descriptor 3 (pipe:[363435355]) leaked on vgs invocation. Parent PID 1007944: /usr/sbin/grub-probe File descriptor 3 (pipe:[363435355]) leaked on vgs invocation. Parent PID 1008001: /usr/sbin/grub-probe File descriptor 3 (pipe:[363435355]) leaked on vgs invocation. Parent PID 1008001: /usr/sbin/grub-probe Found linux image: /boot/vmlinuz-6.8.0-49-generic Found initrd image: /boot/initrd.img-6.8.0-49-generic File descriptor 3 (pipe:[363435355]) leaked on vgs invocation. Parent PID 1008083: /usr/sbin/grub-probe File descriptor 3 (pipe:[363435355]) leaked on vgs invocation. Parent PID 1008083: /usr/sbin/grub-probe File descriptor 3 (pipe:[363435355]) leaked on vgs invocation. Parent PID 1008094: /usr/sbin/grub-probe File descriptor 3 (pipe:[363435355]) leaked on vgs invocation. Parent PID 1008094: /usr/sbin/grub-probe File descriptor 3 (pipe:[363435355]) leaked on vgs invocation. Parent PID 1008104: /usr/sbin/grub-probe File descriptor 3 (pipe:[363435355]) leaked on vgs invocation. Parent PID 1008104: /usr/sbin/grub-probe File descriptor 3 (pipe:[363435355]) leaked on vgs invocation. Parent PID 1008114: /usr/sbin/grub-probe File descriptor 3 (pipe:[363435355]) leaked on vgs invocation. Parent PID 1008114: /usr/sbin/grub-probe Found linux image: /boot/vmlinuz-6.8.0-40-generic Found initrd image: /boot/initrd.img-6.8.0-40-generic File descriptor 3 (pipe:[363435355]) leaked on vgs invocation. Parent PID 1008391: /usr/sbin/grub-probe File descriptor 3 (pipe:[363435355]) leaked on vgs invocation. Parent PID 1008391: /usr/sbin/grub-probe Memtest86+ needs a 16-bit boot, that is not available on EFI, exiting Warning: os-prober will not be executed to detect other bootable partitions. Systems on them will not be added to the GRUB boot configuration. Check GRUB_DISABLE_OS_PROBER documentation entry. Adding boot menu entry for UEFI Firmware Settings ... done Created symlink /etc/systemd/system/mdmonitor.service.wants/mdcheck_continue.timer → /lib/systemd/system/mdcheck_continue.timer. Created symlink /etc/systemd/system/mdmonitor.service.wants/mdcheck_start.timer → /lib/systemd/system/mdcheck_start.timer. Created symlink /etc/systemd/system/mdmonitor.service.wants/mdmonitor-oneshot.timer → /lib/systemd/system/mdmonitor-oneshot.timer. 正在设置 cockpit-system (324-1~bpo22.04.1) ... 正在设置 cockpit-networkmanager (324-1~bpo22.04.1) ... 正在设置 libblockdev-mdraid2:amd64 (2.26-1) ... 正在设置 cockpit-packagekit (324-1~bpo22.04.1) ... 正在设置 cockpit-storaged (324-1~bpo22.04.1) ... 正在设置 cockpit (324-1~bpo22.04.1) ... 正在处理用于 man-db (2.10.2-1) 的触发器 ... 正在处理用于 libc-bin (2.35-0ubuntu3.8) 的触发器 ... 正在处理用于 initramfs-tools (0.140ubuntu13.4) 的触发器 ... update-initramfs: Generating /boot/initrd.img-6.8.0-49-generic I: The initramfs will attempt to resume from /dev/dm-1 I: (/dev/mapper/vgubuntu-swap_1) I: Set the RESUME variable to override this.安装后通过端口检测服务是否正确:zhuzl@zhuzl-M9-PRO:~$ sudo lsof -i:9090 COMMAND PID USER FD TYPE DEVICE SIZE/OFF NODE NAME systemd 1 root 164u IPv6 363430477 0t0 TCP *:9090 (LISTEN) zhuzl@zhuzl-M9-PRO:~$从上面的命令结果可知,Cockpit 已成功安装并监听 9090 端口。此时我们可以在服务器的防火墙放行 9090 端口后直接通过9090端口访问,由于是web服务,我们也可以使用Nginx 代理对外提供服务,根据个人喜好来就好。初体验登录页从登录页我们可以看到,登录窗都做到了自动国际化,还是不错的。使用 Linux 系统的账号登录,显示如下失败页面:根据界面的报错提示,执行sudo journalctl -u cockpit命令查看日志,内容如下:zhuzl@zhuzl-M9-PRO:~$ sudo journalctl -u cockpit [sudo] zhuzl 的密码: 11月 22 16:07:20 zhuzl-M9-PRO systemd[1]: Starting Cockpit Web Service... 11月 22 16:07:20 zhuzl-M9-PRO cockpit-certificate-ensure[1048208]: /usr/lib/cockpit/cockpit-certificate-helper: line 25: sscg: command not found 11月 22 16:07:20 zhuzl-M9-PRO cockpit-certificate-ensure[1048209]: .+++++++++++++++++++++++++++++++++++++++++++++++++++++++++++++++++*.......+......+....+++++++++++++++++++++++++++++> 11月 22 16:07:20 zhuzl-M9-PRO cockpit-certificate-ensure[1048209]: .....+............+.............+..+....+...+.....+.+++++++++++++++++++++++++++++++++++++++++++++++++++++++++++++++> 11月 22 16:07:20 zhuzl-M9-PRO cockpit-certificate-ensure[1048209]: ----- 11月 22 16:07:20 zhuzl-M9-PRO systemd[1]: Started Cockpit Web Service. 11月 22 16:10:02 zhuzl-M9-PRO systemd[1]: cockpit.service: Deactivated successfully.根据提示是找不到sscg命令,我们安装一下sudo apt install sscg该命令执行情况如下:zhuzl@zhuzl-M9-PRO:/home/zhuzl# sudo apt install sscg 正在读取软件包列表... 完成 正在分析软件包的依赖关系树... 完成 正在读取状态信息... 完成 将会同时安装下列软件: libpath-utils1 powertop 建议安装: cpufrequtils laptop-mode-tools 下列【新】软件包将被安装: libpath-utils1 powertop sscg 升级了 0 个软件包,新安装了 3 个软件包,要卸载 0 个软件包,有 88 个软件包未被升级。 需要下载 225 kB 的归档。 解压缩后会消耗 705 kB 的额外空间。 您希望继续执行吗? [Y/n] y 获取:1 http://mirrors.tuna.tsinghua.edu.cn/ubuntu jammy/main amd64 libpath-utils1 amd64 0.6.2-1 [9,254 B] 获取:2 http://mirrors.tuna.tsinghua.edu.cn/ubuntu jammy/universe amd64 sscg amd64 3.0.2-1 [23.9 kB] 获取:3 http://mirrors.tuna.tsinghua.edu.cn/ubuntu jammy/main amd64 powertop amd64 2.14-1build1 [191 kB] 已下载 225 kB,耗时 57秒 (3,917 B/s) 正在选中未选择的软件包 libpath-utils1:amd64。 (正在读取数据库 ... 系统当前共安装有 263679 个文件和目录。) 准备解压 .../libpath-utils1_0.6.2-1_amd64.deb ... 正在解压 libpath-utils1:amd64 (0.6.2-1) ... 正在选中未选择的软件包 sscg。 准备解压 .../sscg_3.0.2-1_amd64.deb ... 正在解压 sscg (3.0.2-1) ... 正在选中未选择的软件包 powertop。 准备解压 .../powertop_2.14-1build1_amd64.deb ... 正在解压 powertop (2.14-1build1) ... 正在设置 libpath-utils1:amd64 (0.6.2-1) ... 正在设置 powertop (2.14-1build1) ... 正在设置 sscg (3.0.2-1) ... 正在处理用于 man-db (2.10.2-1) 的触发器 ... 正在处理用于 libc-bin (2.35-0ubuntu3.8) 的触发器 ... zhuzl@zhuzl-M9-PRO:/home/zhuzl#主界面版本信息概览-指标和历史数据概览-硬件详细信息日志存储网络用户账户服务终端
-
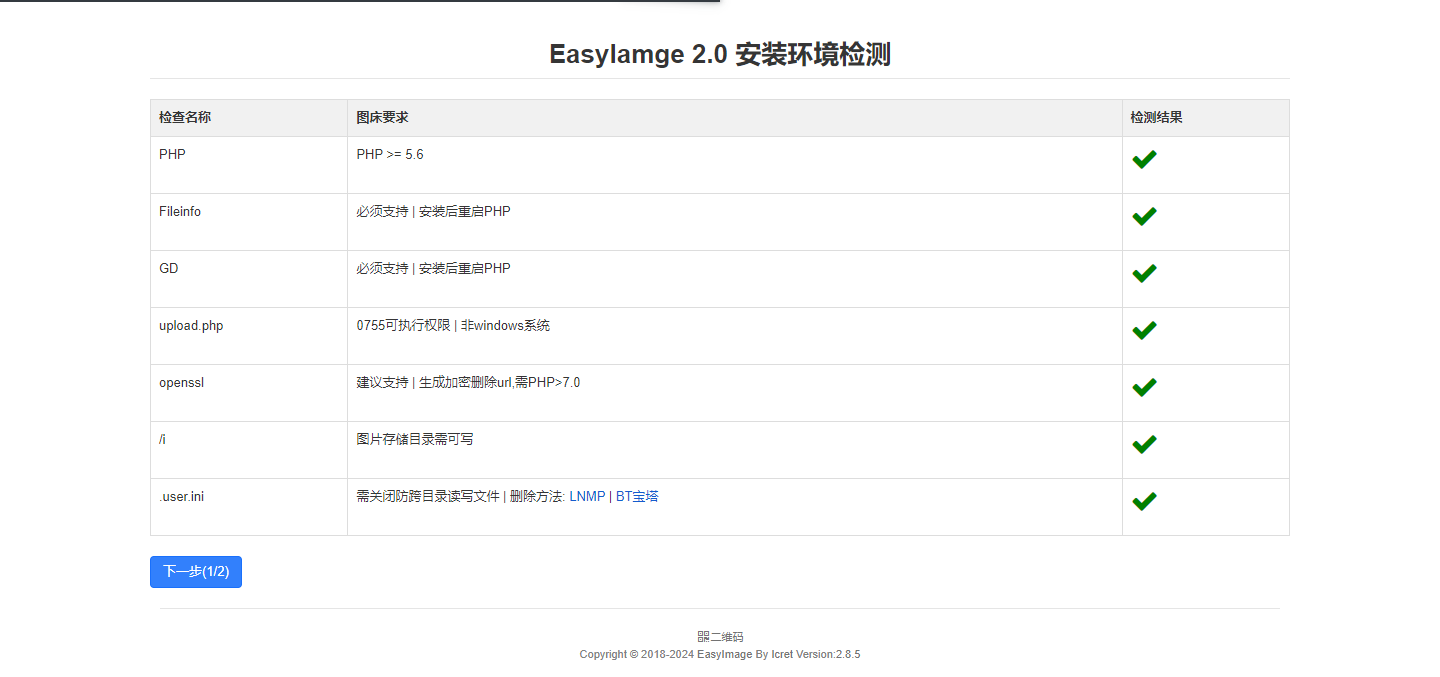
Docker搭建一款功能强大、易于使用的图床程序和图像处理工具 软件介绍EasyImages是一款功能强大的图床程序和图像处理工具,它在多个方面展现出其独特的优势和特点,无论是作为个人用户还是开发者来说都是一个不错的选择。基本特点自托管特性 :EasyImages提供自托管功能,这意味着用户可以完全控制自己的图片数据和隐私,无需依赖第三方图床服务,从而避免了数据隐私风险、服务限制和图片加载延迟等问题。批量上传与多种URL形式 :支持批量上传图片,并能返回多种形式的URL,包括图片直链、Markdown格式URL、BBCCode、Html、缩略图等,满足用户在不同场景下的需求。在线图片管理 :提供一个直观的在线图片管理界面,用户可以方便地查看、编辑、组织和管理上传的图片,支持创建文件夹、排序图片、批量删除或打包图片等功能。上传限制与格式转换 :支持设置上传图片的最低宽度和高度,确保图片质量;同时,能够自动将上传的图片转换为不同的格式,以满足网站或应用的需求。水印功能:支持自动为上传的图片添加文字或图片水印,有助于保护图片版权和防止滥用。资源占用少 :对于安装环境和服务器性能要求非常低,甚至不需要数据库支持,使得在较小的服务器上也能轻松运行且不会占用过多资源。安全性与控制 :提供黑白名单上传功能,允许用户设置哪些IP地址或用户可以上传图片;同时,支持上传日志IP定位和限制每日上传次数等功能,以增强图床的安全性。数据统计与网站统计 :提供数据统计功能,帮助用户跟踪图片的上传情况、资源占用情况和存储使用情况等;此外,还支持网站统计功能,以提供更全面的信息。API支持 :提供了全面的API支持,使开发者能够在其项目中方便地上传和管理图片。图像处理功能除了作为图床程序外,EasyImages还具备强大的图像处理功能。它是一款轻量级且高效的JavaScript库,专为简化和加速图像处理而设计。基于HTML5的Canvas API构建,充分利用了浏览器的硬件加速能力,使得在处理大量或高分辨率的图片时也能保持流畅的性能。EasyImages提供了多种常用的图像操作功能,如缩放、裁剪、旋转、添加水印等。通过简洁的API接口,开发者可以快速地在自己的项目中集成并实现复杂的图片处理需求。此外,它还具有良好的社区支持和丰富的示例代码可供参考学习。相关连接官方网站:https://icret.github.io/EasyImages2.0/#/GitHub地址:https://github.com/icret/EasyImages2.0Docker镜像:https://hub.docker.com/r/ddsderek/easyimage应用部署根据官网推荐的方式,使用 docker compose 部署,编排文件内容如下:services: easyimage: image: ddsderek/easyimage:latest container_name: easyimage networks: - net-zzl ports: - 8113:80 environment: - TZ=Asia/Shanghai - PUID=1000 - PGID=1000 - DEBUG=false volumes: - ./config:/app/web/config - ./data:/app/web/i restart: unless-stopped networks: net-zzl: name: bridge_zzl external: true使用 docker compose up -d 启动服务后,进入如下图所示的安装环境检测页面:单击「下一步」按钮,进入「网站基础配置」页面:填写信息后,单击「开始安装」按钮,安装完成后进入下图所示的管理员登录页面:输入账号、密码后,进入如下图所示的主界面:
-
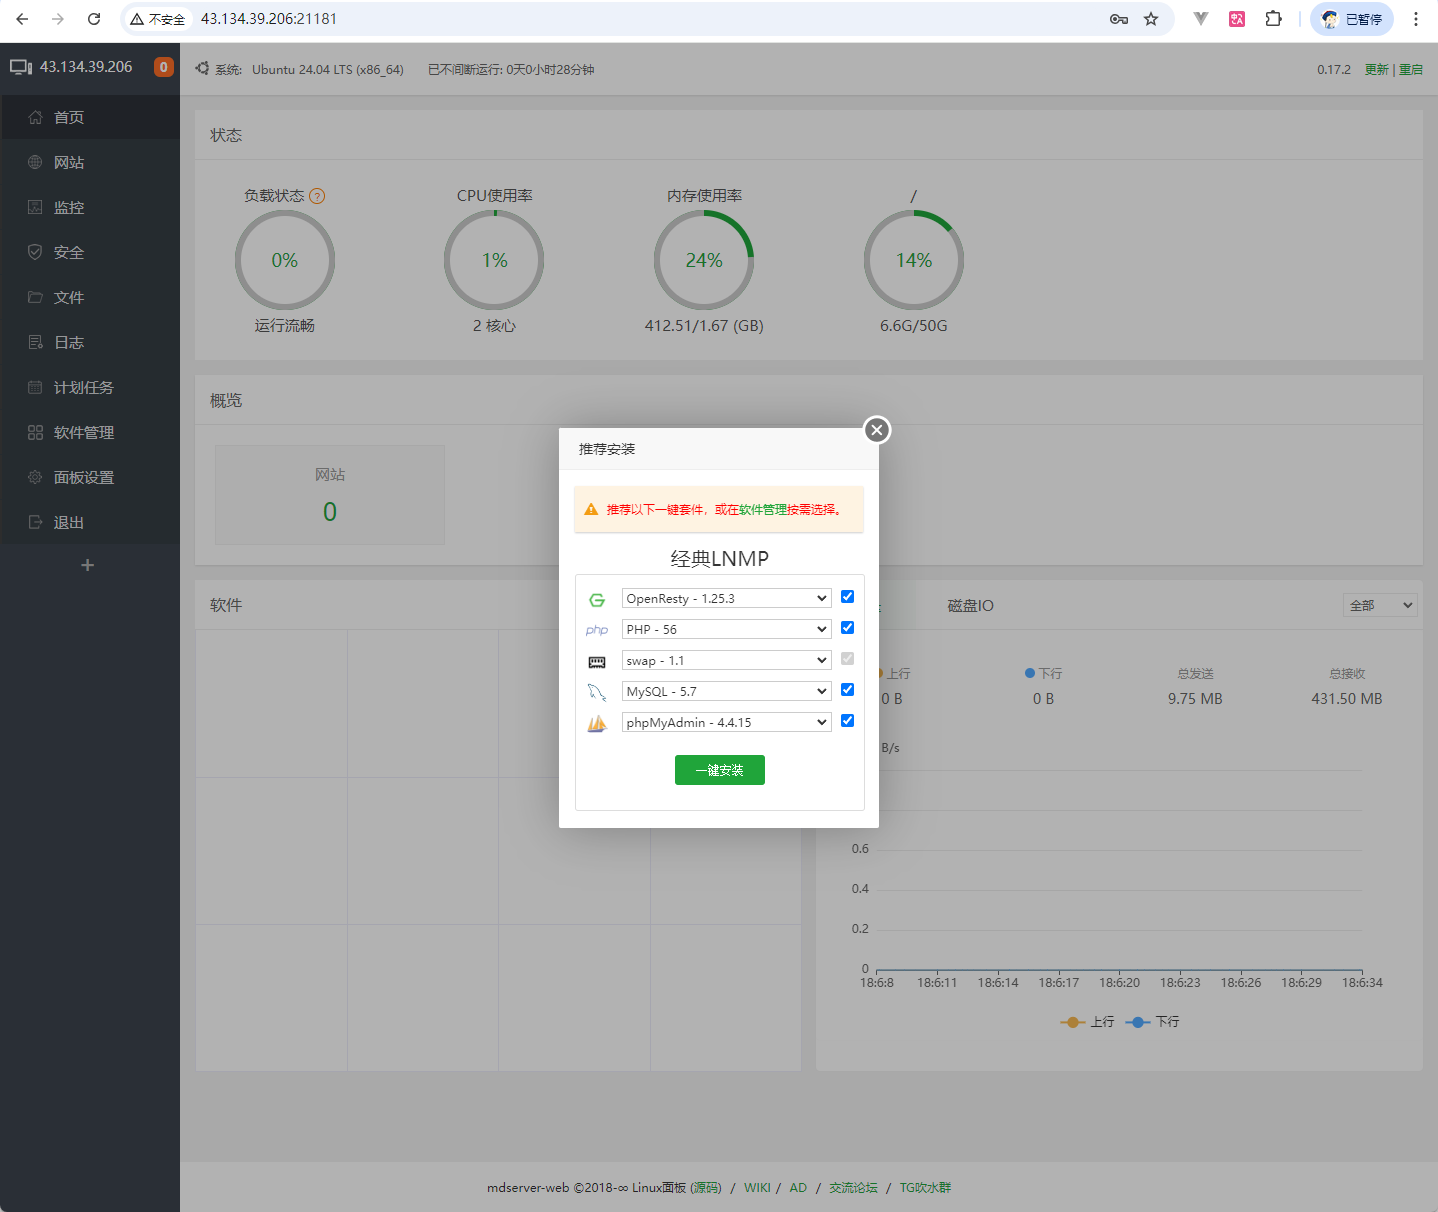
一款开源、免费、简单 Linux 服务器管理面板:mdserver-web安装及使用初体验 背景使用宝塔面板已有一段时间,它确实极大地简化了 Linux 系统的日常维护工作,实现了傻瓜式操作。然而,宝塔面板在用户信息收集和资源占用方面存在一些争议。此外,我也尝试过 1Panel,虽然它的界面现代且美观,但遗憾的是,资源占用反而高于宝塔面板,且在易用性上跟宝塔面板比起来还略逊一筹。最近,我在公众号上了解到一款开源、仿宝塔界面的MDServer-Web,截止当前(2024-09-29)在 Github 已获得 4k+ 的 star,便心生一试的想法。简介一款开源、免费、简单 Linux 服务器管理面板,MDServer-Web 与著名的宝塔面板相似,但更安全且支持多种功能。它安装简单,作者承诺不卖数据、不监控用户、不注入病毒,可以放心使用。软件特性:✅ SSH 终端工具✅ 面板收藏功能✅ 网站子目录绑定✅ 网站备份功能✅ 插件方式管理✅ 自动更新优化✅ 支持 OpenResty、PHP 5.2-8.1、MySQL、MongoDB、Memcached、Redis 等✅ 更多...安装安装命令从官网拷贝如下地址进行安装curl --insecure -fsSL https://cdn.jsdelivr.net/gh/midoks/mdserver-web@latest/scripts/install.sh | bash安装完成后显示如下信息:starting mw-tasks... done .stopping mw-tasks... done stopping mw-panel... cli.sh: line 20: 31687 Killed python3 task.py >> ${DIR}/logs/task.log 2>&1 done starting mw-tasks... done starting mw-panel... .........done ================================================================== MW-Panel default info! ================================================================== MW-Panel-Url: http://43.134.39.206:54724/4tt3ow6j username: tmsvus16 password: koaumgpj Warning: If you cannot access the panel. release the following port (54724|80|443|22) in the security group. ================================================================== Time consumed: 6 Minute!修改端口提供跟宝塔类似的命令行查看及修改面板信息root@VM-12-13-ubuntu:/data/dockerRoot# mw ===============mdserver-web cli tools================= (1) 重启面板服务 (2) 停止面板服务 (3) 启动面板服务 (4) 重载面板服务 (5) 修改面板端口 (10) 查看面板默认信息 (11) 修改面板密码 (12) 修改面板用户名 (13) 显示面板错误日志 (20) 关闭BasicAuth认证 (21) 解除域名绑定 (22) 解除面板SSL绑定 (23) 开启IPV6支持 (24) 关闭IPV6支持 (25) 开启防火墙SSH端口 (26) 关闭二次验证 (27) 查看防火墙信息 (100) 开启PHP52显示 (101) 关闭PHP52显示 (200) 切换Linux系统软件源 (201) 简单速度测试 (0) 取消 ====================================================== 请输入命令编号:5 请输入新的面板端口:21181 stopping mw-panel... done starting mw-panel... ...done nw================================================================== MW-Panel default info! ================================================================== MW-Panel-Url: http://43.134.39.206:21181/4tt3ow6j username: tmsvus16 password: koaumgpj Warning: If you cannot access the panel. release the following port (21181|80|443|22) in the security group. ==================================================================初体验根据提供的端口及登录信息,使用浏览器访问打开如下所示的主界面:应用安装:链接Github 开源地址:https://github.com/midoks/mdserver-web官网地址:http://www.midoks.icu/ 广告有些多,且没什么内容(2024-09-29)论坛:https://bbs.midoks.icu/
-
记一次升级gitlab的记录(16.3.3~17.3.1) 开发服务器的 gitlab 使用 docker 搭建,docker-compose.yml 文件内容如下:services: gitlab: image: 'registry.gitlab.cn/omnibus/gitlab-jh:latest' restart: always container_name: gitlab hostname: 'git.work.zhuzhilong.com' environment: GITLAB_OMNIBUS_CONFIG: | external_url 'http://git.work.zhuzhilong.com' # Add any other gitlab.rb configuration here, each on its own line networks: - net-zzl ports: - '8007:80' - '2223:22' volumes: - './config:/etc/gitlab' - './logs:/var/log/gitlab' - './data:/var/opt/gitlab' - ../hosts:/etc/hosts shm_size: '256m' networks: net-zzl: name: bridge_zzl external: true由于该 gitlab 搭建后一直未更新过,今天尝试个升级,升级前,我们先看看系统环境信息:由于 gitlab 用的镜像是 registry.gitlab.cn/omnibus/gitlab-jh:latest,我先尝试直接拉取一下最新的镜像看是否可以直接升级,拉取命令:docker compose pull,拉取过程如下:zhuzl@zhuzl-M9-PRO:/data/dockerRoot/apps/gitlab$ docker compose pull [+] Pulling 10/10 ✔ gitlab 9 layers [⣿⣿⣿⣿⣿⣿⣿⣿⣿] 0B/0B Pulled 62.1s ✔ 857cc8cb19c0 Already exists 0.0s ✔ d388127601d7 Pull complete 1.0s ✔ c973ce60899e Pull complete 1.6s ✔ d47067d54097 Pull complete 1.2s ✔ b37f526cb6d4 Pull complete 1.4s ✔ e3e25c0883d4 Pull complete 6.6s ✔ 38326bc1340c Pull complete 7.6s ✔ dc916e282a43 Pull complete 6.6s ✔ 84388f622dc9 Pull complete 44.1s zhuzl@zhuzl-M9-PRO:/data/dockerRoot/apps/gitlab$ 然后,我们使用 docker compose up -d 启动服务,启动服务后,使用docker logs -f gitlab命令看看日志: zhuzl@zhuzl-M9-PRO:/data/dockerRoot/apps/gitlab$ docker logs -f gitlab Thank you for using GitLab Docker Image! Current version: gitlab-jh=17.3.1-jh.0 Configure GitLab for your system by editing /etc/gitlab/gitlab.rb file And restart this container to reload settings. To do it use docker exec: docker exec -it gitlab editor /etc/gitlab/gitlab.rb docker restart gitlab For a comprehensive list of configuration options please see the Omnibus GitLab readme https://gitlab.com/gitlab-org/omnibus-gitlab/blob/master/README.md If this container fails to start due to permission problems try to fix it by executing: docker exec -it gitlab update-permissions docker restart gitlab Cleaning stale PIDs & sockets It seems you are upgrading from 16.3.3-jh to 17.3.1. It is required to upgrade to the latest 16.11.x version first before proceeding. Please follow the upgrade documentation at https://docs.gitlab.com/ee/update/index.html#upgrading-to-a-new-major-version Thank you for using GitLab Docker Image! Current version: gitlab-jh=17.3.1-jh.0 Configure GitLab for your system by editing /etc/gitlab/gitlab.rb file And restart this container to reload settings. To do it use docker exec: docker exec -it gitlab editor /etc/gitlab/gitlab.rb docker restart gitlab For a comprehensive list of configuration options please see the Omnibus GitLab readme https://gitlab.com/gitlab-org/omnibus-gitlab/blob/master/README.md If this container fails to start due to permission problems try to fix it by executing: docker exec -it gitlab update-permissions docker restart gitlab Cleaning stale PIDs & sockets It seems you are upgrading from 16.3.3-jh to 17.3.1. It is required to upgrade to the latest 16.11.x version first before proceeding. Please follow the upgrade documentation at https://docs.gitlab.com/ee/update/index.html#upgrading-to-a-new-major-version Thank you for using GitLab Docker Image! Current version: gitlab-jh=17.3.1-jh.0 Configure GitLab for your system by editing /etc/gitlab/gitlab.rb file And restart this container to reload settings. To do it use docker exec: docker exec -it gitlab editor /etc/gitlab/gitlab.rb docker restart gitlab For a comprehensive list of configuration options please see the Omnibus GitLab readme https://gitlab.com/gitlab-org/omnibus-gitlab/blob/master/README.md If this container fails to start due to permission problems try to fix it by executing: docker exec -it gitlab update-permissions docker restart gitlab Cleaning stale PIDs & sockets It seems you are upgrading from 16.3.3-jh to 17.3.1. It is required to upgrade to the latest 16.11.x version first before proceeding. Please follow the upgrade documentation at https://docs.gitlab.com/ee/update/index.html#upgrading-to-a-new-major-version zhuzl@zhuzl-M9-PRO:/data/dockerRoot/apps/gitlab$ 从日志中的提示可知,系统检测到了,我们是从16.3.3-jh 升级到 17.3.1.但是要升级到17.x 必须先升级到 16.11.x 。于是将 docker-compose.yaml 文件中的image值改为:registry.gitlab.cn/omnibus/gitlab-jh:16.11.3,重新拉取,然后运行,观察日志:zhuzl@zhuzl-M9-PRO:/data/dockerRoot/apps/gitlab$ docker logs -f gitlab Thank you for using GitLab Docker Image! Current version: gitlab-jh=16.11.3-jh.0 Configure GitLab for your system by editing /etc/gitlab/gitlab.rb file And restart this container to reload settings. To do it use docker exec: docker exec -it gitlab editor /etc/gitlab/gitlab.rb docker restart gitlab For a comprehensive list of configuration options please see the Omnibus GitLab readme https://gitlab.com/gitlab-org/omnibus-gitlab/blob/master/README.md If this container fails to start due to permission problems try to fix it by executing: docker exec -it gitlab update-permissions docker restart gitlab Cleaning stale PIDs & sockets It seems you are upgrading from 16.3.3-jh to 16.11.3. It is required to upgrade to the latest 16.7.x version first before proceeding. Please follow the upgrade documentation at https://docs.gitlab.com/ee/update/#upgrade-paths Thank you for using GitLab Docker Image! Current version: gitlab-jh=16.11.3-jh.0 Configure GitLab for your system by editing /etc/gitlab/gitlab.rb file And restart this container to reload settings. To do it use docker exec: docker exec -it gitlab editor /etc/gitlab/gitlab.rb docker restart gitlab For a comprehensive list of configuration options please see the Omnibus GitLab readme https://gitlab.com/gitlab-org/omnibus-gitlab/blob/master/README.md If this container fails to start due to permission problems try to fix it by executing: docker exec -it gitlab update-permissions docker restart gitlab Cleaning stale PIDs & sockets It seems you are upgrading from 16.3.3-jh to 16.11.3. It is required to upgrade to the latest 16.7.x version first before proceeding. Please follow the upgrade documentation at https://docs.gitlab.com/ee/update/#upgrade-paths zhuzl@zhuzl-M9-PRO:/data/dockerRoot/apps/gitlab$根据日志提示,要升级到16.11.3 的话,需要先升级到 16.7.x , 于是我们继续修改docker-compose.yaml 中的 image 为:registry.gitlab.cn/omnibus/gitlab-jh:16.11.3,继续拉取镜像并启动服务,经过漫长等待后,登录gitlab,查看版本发现第一步升级到16.7.x已完成:然后继续升级到16.11.x,修改docker 镜像后,重启服务,经过漫长的等待后,成功升级到16.11.3:然后我们将image 修改为:registry.gitlab.cn/omnibus/gitlab-jh:latest`,重新启动服务,登录后,已经升级到最新的 17.3.1 版本:升级完成后,查看容器日志,发现大量类似这样的错误日志输出:2024-09-11_04:05:55.21146 ts=2024-09-11T04:05:55.211Z caller=main.go:181 level=info msg="Starting Alertmanager" version="(version=0.27.0, branch=master, revision=0aa3c2aad14cff039931923ab16b26b7481783b5)" 2024-09-11_04:05:55.21148 ts=2024-09-11T04:05:55.211Z caller=main.go:182 level=info build_context="(go=go1.22.5, platform=linux/amd64, user=GitLab-Omnibus, date=, tags=unknown)" 2024-09-11_04:05:55.21183 ts=2024-09-11T04:05:55.211Z caller=cluster.go:179 level=warn component=cluster err="couldn't deduce an advertise address: no private IP found, explicit advertise addr not provided" 2024-09-11_04:05:55.21286 ts=2024-09-11T04:05:55.212Z caller=main.go:221 level=error msg="unable to initialize gossip mesh" err="create memberlist: Failed to get final advertise address: No private IP address found, and explicit IP not provided"简单搜了下,找到这个网址:https://gitlab.com/gitlab-org/omnibus-gitlab/-/issues/4556按照提示,配置信息添加如下信息即可:alertmanager['enable'] = false。由此,我进一步调整 docker-compose.yml,文件,最终的内容如下:services: gitlab: image: 'registry.gitlab.cn/omnibus/gitlab-jh:latest' # image: 'registry.gitlab.cn/omnibus/gitlab-jh:16.11.3' # image: 'registry.gitlab.cn/omnibus/gitlab-jh:16.7.7' restart: always container_name: gitlab hostname: 'git.work.zhuzhilong.com' environment: GITLAB_OMNIBUS_CONFIG: | external_url 'http://git.work.zhuzhilong.com' # Add any other gitlab.rb configuration here, each on its own line alertmanager['enable']=false networks: - net-zzl ports: - '8007:80' - '2223:22' volumes: - './config:/etc/gitlab' - './logs:/var/log/gitlab' - './data:/var/opt/gitlab' - ../hosts:/etc/hosts shm_size: '256m' networks: net-zzl: name: bridge_zzl external: true
-
一款超级好用的端口映射工具:rinetd 2014年的时候参与江西交通厅的项目,由于厅里只有一台跳板机可以访问省政府的在线办事内网服务,而内网机房也只有一台服务器能访问跳板机,而我们的项目又需要访问相关服务,然后就在内网的服务器上部署了个端口映射的软件,当时一直记得这款软件超级简单易用。近期一台开发服务器上的网络环境有同类的需求,但是时隔近10年,连名字都忘了,还好平常有记录工作日志的习惯,从10年前的工作日志里找到了当时的记录,就是它了: rinetd软件介绍rinetd 是一个简单易用的端口映射/转发/重定向工具。它通常用于将网络流量从一个端口转发到另一个端口,或者从一个IP地址转发到另一个IP地址。rinetd特别适用于那些需要将服务请求从一个网络地址或端口转发到另一个不同地址或端口的情况。rinetd的特点:简单性:配置简单,通过一个配置文件就可以完成设置。轻量级:rinetd自身占用的系统资源非常少。支持IPv4:它支持IPv4网络连接的重定向。安全性:可以设置允许哪些IP地址进行转发,从而提供一定程度的网络访问控制。软件使用安装rinetd:在大多数 Linux 发行版中,rinetd可以通过包管理器安装。例如,在基于Debian的系统(如Ubuntu)中,可以使用以下命令安装:sudo apt-get update sudo apt-get install rinetd以下是源码安装代码:windows: rinetd-win.ziplinux: rinetd.tar.gz配置rinetd:rinetd 的配置文件位于 /etc/rinetd.conf。以下是配置文件的一个基本示例:# # this is the configuration file for rinetd, the internet redirection server # # you may specify global allow and deny rules here # only ip addresses are matched, hostnames cannot be specified here # the wildcards you may use are * and ? # # allow 192.168.2.* # deny 192.168.2.1? # # forwarding rules come here # # you may specify allow and deny rules after a specific forwarding rule # to apply to only that forwarding rule # # bindadress bindport connectaddress connectport # for rocketMQ # 将所有发往本机18090端口的连接重定向到192.168.150.250的18080端口。 0.0.0.0 18090 192.168.150.250 18080 0.0.0.0 18091 192.168.150.250 18081 0.0.0.0 18092 192.168.150.250 18082 #0.0.0.0 18093 192.168.150.250 18083 0.0.0.0 18076 192.168.150.250 19876 # logging information logfile /var/log/rinetd.log # uncomment the following line if you want web-server style logfile format # logcommon日常运维命令# 启动服务 sudo systemctl restart rinetd # 重启服务 sudo systemctl restart rinetd # 查看运行状态 sudo systemctl status rinetd # 设为开机自启动 sudo systemctl enable rinetd特别说明:确保系统的防火墙规则允许 rinetd 进行必要的网络通信。
-
Java工程使用ulid初体验 背景从公众号推文看到不少博主推荐使用 ulid 替换 uuid,提及的 ulid 的优点如下:1、 全局唯一性 :通过结合时间戳和随机数,ULID能够确保生成的标识符在全球范围内是唯一的。2、 可排序性 :由于ULID中包含了时间戳信息,因此它们可以按照时间顺序进行排序,这在数据处理和分析中非常有用。3、 高性能 :ULID的生成速度远快于传统的UUID,且其编码方式更为高效。4、 易读性 :虽然ULID也是由一串字符组成,但其采用的编码方式使得它相对更易于人类阅读和记忆。ULID(Universally Unique Lexicographically Sortable Identifier)是一种用于生成全局唯一、可按字典序排序的标识符的格式。ULID结合了时间戳和随机数的特性,旨在提供高性能、低碰撞、可排序和易读的标识符。引入依赖<dependency> <groupId>com.github.f4b6a3</groupId> <artifactId>ulid-creator</artifactId> <version>5.2.3</version> </dependency>生成随机字符串 Ulid ulid = UlidCreator.getUlid(); String randomId = ulid.toString();测试代码package net.x2m.pms.collect; import com.github.f4b6a3.ulid.Ulid; import com.github.f4b6a3.ulid.UlidCreator; public class UlIdTest { public static void main(String[] args) { for (int i = 0; i < 10; i++) { Ulid ulid = UlidCreator.getUlid(); System.out.println(ulid.toString()); } } }运行以上代码后生成示例数据如下:01J70X9YDC7YSTJAPWPDFDH2CK 01J70X9YQS0NCCFCWEZ5RVXEXP 01J70X9YQS48ES2ETYT7FHQG2H 01J70X9YQTSGF792XY07W2TDZ2 01J70X9YQTEW2KTFX5VJRSAT9R 01J70X9YQTFBPZCMJWDQVNV0MA 01J70X9YQTSEX81YK0S7CB6X6W 01J70X9YQV4XAR9MHDN2RDJH8A 01J70X9YQV8HMMX2DYZ2Q5Y559 01J70X9YQV0R5PN0P0536NZM4Z
-
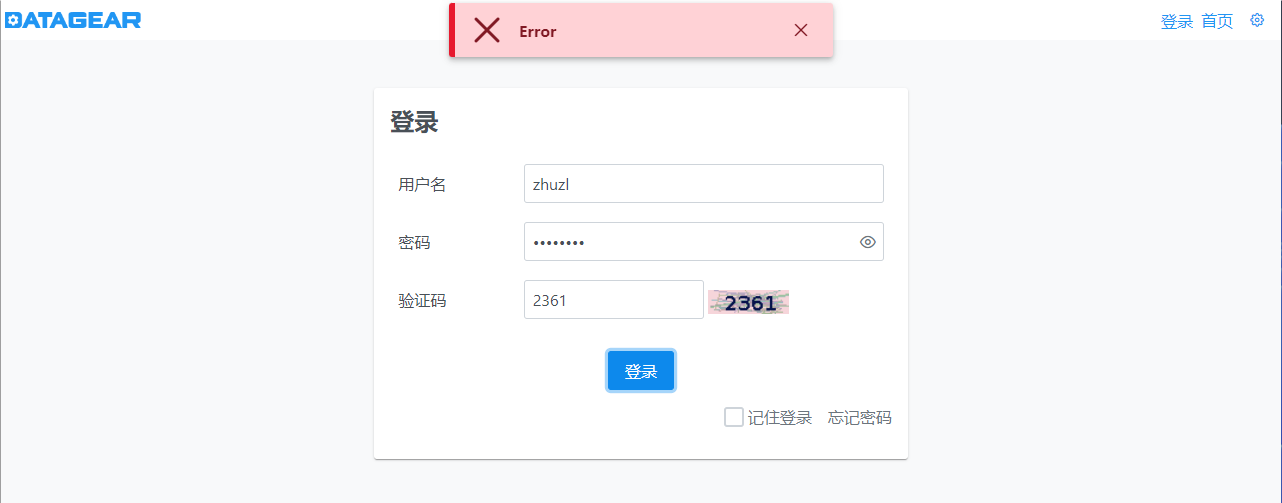
HTTPS代理访问DataGear登录失败的问题 背景说明在一些项目中我们有用到 DataGear 来做大屏展示,将 DataGear 部署到产线后,发现通过HTTPS协议访问应用正常,但是登录的时候,账号密码正确的情况下,提示Error,如下图所示:问题分析打开浏览器开发者工具,查看网络请求,我们发现登录的时候请求的 https://xxx.com/login/doLogin ,登录成功后 302 重定向到了 http://xxx.com/login/success 地址,由于HTTP协议不一致,存在跨域,导致Ajax无法正常获取到响应数据:部署说明DataGear 使用 Docker 部署,使用 Nginx 配置SSL代理对外提供服务。问题修复通过前面的分析,我想可能是 Nginx 到 DataGear 的过程中在登录的时候网络协议丢失了,通过查找SpringBoot 的官方文档,有找到如下章节:14.3. Enable HTTPS When Running behind a Proxy Server。从标题我们就可以看到,这就是我们碰到的使用场景:根据提示也是跟代理的一些HTTP头信息相关,我们根据提示,在datagear-web 工程的 application.properties 文件中,添加了如下配置信息:# 处理https重定向不正确的问题 server.tomcat.remoteip.protocol-header=X-Forwarded-Proto server.tomcat.remoteip.remote-ip-header=X-Forwarded-For重新构建Docker镜像并重新运行DataGear容器,然后在nginx 代理配置中添加如下设置代理头信息:proxy_set_header X-Forwarded-For $remote_addr; proxy_set_header X-Forwarded-Proto $scheme;如果使用 Nginx Proxy Manager ,可以在 ProxyHost 中,将上面的代理配置信息加入到自定义Nginx配置中,如下图所示:保存重启Nginx后,重新登录可以看到,能响应正确的重定向地址,至此HTTPS代理登录问题完美解决: