搜索到
155
篇与
朱治龙
的结果
-

-
-
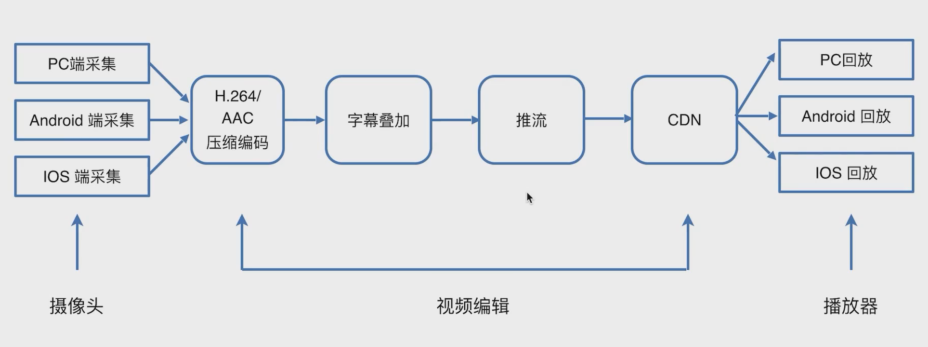
H5与小程序直播入门-学习笔记 链接:https://www.bilibili.com/video/BV1b7411T7t1直播原理HLS协议动态列表:基本上未使用静态列表全量列表:一般用于直播RTMP协议RTMP是Real Time Messaging Protocol (实时消息传输协议)的首字母缩写。该协议基于 TCP,是一个协议族,包括RTMP基本协议及RTMPT/RTMPS/RTMPE等多种变种。RTMP是一种设计用来进行实时数据通信的网络协议,主要用来在Flash、AIR平台和支持RTMP协议的流媒体/交互服务器之间进行音视频和数据通信。flvHTTP-FLV协议1、可以在一定程度上避免防火墙的干扰(例如,有的机房只允许80端口通过).2、可以很好的兼容HTTP 302跳转,做到灵活调度.3、可以使用HTTPS做加密通道.4、很好的支持移动端(Android, IOS).video详解controls:是否显示控制条controlslist:控制条显示内容autoplay:自动播放poster:封面图loop:循环播放preload:预加载,在不同设备上行为有些不一致volume:音量,通过 js 控制muted:是否静音<!DOCTYPE html> <html lang="en"> <head> <meta charset="UTF-8"> <meta http-equiv="X-UA-Compatible" content="IE=edge"> <meta name="viewport" content="width=device-width, initial-scale=1.0"> <title>video 详解</title> </head> <body> <video src="./media/blsc.mp4" id="video" autoplay muted loop preload="auto" controls controlslist="nodownload nofullscreen" width="800" height="600" poster="./images/poster.jpg"></video> <script> var videoEl = document.getElementById('video') // 调整音量 videoEl.volumn = 0.5 // 设置进度,单位为秒 videoEl.currentTime = 60 // 切换视频地址 videoEl.src = './media/paratera.mp4' </script> <video id="sourceDemo" controls poster="./images/poster.jpg"> <source src="./media/blsc.mp4" type="video/mp4"> <source src="./media/paratera.mp4" type="video/mp4"><!-- 第一个错误时使用第二个地址进行播放 --> </video> <script> var videoEl = document.getElementById('sourceDemo') console.log('videoEl.currentSrc', videoEl.currentSrc) </script> </body> </html>video 事件<!DOCTYPE html> <html lang="en"> <head> <meta charset="UTF-8"> <meta http-equiv="X-UA-Compatible" content="IE=edge"> <meta name="viewport" content="width=device-width, initial-scale=1.0"> <title>video 事件</title> </head> <body> <video src="./media/blsc.mp4" id="video" autoplay muted preload="auto" controls controlslist="nodownload nofullscreen" width="800" height="600" poster="./images/poster.jpg"></video> <script> var videoEl = document.getElementById('video') // 开始加载视频 video.addEventListener('loadstart', e => { console.log('loadStart', e) }) // 时长变化,不一定发生一次 video.addEventListener('durationchange', e => { console.log('durationchange', e, video.duration) }) // 视频的元数据下载完成 video.addEventListener('loadedmetadata', e => { console.log('loadedmetadata', e) }) // 数据加载完成 video.addEventListener('loadeddata', e => { console.log('loadeddata', e) }) // 播放进度 video.addEventListener('progress', e => { console.log('progress', e) }) // 有帧可以播放 video.addEventListener('canplay', e => { console.log('canplay', e) }) // 可以流畅播放 video.addEventListener('canplaythrough', e => { console.log('canplaythrough', e) }) // 监听播放 video.addEventListener('play', e => { console.log('play', e) }) // 监听暂停 video.addEventListener('pause', e => { console.log('pause', e) }) // seeking,点进度条加载,开始查找 video.addEventListener('seeking', e => { console.log('seeking', e) }) // seeked,下载数据完成后,标记seek结束 video.addEventListener('seeked', e => { console.log('seeked', e) }) // waiting,解码过程中 video.addEventListener('waiting', e => { console.log('waiting', e) }) // playing,暂停到播放状态之间会触发playing video.addEventListener('playing', e => { console.log('playing', e) }) // timeupdate,一般用于更新播放进度条 video.addEventListener('timeupdate', e => { console.log('timeupdate', e) }) // ended:播放结束 video.addEventListener('ended', e => { console.log('ended', e) }) // error:异常捕获,浏览器自带重试机制 video.addEventListener('error', e => { console.log('error', e) }) </script> </body> </html>
-
-
易读错英语单词记录 整理我个人常读错的英语单词static发音:['stætɪk]链接:https://www.iciba.com/word?w=static释义:静态的;静止的;稳定的;静力的;静电的静电;静电干扰deprecated英[ˈdeprəkeɪtɪd]美[ 'dɛprə,ketɪd]链接:http://www.iciba.com/word?w=deprecated释义:不赞成,反对( deprecate的过去式和过去分词 )encrypt英[ɪnˈkrɪpt]美[ɛnkrɪpt]链接:http://www.iciba.com/word?w=encrypt释义:v.加密,将…译成密码vt.& vi. 把…加密(或编码),将…译成密码record英[ˈrekɔːd]美[ˈrekərd]链接:http://www.iciba.com/word?w=record释义n.记录,记载; 唱片; (体育运动或活动的)纪录; 履历; 案底v.记录;记载; 录制; 标明,显示adj.创纪录的parameter英[pəˈræmɪtə(r)]美[pəˈræmɪtər]链接:http://www.iciba.com/word?w=parameter释义n.[数]参数; <物><数>参量; 限制因素; 决定因素execute英[ˈeksɪkjuːt]美[ˈeksɪkjuːt]链接:http://www.iciba.com/word?w=execute释义v.处死; 实施; 完成; 制作decimal英[ˈdesɪml]美[ˈdesɪml]链接:http://www.iciba.com/word?w=decimal释义adj.十进位的; 小数的n.小数unique英[juˈniːk]美[juˈniːk]链接:http://www.iciba.com/word?w=unique释义adj.唯一的; 独特的; 特有的input英[ˈɪnpʊt]美[ˈɪnpʊt]链接:http://www.iciba.com/word?w=input释义n.输入,投入; 输入电路; <电>输入端; 输入的数据vt.把…输入电脑; 自 输入; 输入,给料
-
UI设计-AI基础-学习笔记 以下仅为学习过程中的简单记录图标的定义分类与应用场景线性![线性图表标(/usr/uploads/2022/05/2214274233.png)面性线性填充扁平图标通过色块构成图标,没有渐变、投影等效果手绘图标写实图标图标绘制的标准化流程设计流程确定主题风格 --> 关联性 --> 切入点(受众、行业) --> 草稿(大致形状构想)设计过程中的注意点结构造型:一致性栅格线细节处理色彩搭配后续输出包装总结图标结构设计之布尔运算可尝试使用布尔运算方式绘制手工如下图标:阵列复制技巧先使用 Ctrl+T 自由切换,按住Alt键可结合鼠标移动中心点,对图形进行调整(如位置、大小、角度等)后,可使用 Ctrl+Alt+Shift+T 快速复制可尝试使用阵列复制的方式绘制如下图标:圆角半径JS脚本插件Corner Editor圆角插件,下载地址:Corner Editor.zip下载后,解压将jsx文件拷贝到PS安装目录下的 Presets 目录,重启应用即可通过 文件 -> 脚本 -> Corner Editor 打开插件
-
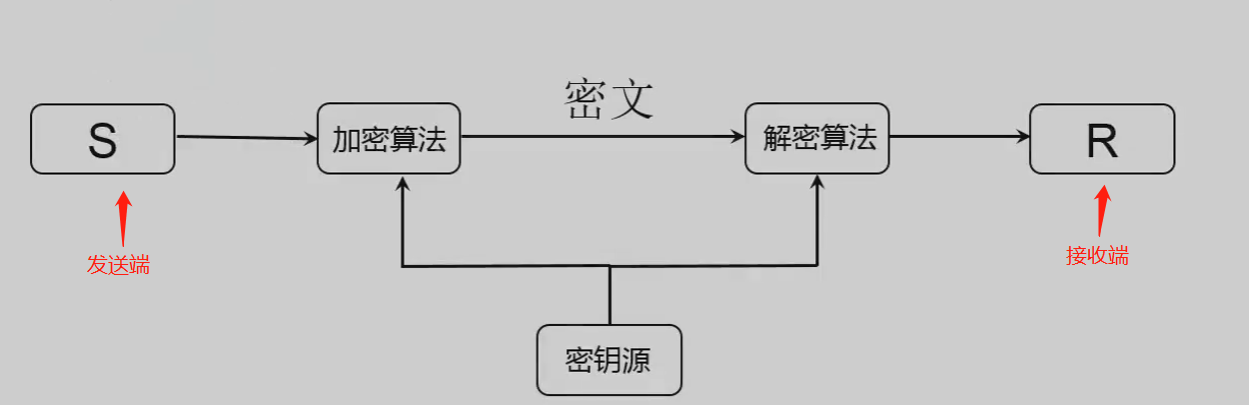
Java 中加密算法的编程使用-学习笔记 Base64 编码的编程使用密码学综述密码学基本功能1)机密性2)鉴别3)报文完整性4)不可否认性基本模型密码学算法的分类消息编码: Base64消息摘要: MD类、SHA类、MAC对称密码: DES、3DES、 AES非对称密码: RSA、DH密钥交换数字签名: RSASignature、DSASignature密码学五元组明文密文加密算法(公开)解密算法(公开)密钥密钥密钥和密码的巨大区别密钥!=密码Key != Password密钥+规则==密码在密码破解者看来,拿到密钥就等于有了密码!所以,重点在密钥对称密码(传统密码)与非对称密码(公钥密码)对称密码:加解密使用相同密钥的密码体制非对称密码:加解密使用不同的密钥一公钥与私钥Java编程中常用类消息编码 BASE64Encoder、BASE64Decoder消息摘要 MessageDigest对称密码 KeyGenerator、SecretKey、 Cipher非对称密码 KeyPairGenerator、KeyFactory、 KeyPair、PublicKey、 PrivateKey、 Cipher数字签名 SignatureBase64 算法的编程使用Base64编码示例 密文: UGFyYXRlcmE=明文: ParateraBase64算法定义 Base64是一种基于64个字符的编码算法,以任意8位字节序列组合的描述形式,这种形式不易直接识别。经Base64编码后的字符串的字符数是以4为单位的整数倍。Base64 密钥4.Base64 编程使用引入sun.misc.BASE64Decoder.jar1、加密:byte[] data = "Paratera".getBytes(); String result= new BASE64Encoder().encode(data) ;2、解密:byte[] result = new BASE64Decoder().decodeBuffer(data) ;Base64 算法的实际应用使用Telnet 发送邮件:pubLic class Base64Util { public static String enc ryptBase64(byte[] data){ return new BASE64Encoder().encode(data); } public static String dec ryptBase64(String data) throws IOException{ byte[] resultBytes = new BASE64Decoder().decodeBuffer(data); return new String( resultBytes); } } pubLic class SMTPMain { public static void main(String[] args) { //用户名密码 String sender = "cnsmtp01@163.com"; String receiver = "cnsmtp02@163. com"; String password = "computer"; //将用户名和密码进行Base64编码 String userBase64 = Base64Util.encryptBase64(sender.substring(0, sender.index0f("@")).getBytes()); String passBase64 = Base64Util.encryptBase64(password.getBytes()); try { Socket socket = new Socket("smtp.163.com", 25); InputStream inputStream = socket.getInputStream(); OutputStream outputStream = socket.getOutputStream(); BufferedReader reader = new BufferedReader(new InputStreamReader(inputStream)); PrintWriter writter = new PrintWriter(outputStream, true); System.out.println(reader.readLine()); // HELO writter.println("HELO Paratera"); System.out.println(reader.readLine()); // AUTH LOGIN >> >Base64 writter.println( "AUTH LOGIN"); System.out.println(reader.readLine()); writter.println(userBase64); System.out.println(reader.readLine()); writter.println(passBase64); System.out.println(reader.readLine()); // Set "MAIL FROM" and "RCPT TO" writter.println("MAIL FROM:<" + sender + ">"); System.out.println(reader.readLine()); writter.println( "RCPT TO:<" + receiver + ">"); System.out.println(reader.readLine()); // Set "DATA" writter.println("DATA"); System.out.println(reader.readLine()); writter.println("SUBJECT:你好并行集团"); writter.println("FROM:" + sender); writter.println("T0:" + receiver); writter.println("Content-Type: text/plain;charset=\"gb2312\""); writter.println(); writter.println("北京并行科技股份有限公司(简称并行科技,PARATERA,股票代码:839493,挂牌新三板)成立于2007年,是国内领先的超算云服务和运营服务提供商,提供超算公有云服务、超算行业云服务、AI云服务、设计仿真云和计算资源建设及运营服务。"); writter.println("."); writter.println(""); System.out.println(reader.readLine()); //发送完毕了, 和服务器拜拜 writter.println("RSET"); System.out.println(reader.readLine()); writter.println("QUIT"); System.out.println(reader.readLine()); } catch (Exception e) { e.printStackTrace(); } } } 消息摘要的编程使用消息摘要概述唯一对应一个消息或文本的固定长度的值,由一个单向Hash加密函数对消息进行作用而产生消息摘要的分类:(1) MD (Message Digest) :消息摘要算法(2) SHA (Secure Hash Algorithm) : 安全散列算法(3) MAC (Message Authentication Code) :消息认证码算法消息摘要的日常应用验证数据完整性(防止在传输途中被篡改)MD算法的编程使用为计算机安全领域广泛使用的一种散列函数,用以提供消息的 完整性 保护MD系列算法(JDK)算法数据长度摘要长度MD2任意128MD5任意128MD算法编程使用核心代码//初始化MessageDigest MessageDigest md5 = MessageDigest.getInstance("MD5"); //更新, data为原始数据 md5.update(data); /生成摘要 byte[] result= md5.digest(); 完整示例代码:// ---------1.BytesToHex.java--------- package net.wljy.crypt.util; /** * 字节转16进制 * * @author paratera * */ public class BytesToHex { public static String fromBytesToHex(byte[] resultBytes) { StringBuilder builder = new StringBuilder(); for (int i = 0; i < resultBytes.length; i++) { if (Integer.toHexString(0xFF & resultBytes[i]).length() == 1) { builder.append("0").append(Integer.toHexString(0xFF & resultBytes[i])); } else { builder.append(Integer.toHexString(0xFF & resultBytes[i])); } } return builder.toString(); } } // ---------2.MessageDigestUtil.java--------- package net.wljy.crypt; import java.io.File; import java.io.FileInputStream; import java.security.DigestInputStream; import java.security.MessageDigest; import java.security.NoSuchAlgorithmException; import net.wljy.crypt.util.BytesToHex; public class MessageDigestUtil { /** * MD5字符串加密 * @param data 待加密字符串 * @return */ public static String encryptMD5(byte [] data) { MessageDigest md5; try { md5 = MessageDigest.getInstance("MD5"); md5.update(data); byte[] resultBytes = md5.digest(); return BytesToHex.fromBytesToHex(resultBytes); } catch (NoSuchAlgorithmException e) { // TODO Auto-generated catch block e.printStackTrace(); } return null; } /** * 获取文件MD5值 * @param filePath 文件路径 * @return */ public static String getMD5ofFile(String filePath) { FileInputStream fis; try { fis = new FileInputStream(new File(filePath)); DigestInputStream dis = new DigestInputStream(fis, MessageDigest.getInstance("MD5")); byte[] buffer = new byte[1024]; int read = dis.read(buffer, 0, 1024); while(read != -1) { read = dis.read(buffer, 0, 1024); } MessageDigest md = dis.getMessageDigest(); return BytesToHex.fromBytesToHex(md.digest()); } catch (Exception e) { e.printStackTrace(); } return null; } } // ---------3.MD5Test.java--------- package net.wljy.crypt; public class MD5Test { public static final String DATA = "并行集团"; public static void main(String[] args) { String md5Str = MessageDigestUtil.encryptMD5(DATA.getBytes()); System.out.println(md5Str); String fileMd5Str = MessageDigestUtil.getMD5ofFile("D:/API接口文档.html"); System.out.println("文件MD5:" + fileMd5Str); } } SHA算法的编程使用安全哈希算法,主要适用于数字签名标准里面定义的数字签名算法SHA算法种类算法数据长度摘要长度SHA-1任意160SHA-256任意256SHA-384任意384SHA-512任意512核心代码//初始化MessageDigest MessageDigest sha = MessageDigest.getInstance("SHA-x"); // SHA-x需替换为具体的算法名称 //更新, data为原始数据 sha.update(data); /生成摘要 byte[] result= sha.digest(); 示例代码: /** * 计算某一数据的hash摘要值 * @param data * @return */ public static String encryptSHA(byte [] data) { try { MessageDigest sha = MessageDigest.getInstance("SHA-256"); sha.update(data); return BytesToHex.fromBytesToHex(sha.digest()); } catch (NoSuchAlgorithmException e) { e.printStackTrace(); } return null; }HMAC算法的编程使用引言:单一MD或SHA算法缺点? 摘要值容易被篡改!结合了MD5和SHA算法的优势,同时用 密钥 对摘要加密,是一种更为安全的消息摘要算法。HMAC算法的种类算法数据长度摘要长度HmacMD5任意128HmacSHA1任意160HmacSHA256任意256HmacSHA384任意384HmacSHA512任意512如何生成密钥KeyGenerator!核心代码1.构建密钥//初始化KeyGenerator KeyGenerator keyGen = KeyGenerator.getInstance("HmacMD5"); //产生密钥 SecretKey secretKey = keyGen.generateKey(); //得到密钥字节数组 byte[] key= secretKey.getEncoded(); 2.执行消息摘要//从字节数组还原密钥 SecretKey secretKey = new SecretKeySpec(key, "HmacMD5"); //实例化Mac Mac mac = Mac.getInstance("HmacMD5"); //用密钥初始化Mac mac.init(secretKey); //执行消息摘要 byte[] result = mac.doFinal(data); 散列函数特征:(1)输入任意长度数据,输出固定长度散列值,计算很容易,过程不可逆(2)对于某数据,其散列值固定(3)两个数据不同,则对应的散列值也不同(4)两个散列值不同,则对应的原始输入数据也不同2.散列函数破解(1)真破解:2005年2月,王小云教授破解了SHA-1 算法,已知数据A和其散列值,找到了另一个数据B与A的散列值相同(2)假破解:根据数据库查询散列值,找到其对应的数据明文,根本在于数据库的查询!对称密码的编程使用对称密码概述1、加密密钥和解密密钥相同,对于大多数对称密码算法,加解密过程互逆2、加解密通信模型3、特点:算法公开、计算量小、加密速度快、加密效率高4、弱点:双方都使用同样密钥,安全性得不到保证5、分组密码工作模式(1) ECB: 电子密码本(2) CBC: 密文链接(3) CFB: 密文反馈(4) OFB:输出反馈(5) CTR: 计数器6、分组密码填充方式(1) NoPadding(2) PKCS5Padding(3) ISO10126Padding7、常用对称密码:(1) DES (Data Encryption Standard)(2) 3DES (Triple DES、DESede)3重DES(3) AES (Advanced Encryption Standard)DES算法的编程使用DES:数据加密标准,是对称加密算法领域中的典型算法特点:密钥偏短(56位)、 生 命周期短JDK实现| 算法 | 密钥长度 | 默认密钥长度 | 工作模式 | 填充方式 |DES5656ECB、CBC、PCBC、CTR、CTS、CFB、CFB8-CFB128、OFB、OFB8-OFB128NoPadding、PKCS5Padding、ISO10126Padding4、示例代码// ---------1.DESUtil.java--------- package net.wljy.crypt.des; import java.security.NoSuchAlgorithmException; import javax.crypto.Cipher; import javax.crypto.KeyGenerator; import javax.crypto.SecretKey; import javax.crypto.spec.SecretKeySpec; public class DESUtil { /** * 生成密钥 * * @return */ public static byte[] initKey() { try { KeyGenerator keyGen = KeyGenerator.getInstance("DES"); keyGen.init(56); SecretKey secretKey = keyGen.generateKey(); return secretKey.getEncoded(); } catch (NoSuchAlgorithmException e) { e.printStackTrace(); } return null; } /** * DES加密 * * @param data 要加密的数据 * @param key 密钥 * @return */ public static byte[] encrypt(byte[] data, byte[] key) { SecretKey secretKey = new SecretKeySpec(key, "DES"); try { // DES/ECB/NoPadding --> 加密方式/工作模式/填充方式,没有严格要求的场景只写加密方式即可 Cipher cipher = Cipher.getInstance("DES"); cipher.init(Cipher.ENCRYPT_MODE, secretKey); return cipher.doFinal(data); } catch (Exception e) { e.printStackTrace(); } return null; } /** * DES加密 * * @param data 要解密的数据 * @param key 密钥 * @return */ public static byte[] decrypt(byte[] encryptedData, byte[] key) { SecretKey secretKey = new SecretKeySpec(key, "DES"); try { // DES/ECB/NoPadding --> 加密方式/工作模式/填充方式,没有严格要求的场景只写加密方式即可 Cipher cipher = Cipher.getInstance("DES"); cipher.init(Cipher.DECRYPT_MODE, secretKey); return cipher.doFinal(encryptedData); } catch (Exception e) { e.printStackTrace(); } return null; } } // ---------2.DESTest.java--------- package net.wljy.crypt.des; import net.wljy.crypt.util.BytesToHex; public class DESTest { public static final String DATA = "并行集团"; public static void main(String[] args) { // 获取密钥 byte[] initKey = DESUtil.initKey(); System.out.println("secretKey:" + BytesToHex.fromBytesToHex(initKey)); // 加密数据 byte[] desResultData = DESUtil.encrypt(DATA.getBytes(), initKey); System.out.println("desResultData:" + BytesToHex.fromBytesToHex(desResultData)); // 解密数据 byte[] decryptResultData = DESUtil.decrypt(desResultData, initKey); System.out.println("decryptResultData:" + new String(decryptResultData)); } } 3DES算法的编程使用1、3DES:将密钥长度增至112位或168位,通过增加迭代次数提高安全性2、缺点:处理速度较慢、密钥计算时间较长、加密效率不高3、JDK实现算法密钥长度默认密钥长度工作模式填充方式3DES112、168168ECB、CBC、PCBC、CTR、CTS、CFB、CFB8-CFB128、OFB、OFB8-OFB128NoPadding、PKCS5Padding、ISO10126Padding核心代码1、生成密钥KeyGenerator keyGen = KeyGenerator.getInstance("DESede"); keyGen.init(168); //可指定密钥长度为112或168, 默认为168 SecretKey secretKey = keyGen.generateKey(); 2.加/解密SecretKey secretKey = new SecretKeySpec(key, "DESede"); Cipher cipher = Cipher.getInstance("DESede"); cipher.init(Cipher.ENCRYPT_MODE,secretKey); byte[] cipherByte = cipher.doFinal(data); 4、完整示例代码// ---------1.TripleDESUtil.java--------- package net.wljy.crypt.tripledes; import java.security.NoSuchAlgorithmException; import javax.crypto.Cipher; import javax.crypto.KeyGenerator; import javax.crypto.SecretKey; import javax.crypto.spec.SecretKeySpec; /** * 3DES * * @author paratera * */ public class TripleDESUtil { /** * 生成密钥 * * @return */ public static byte[] initKey() { KeyGenerator keyGen; try { keyGen = KeyGenerator.getInstance("DESede"); keyGen.init(168); // 112 168 SecretKey secretKey = keyGen.generateKey(); return secretKey.getEncoded(); } catch (NoSuchAlgorithmException e) { e.printStackTrace(); } return null; } /** * 3DES加密 * * @param data 待加密数据 * @param key 密钥 * @return */ public static byte[] encrypt(byte[] data, byte[] key) { try { SecretKey secretKey = new SecretKeySpec(key, "DESede"); Cipher cipher = Cipher.getInstance("DESede"); cipher.init(Cipher.ENCRYPT_MODE, secretKey); return cipher.doFinal(data); } catch (Exception e) { e.printStackTrace(); } return null; } /** * 3DES解密 * * @param encrypedData 待解加密数据 * @param key 密钥 * @return */ public static byte[] decrypt(byte[] encrypedData, byte[] key) { try { SecretKey secretKey = new SecretKeySpec(key, "DESede"); Cipher cipher = Cipher.getInstance("DESede"); cipher.init(Cipher.DECRYPT_MODE, secretKey); return cipher.doFinal(encrypedData); } catch (Exception e) { e.printStackTrace(); } return null; } } // ---------2.TripleDESTest.java--------- package net.wljy.crypt.tripledes; import net.wljy.crypt.util.BytesToHex; public class TripleDESTest { public static final String DATA = "并行集团"; public static void main(String[] args) { // 获取密钥 byte[] initKey = TripleDESUtil.initKey(); System.out.println("secretKey:" + BytesToHex.fromBytesToHex(initKey)); // 加密数据 byte[] resultData = TripleDESUtil.encrypt(DATA.getBytes(), initKey); System.out.println("3DESResultData:" + BytesToHex.fromBytesToHex(resultData)); // 解密数据 byte[] decryptResultData = TripleDESUtil.decrypt(resultData, initKey); System.out.println("3DESdecryptResultData:" + new String(decryptResultData)); } } AES算法的编程使用1、AES:高级数据加密标准,能够有效抵御已知的针对DES算法的所有攻击2、特点:密钥建立时间短、灵敏性好、内存需求低、安全性高3、JDK实现算法密钥长度默认密钥长度工作模式填充方式AES128、192、256128ECB、CBC、PCBC、CTR、CTS、CFB、CFB8-CFB128、OFB、OFB8-OFB128NoPadding、PKCS5Padding、ISO10126Padding核心代码1、生成密钥KeyGenerator keyGen = KeyGenerator.getInstance("AES"); keyGen.init(128); //默认128,获得无政策权限后可为192或256 SecretKey secretKey = keyGen.generateKey();2、加/解密SecretKey secretKey = new SecretKeySpec(key, "AES"); Cipher cipher = Cipher.getInstance("AES"); cipher.init(Cipher.ENCRYPT_MODE,secretKey); // ENCRYPT_MODE:加密 || DECRYPT_MODE:解密 byte[] cipherByte = cipher.doFinal(data);政策权限文件keyGen.init(),如果给值为19或256会报错,JDK8及之前的文件可到如下地址下载政策文件:https://www.oracle.com/java/technologies/javase-jce-all-downloads.html。下载后覆盖jdk/jre/lib/security下的两个jar包即可。非对称密码的编程使用非对称密码概述1、对称密码中的密钥配送存在不安全问题2、非对称密码通信模型3、非对称密码的特征(1).需要两个密钥来进行加密和解密,分别为公钥和私钥(2).公钥和私钥相互配对,称为KeyPair4、非对称密码的优缺点(1).优点:相比于对称密码,安全性更高(2).缺点:加解密花费时间长、速度慢5、常用非对称密码:(1).DH密钥交换算法(2).RSA算法(3).EIGamal算法6、非对称密码的作用(1).密钥交换(DH)(2).加密/解密(RSA)(3).数字签名(RSA)DH 算法的编程使用RSA 算法的编程使用数字签名的编程使用0数字签名概述RSASignature 算法的编程使用DSASignature 算法的编程使用
-
Web安全-学习笔记 Web安全,也可以叫做Web应用安全。互联网本来是安全的,自从有了研究安全的人之后,互联网就变的不安全了。HTTP协议与会话管理当我们访问一个网址的时候,这中间发生了什么?输入网址浏览器查找域名的IP地址浏览器给Web服务器发送一个HTTP请求服务端处理请求服务端发回一个HTTP响应Web应用的组成与网页的渲染浏览器特性与安全策略Cookie的安全策略内容安全策略XSSXSS,全称跨站脚本(Cross Site Scripting), 一种注入式攻击方式。XSS成因对于用户输入没有严格控制而直接输出到页面对非预期输入的信任XSS的危害盗取各类用户账号,如机器登录账号、用户网银账号、各类管理员账号窃取数据非法转账挂马……XSS的分类存储型(持久型)反射型(非持久型)http://www.xx.com/search.html?key_ pro="><script>confirm(1501)</script>DOM型其实DOM型也属于反射型的一种,不过比较特殊,所以一般也当做一种单独类其他XSS类别mXSS(突变型XSS)UXSS(通用型XSS)Flash XSSUTF-7 XSSMHTML XSS - 仅IE低版本CSS XSS - 仅IE低版本VBScript XSS - 仅IECSRFCSRF,全称跨站伪造请求(Cross-site request forgery),也称为one click attack/session riding,还可以缩写为XSRF。CSRF与XSS的区别XSS:利用对用户输入的不严谨然后执行JS语句CSRF:通过伪造受信任用户发送请求CSRF可以通过XSS来实现CSRF的防御方法通过验证码进行防御检查请求来源增加请求参数token
-
Javascript设计模式-学习笔记 设计模式概念解读设计模式(Design pattern)是一套被反复使用、思想成熟、经过分类和无数 实战设计经验 的总结的。使用设计模式是为了让系统代码可重用、可扩展、可解耦、更容易被人理解且能保证代码可靠性。设计模式使代码开发真正工程化;设计模式是软件工程的基石脉络,如同大厦的结构一样。只有夯实地基搭好结构,才能盖好坚实的大楼。也是我们迈向高级开发人员必经的一步。单例模式文字解读单例就是保证一个类只有一个实例,实现的方法一般是先判断实例存在与否,如果存在直接返回,如果不存在就创建了再返回,这就确保了一个类只有一个实例对象。在JavaScript里,单例作为一个命名空间提供者,从全局命名空间里提供一个唯一的访问点来访问该对象。构造函数模式文字解读构造函数用于创建特定类型的对象——不仅声明了使用的对象,构造函数还可以接受参数以便第一次创建对象的时候设置对象的成员值。你可以自定义自己的构造函数,然后在里面声明自定义类型对象的属性或方法。在JavaScript里,构造函数通常是认为用来实现实例的,JavaScript没有类的概念,但是有特殊的构造函数。通过new关键字来调用自定义的构造函数,在构造函数内部,this关键字引用的是新创建的对象。拟物化解读代码示例一://1.用于创建特定类型的对象 //2.这样的函数名会被人笑话的 //3.js开发的时候写单引号 //4.js里构造函数比较特殊的地方new //5.其他的语言里比如PHP里人家实现有一个关键字A class //6.zaomen就是构造函数他又充当了类的概念 function zaomen (suo, huawen) { if (!(this instanceof zaomen)) { return new zaomen(...arguments); } this.suo = suo || '普通' this.huawen = huawen || '普通' this.create = function(){ return ' [锁头] '+this.suo +' [ 花纹] '+ this.huawen } } var xiaozhang = new zaomen('指纹锁', '高贵') alert('xiaozhang' + xiaozhang.create()) var xiaoli = zaomen('密码锁', '雕花') alert('xiaoli' + xiaoli.create()) 示例二:结合单例模式var Panpan = { zaomen: function (suo, huawen) { this.suo = suo || '普通' this.huawen = huawen || '普通' this.create = function(){ return ' 盼盼造门:[锁头] '+this.suo +' [ 花纹] '+ this.huawen } } } var Tubaobao = { zaomen: function (suo, huawen) { this.suo = suo || '普通' this.huawen = huawen || '普通' this.create = function(){ return ' 兔宝宝造门:[锁头] '+this.suo +' [ 花纹] '+ this.huawen } } } var xiaozhang = new Panpan.zaomen('指纹锁', '高贵') alert('xiaozhang' + xiaozhang.create()) var xiaoli = new Tubaobao.zaomen('密码锁', '雕花') alert('xiaoli' + xiaoli.create()) 工厂模式概念解读工厂模式定义一个用于创建对象的接口,这个接口由子类决定实例化哪一个类。该模式使一个类的实例化延迟到了子类。而子类可以重写接口方法以便创建的时候指定自己的对象类型(抽象工厂)。这个模式十分有用,尤其是创建对象的流程赋值的时候,比如依赖于很多设置文件等。并且,你会经常在程序里看到工厂方法,用于让子类类定义需要创建的对象类型。使用场景1.对象的构建十分复杂。2.需要依赖具体的环境创建不同实例。3.处理大量具有相同属性的小对象。注意事项:1.不能滥用工厂,有时候仅仅是给代码增加复杂度。代码实战简单工厂//这是一个简单工厂模式 var XMLHttpFactory = function() { } XMLHttpFactory.createXMLHttp = function() { var XMLHttp = null //XMLHttpFactory.createXMLHttp()这个方法根据当前环境的具体情况返回一个XHR对象。 if (window.XMLHttpReqyest){ XMLHttp = new XMLHttpRequest() } else if(window.ActiveXObject) { XMLHttp = new ActiveXOb ject("Microsof+.XMLHTTP") return XMLHttp } } var AjaxHander = function() { var XMLHttp = XMLHttpFactory.createXMLHttp(); /...具体的操作..*/ }抽象工厂//这是一个抽象工厂模式 var XMLHttpFactory = function() { } XMLHttpFactory.prototype = { //如果真的要调用这个无法会抛出一个错误,它不能被实例化,只能用来派生子类 createFactory: function(){ throw new Error('This is an abstract class') } } //派生子类,文章开始处有基础介绍那有讲解继承的模式,不明白可以去参考原理 var XHRHandler = function() { XMLHttpFactory.call(this) } XHRHandler.prototype = new XMLHttpFactory() XHRHandler.prototype.constructor = XHRHandler //重新定义createFactory方法 XHRHandler.prototype.createFactory = function() { var XMLHttp = null if (window.XMLHttpRequest){ XMLHttp = new XMLHttpRequest() }else if(window.ActiveXObject){ XMLHttp = new ActiveXObject('Microsoft.XMLHTTP') } return XMLHttp } 代理模式概念解读代理,顾名思义就是帮助别人做事,GoF对代理模式的定义如下:代理模式(Proxy) ,为其他对象提供一种代理以控制对这个对象的访问。代理模式使得代理对象控制具体对象的引用。代理几乎可以是任何对象:文件,资源,内存中的对象,或者是一-些难以复制的东西。使用场景1.远程代理(一个对象将不同空间的对象进行局部代理)。2.虚拟代理(根据需要创建开销很大的对象如渲染网页暂时用占位代替真图)。3.安全代理(控制真实对象的访问权限)。4.智能指引(调用对象代理处理另外一些事情如垃圾回收机制)。代码实战//代理模式需要3方 //1.买家 function maijiq(argument){ this.name = '小明' } //2.中介卖房 function zhongjie(){ } zhongjie.prototype.maifang = function() { new fangdong(new maijia().maifang('20万') } //3.房东坐等收钱 function fangdong(maijia){ this.mailjia_name = maijia.name this.maifang = function(money){ alert('收到了来自I ' + this.maijia_ name+' ]' + money+'人民币') } } (new zhongjie).maifang() AlloyStic HTML5骨骼动画建造者模式概念解读建造者模式可以将一个复杂对象的构建与其表示相分离,使得同样的构建过程可以创建不同的表示。也就是说如果我们用了建造者模式,那么用户就需要指定需要建造的类型就可以得到它们,而具体建造的过程和细节就不需要知道了。建造者模式实际,就是一个指挥者,-个建造者,一个使用指挥者调用具体建造者工作得出结果的客户。建造者模式主要用于“分步骤构建一个复杂的对象”,在这其中“分步骤”是一个稳定的算法,而复杂对象的各个部分则经常变化。适用场景1.分步创建一一个复杂的对象。2.解耦封装过程和具体创建的组件。3.无需关心组件如何组装。注意事项1.一定要一个稳定的算法进行支持。2.加工工艺是暴露的。代码实战// 1.产出的东西是房子 // 2.baogongtou调用工人进行开工而且他要很清除工人们具体的某一个大项 // 3.工人是盖房子的工人可以建卧室建客厅建厨房 // 4.包工头只是一个接口而已他不干活他只对外说我能盖房子 function Fangzi() { this.woshi = '' this.keting = '' this.chufang = '' } function Baogongtou() { this.gaifangzi = function(gongren1) { gongren1.jian_woshi() gongren1.jian_keting() gongren1.jian_chufang() } } function Gongren() { this.jian_woshi = function() { console.log('卧室盖好了') } this.jian_keting = function() { console.log('客厅建好了') } this.jian_chufang = function() { console.log('厨房建好了') } this.jiaogong = function() { var _fangzi = new Fangzi() _fangzi.woshi = 'ok' _fangzi.keting = 'ok' _fangzi.chufang = 'ok' return _fangzi } } var gongren = new Gongren() var baogongtou = new Baogongtou() baogongtou.gaifangzi(gongren) // 主人要房子 var myfangzi = gongren.jiaogong() console.log(myfangzi)命令模式概念解读命令模式(Command)的定义是:用来对方法调用进行参数化处理和传送,经过这样处理过的方法调用可以在任何需要的时候执行。也就是说该模式旨在将函数的调用、请求和操作封装成一个单一的对象,然后对这个对象进行一系列的处理。它也可以用来消除调用操作的对象和实现操作的对象之间的耦合。这为各种具体的类的更换带来了极大的灵活性。模式作用1.将函数的封装、请求、调用结合为一体。2.调用具体的函数解耦命令对象与接收对象。3.提高程序模块化的灵活性。注意事项1.不需要接口一致,直接调用函数即可,以免造成浪费。代码实战var lian = {} lian.paobing = function(pao_num) { console.log(pao_num + '门炮开始战斗') } lian.bubing = function(bubing_num) { console.log(bubing_num + '个人开始战斗') } lian.lianzhang = function(mingling) { lian[mingling.type](mingling.num) } lian.lianzhang({ type: 'paobing', num: 100 }) lian.lianzhang({ type: 'bubing', num: 500 })观察者模式 / 发布订阅模式概念解读观察者模式又叫发布订阅模式(Publish/Subscribe) ,它定义了一种一对多的关系,让多个观察者对象同时监听某一个主题对象,这个主题对象的状态发生变化时就会通知所有的观察者对象,使得它们能够自动更新自己。模式作用1.支持简单的广播通信,自动通知所有已经订阅过的对象。2.页面载入后目标对象很容易与观察者存在一种动态关联,增加了灵活性。3.目标对象与观察者之间的抽象耦合关系能够单独扩展以及重用。注意事项:1.监听要在触发之前。代码实战// 提前引入jQuery ~(function() { var $ = {} var o = $({}) $.jianting = function() { o.on.apply(a.arguments) } $.fabu = function() { o.trigger.apply(arguments) } $.qingchu = function() { o.off.apply(o, arguments) } })() $.jianting('/test/ls', function(e, a, b, c) { console.log(a + '||' + b + '||' + c) }) $.jianting('/test/ls', function(a, b, c) { console.log('ok') }) $.fabu('/test/ls', [1, 2, 3])适配器模式概念解读适配器模式(Adapter)是将一个类(对象)的接口(方法或属性)转换成客户希望的另外一个接口(方法或属性),适配器模式使得原本由于接口不兼容而不能一起工作的那些类(对象)可以一起工作。模式作用1.使用一个已经存在的对象,但其方法或接口不符合你的要求。2.创建一个可复用的对象,该对象可以与其他不相关或不可见的对象协同工作。3.使用已经存在的一个或多个对象,但是不能进行继承已匹配它的接口。注意事项1.与代理模式的区别,代理模式是不改变原接口适配是原接口不符合规范。代码实战function pp() { this.test = function() { console.log('我是原test') } } pp.prototype.gogo = function() { console.log('我是原go') } function shipeiqi() { var s = new pp var aa = { test: function () { s.test() }, go: function() { s.gogo() } } return aa } var bb = shipeiqi() bb.test() bb.go() 责任链模式概念解读职责链模式是使多个对象都有机会处理请求,从而避免请求的发送者和接受者之间的耦合关系。将这个对象连成一条链,并沿着这条链传递该请求,直到有一个对象处理他为止。链中收到请求的对象要么亲自处理它,要么转发给下一个候选者。提交方并不明确有多少个对象会处理它,任一候选者都可以响应相应的请求,可以在运行时刻决定哪些候选者参与到链中。模式作用1.dom的冒泡有些类似职责链。2.nodejs 当controller中有很多负责操作逻辑的时候拆分中间件。3.解耦发送者和接受者。注意事项1.javascript中的每一次 「.」 是有代价的,要在必要的时候应用。代码实战// 职责链模式 function laoban(xiangmujingli) { if (xiangmujingli) { this.xiangmujingli = xiangmujingli } } laoban.prototype.write = function(code) { this.xiangmujingli.write(code) } function xiangmujingli(coder) { if (coder) { this.coder = coder } } xiangmujingli.prototype.write = function(code) { this.coder.write(code) } function coder() { } coder.prototype.write = function(code) { console.log('coding:' + code) } // 由begin发起,coder结束 var begin = new laoban(new xiangmujingli(new coder())) begin.write('php')迭代器模式概念解读迭代器模式提供一种方法顺序访问一个聚合对象中各个元素,而又不需要暴露该方法中的内部表示。jquery中我们经常会用到一个each函数就是迭代器模式。模式作用1.为遍历不同的集合结构提供一个统一 的接口, 从而支持同样的算法在不同的集合结构上进行操作。2.对于集合内部结果常常变化各异,我们不想暴露其内部结构的话,但又响让客户代码透明底访问其中的元素,这种情况下我们可以使用迭代器模式。注意事项1.一般的迭代,我们至少要有2个方法,hasNext()和Next(), 这样才做做到遍历所有对象。2.遍历的同时更改迭代器所在的集合结构可能会导致问题(比如C#的foreach里不允许修改item)。代码实战var arr = ['1', '2', '3', 'test', 20080708] var diedai = (function() { var length = arr.length var index = 0 return { hasNext: function() { return index < length }, next: function() { var data = arr[index] index = index + 1 return data }, reset: function() { index = 0 } } })() while(diedai.hasNext()) { console.log(diedai.next()) }外观模式概念解读外观模式(Facade) 为子系统中的一组接口提供了一个一致的界面,此模块定义了一个高层接口,这个接口使得这一子系统更加容易使用。外观模式不仅简化类中的接口,而且对接口与调用者也进行了解耦。外观模式经常被认为开发者必备,它可以将一些复杂操作封装起来,并创建一个简单的接口用于调用。模式作用1.在设计初期,应该要有意识地将不同的两个层分离,比如经典的三层结构。2.在开发阶段,子系统往往因为不断的重构演化而变得越来越复杂,增加外观模式可以提供一个简单的接口,减少他们之间的依赖。3.在维护一个遗留的大型系统时,为系统开发一个外观Facade类,为设计粗糙和高度复杂的遗留代码提供比较清晰的接口,让新系统和Facade对象交互。注意事项外观模式被开发者连续使用时会产生一定的性能问题,因为在每次调用时都要检测功能的可用性。代码实战var stopEvent = function(e){ // 同时阻止时间默认行为和冒泡 e.stopPropagation() e.preventDefault() } // stopEvent 本身就是生产门面 $('#xxxx').click(function(e){ stopEvent(e) }) 策略模式概念解读策略模式定义了算法家族,分别封装起来,让他们之间可以互相替换,此模式让算法的变化不会影响到使用算法的客户。模式作用1.所有的这些算法都是做相同的事情,只是实现不同。2.以相同的方式调用所有的方法,减少了各种算法类与使用算法类之间的耦合。3.单独定义算法类,也方便了单元测试。注意事项1.不仅可以封装算法,也可以用来封装几乎任何类型的规则,是要在分析过程中需要在不同时间应用不同的业务规则,就可以考虑是要策略模式来处理各种变化。代码实战var $input = $('#input') var util = { isEmpty: function() { return false }, isTel: function() { return true } } var isEmpty = util.isEmpty($input.val()) var isTel = util.isTel($input.val()) if (!isEmpty && isTel ) { console.log('通过校验') } // OR $.fn.validate $.input.vallidate({ isEmpty: false, isTel: true })中介者模式概念解读中介者模式(Mediator) ,用一个中介对象来封装一系列的对象交互。 中介者使各对象不需要显式地相互引用,从而使其耦合松散,而且可以独立地改变它们之间的交互。模式作用1.软件开发中,中介者是一个行为设计模式,通过提供一个统一的接口让系统的不同部分进行通信。一般,如果系统有很多子模块需要直接沟通,都要创建一个中央控制点让其各模块通过该中央控制点进行交互。中介者模式可以让这些子模块不需要直接沟通,而达到进行解耦的目的。注意事项1.当系统出现了多对多交互复杂的对象群时,先不要急于使用中介者模式,而是要思考一下是不是系统设计有问题。代码实战// 飞机 var feiji = function(name) { this.name = name } feiji.prototype.send = function(msg, to) { console.log(this.name + '发送了信息') tatai.send(msg, to) } feiji.prototype.jieshou = function(msg) { console.log(this.name + '接收到' + msg) } // 塔台 var tatai = { all: {}, zhuce: function(feiji) { this.all[feiji.name] = feiji }, send: function(msg, to) { this.all[to.name].jieshou(msg) } } var feiji1 = new feiji('feiji1') var feiji2 = new feiji('feiji2') tatai.zhuce(feiji1) tatai.zhuce(feiji2) feiji1.send('我马上降落,还有200米', feiji2)原型模式概念解读原型模式(prototype) 是指用原型实例指向创建对象的种类,并且通过拷贝这些原型创建新的对象。对于原型模式,可以利用JavaScript特有的原型继承特性去创建对象的方式,真正的原型继承是作为最新版的ECMAScript5标准提出的,使用0bject.create方 法来创建这样的对象,如Object.create(prototype, optionalDescriptorObjects)模式作用1.原型对象本身就是有效地利用了每个构造器创建的对象注意事项1.注意的依然是浅拷贝和深拷贝的问题,免得出现引用问题。2.现有的文献里查看原型模式的定义,没有针对JavaScript的,你可能发现很多讲解的都是关于类的,但是现实情况是基于原型继承的JavaScript完全避免了类(class)的概念。代码实战// 深拷贝克隆对象。。。 模板方法概念解读模板方法(TemplateMethod) 定义了一个操作中的算法的骨架,而将一些步骤延迟到子类中。模板方法使得子类可以不改变一个算法的结构即可重定义该算法的某些特定步骤。模板方法是一种代码复用的基本技术,在类库中尤为重要,因为他们提取了类库中的公共行为。模板方法导致一种反向的控制结构,这种结构就是传说中的“好莱坞法则”,即“别找找我们,我们找你”,这指的是父类调用一个类的操作,而不是相反。具体体现是面向对象编程编程语言里的抽象类(以及其中的抽象方法),以及继承该抽象类(和抽象方法)的子类。模式作用1.一次性实现一个算法的不变的部分,并将可变的行为留给子类来实现2.各子类中公共的行为应被提取出来并集中到一个公共父类中的避免代码重复,不同之处分离为新的操作,最后,用一个钓鱼这些新操作的模板方法来替换这些不同的代码3.控制子类扩展,模板方法只在特定点调用“hook” 操作,这样就允许在这些点进行扩展注意事项1.和策略模式不同,模板方法使用继承来改变算法的一部分,而策略模式使用委托来改变整个算法。代码实战/***示例一:造人的模板***/ function shangdi() {} shangdi.prototype.zaoren_yanjing = function() { console.log('眼睛') } shangdi.prototype.zaoren_bizi = function() { console.log('鼻子') } shangdi.prototype.zaoren_zuiba = function() { console.log('嘴巴') } shangdi.prototype.zaoren_yanjing = function() { throw new Error('我只是个钩子,需要你自己去探索') } // 小明 function xiaoming() { console.log('小明是上帝的子类') shangdi.call(this) } xiaoming.protype = new shangdi() xiaoming.prototype.aihao = function(){ console.log('小明爱讲笑话') } /***示例二:流程***/ function liucheng(){} liucheng.prototype.start = function() { confirm('您是否要进入游戏?') } liucheng.prototype.loading = function() { confirm('游戏加载中…………') } liucheng.prototype.out = function() { confirm('您是否要离开游戏?') } function xiaojigege(){} xiaojigege.prototype = new liucheng() xiaojigege.start() 装饰者模式概念解读装饰者提供比继承更有弹性的替代方案。装饰者用用于包装同接口的对象,不仅允许你向方法添加行为,而且还可以将方法设置成原始对象调用(例如装饰者的构造函数)。装饰者用于通过重载方法的形式添加新功能,该模式可以在被装饰者前面或者后面加上自己的行为以达到特定的目的。模式作用1.装饰者是-种实现继承的替代方案。当脚本运行时,在子类中增加行为会影响原有类所有的实例,而装饰者却不然。取而代之的是它能给不同对象各自添加新行为。2.添加辅助的额外功能。3.把类(函数)的核心职责和装饰功能区分开了。注意事项1.装饰的类跟被装饰的类,要求拥有相同的访问接口方法(功能)。2.装饰类的要有对被装饰类的引用,用于在装饰类的相应方法,调用相应被装饰类的方法,然后对其进行修饰。3.把每个要装饰的功能放在单独的函数里。代码实战var fangzi = function() {} fangzi.prototype.kongjian = function() { console.log('我是空的房子') } var zhuangshi = function(fangzi) { this.zfangzi = fangzi } zhuangshi.prototype.kongjian = function() { this.zfangzi.kongjian() console.log('我添加了一个家具') } var _fangzi = new fangzi() var _zhuangshi = new zhuangshi(_fangzi) _zhuangshi.kongjian() 组合模式概念解读组合模式(Composite) 将对象组合成树形结构以表示“ 部分-整体”的层次结构,组合模式使得用户对单个对象和组合对象的使用具有一致性。模式作用1.你想表示对象的部分整体层次结构时。2.你希望用户忽略组合对象和单个对象的不同,用户将统一地使用组合结构中的所有对象(方法)注意事项1.该模式经常和装饰者一起使用,它们通常有一个公共的父类(也就是原型)因此装饰必须支持具有add、remove、 getChild操作的 component接口。代码实战var zhengti() {} zhengti.prototype.kafei = function() { throw new Error('不能直接使用') } zhengti.prototype.mianbao = function() { throw new Error('不能直接使用') } function guke() {} guke.prototype.kafei = function() {} guke.prototype.mianbao = function() {} guke.prototype.diancan = function() { this.kafei() this.mianbao() }
-
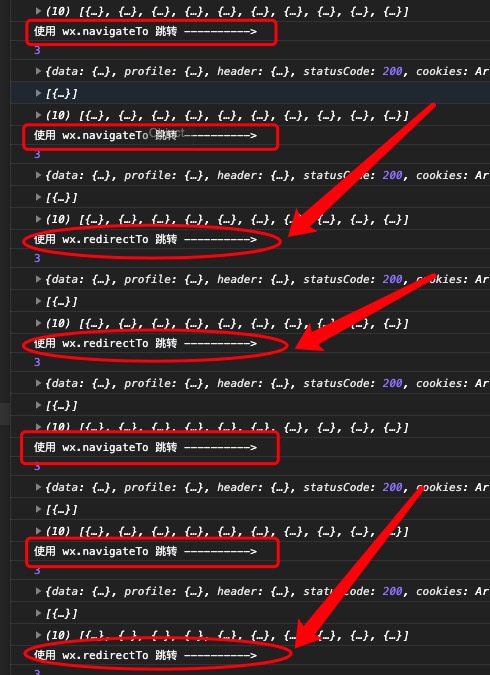
解决小程序导航不能超过 10 层的问题 解决小程序导航不能超过 10 层的问题,原生代码不动,在一个地方通过拦截 wx.navigateTo 解决const originNavigateTo = wx.navigateTo; Reflect.defineProperty(wx, 'navigateTo', { configurable: true, enumerable: true, writable: true, value: function () { const config = arguments[0] || {} // console.log(JSON.stringify(config)) // console.log('originNavigateTo : ', config.url) if (getCurrentPages().length > 9) { console.log('使用wx.redirectTo跳转 ---------->') wx.redirectTo(config) } else { console.log('使用wx.navigateTo跳转 ---------->') originNavigateTo.apply(this, arguments) } } })提示:需配置开启 es6 支持
-
WebGL实战解析(一) - 学习笔记 3D基本元素2D坐标系2D坐标系由x轴和y轴构成。其中,笛卡尔坐标系是最常见的2D坐标系。笛卡尔坐标系规定y轴向上为正方向,x轴向右为正方向HTML5 Canvas 2D坐标系原点(0,0)为左上角,向右为x轴的正方向,向下为y轴的正方向3D坐标系在2D坐标系上增加了表示深度的z轴,即3D物体里屏幕的深度HTML5 WebGL 3D坐标系绘图的可是范围为[-1,+1]网格与3D图形三角形是基础图形3D图形由一个或多个三角形组成网格由一个或多个图形组成,网格也叫模型法线始终垂直于某平面的虚线。在几何中,法线是指平面上垂直于曲线在某点切线的直线。3D变换概念变换原理是对顶点的改变变换的缩放、平移和旋转矩阵逐个顶点的变换方法是复杂乏味的矩阵是复杂性解决之道网格表面纹理与材质一个网格构成了物体的形状,纹理可以定义网格表面的外观纹理可以定义网格表面的外观材质是网格表面的特性光照原理光线方向决定物体的明暗度与阴影在着色过程中,需要考虑光源类型与反射类型光源类型平行光点光源光环境光反射类型漫反射:光色由入射光色、表面漆色和入射角决定环境反射:由入射光色和表面漆色决定着色器替代传统的固定渲染管线可编程性顶点着色器顶点着色器用来描述顶点的位置、颜色的程序片元着色器片元着色器是对网格表面像素的处理程序。3D 世界与立方体立方体的构成一个正方形的立方体在WebGL程序中,实际上是绘制了12个三角形,再对它的表面进行着色,最终形成我们看到的效果。模型文件格式相机、视口和投影左下角的眼睛代表相机,相机角度的不同,观察到的场景的景象就是不同的。而它的远近(x)就决定了他到的物体的大小。图中的绿色区域代表视口,通俗的讲就是WebGL Canvas决定的,它的大小也就决定了它可视化的范围。后面红色的区域能够显示场景的最远距离到哪里。红绿块之间的可视化椎体,就决定了可视化世界的范围。最终的影像会在可视化视口中呈现出来。投影的概念就是物体投影到前方视口上最终形成的影像通过对相机角度的不同,它的椎体肯定是有变化的,它看到的投影到视口上的影像肯定也是不同的。第一个WebGL程序开发WebGL程序的基本步骤得到canvas标签得到绘制上下文对象编写着色器初始化着色器绘制代码实现<!DOCTYPE html> <html lang="en"> <head> <meta charset="UTF-8"> <meta http-equiv="X-UA-Compatible" content="IE=edge"> <meta name="viewport" content="width=device-width, initial-scale=1.0"> <title>第一个WebGL程序</title> <script src="./lib.js"></script> </head> <body> <canvas id="webgl" width="500" height="500"></canvas> <script> var canvasElement = document.getElementById('webgl') const context = canvasElement.getContext('webgl') // 绘制顶点着色器 const vertexShaderSource = ` attribute vec4 apos; void main() { gl_PointSize=20.0; gl_Position = apos; } ` // 绘制片元着色器 const fragShaderSource = ` void main(){ gl_FragColor = vec4(1.0,0.0,0.0,1.0); } ` const program = initShader(context, vertexShaderSource, fragShaderSource) const aposLocation = context.getAttribLocation(program, 'apos') context.clearColor(0.2, 0.3, 0.5, 1.0) context.clear(context.COLOR_BUFFER_BIT) let x = 0.0 let y = 0.0 for(var i = 0, j = 0.1; i< 10; i++){ x += y y += j context.vertexAttrib4f(aposLocation, x, y, 0.0, 1.0) context.drawArrays(context.POINTS, 0, 1) } </script> </body> </html> // lib.js /** * * @param {CanvasContext} gl Canvas Context 对象 * @param {*} vertexShaderSource 顶点着色器源码 * @param {*} fragmentShaderSource 片元着色器源码 * @returns */ const initShader = function(gl, vertexShaderSource, fragmentShaderSource) { // 创建一个空的顶点着色器对象 const vertexShader = gl.createShader(gl.VERTEX_SHADER) // 创建一个空的片元着色器对象 const fragmentShader = gl.createShader(gl.FRAGMENT_SHADER) // 加入源代码 gl.shaderSource(vertexShader, vertexShaderSource) gl.shaderSource(fragmentShader, fragmentShaderSource) // 编译源代码 gl.compileShader(vertexShader) gl.compileShader(fragmentShader) // 创建内部调用的应用程序 var program = gl.createProgram() // 将着色器附着在应用程序上 gl.attachShader(program, vertexShader) gl.attachShader(program, fragmentShader) // 连接 gl.linkProgram(program) gl.useProgram(program) // 输出调试日志 console.log(gl.getShaderInfoLog(fragmentShader)) return program } WebGL 缓冲区对象attribute 变量的使用在顶点着色器中,声明 attribute 变量将 attribute 变量赋值给 gl_Position 变量向 attribute 变量传递数据缓冲区对象的创建与绑定缓冲区对象是绘制面所必须的技术,否则只能绘制点,它可以一次性地写入多个顶点数据,这样就可以为我们描绘出一个图形的轮廓,它可以是一块内存区域,这块内存区域通常来说很可能是显卡分配的创建步骤1、创建缓冲区的方法 var buffer = gl.createBuffer()2、根据返回值判断是否创建成功3、绑定缓冲区方法 gl.bindBuffer(gl.ARRAY_BUFFER,buffer)向缓冲区内写入数据gl.bufferData(gl.ARRAY_BUFFER, data, useMethod)data:是类型化数组useMethod:如何使用内存中的数据,可选值有:gl.STATIC_DRAW 一次性写入,多次绘制gl.STREAM_DRAW 一次性写入,调用几次,比第一次调用的要少,但都是写入一次gl.DYNAMIC_DRAW 多次写入,多次绘制类型化数组:Int8Array Unit8ArrayInt16Array Unit16ArrayInt32Array Unit32ArrayFloat32Array 最常用Float64Array缓冲区数据导入 attribute变量vertexAttribPointer(location, size, type, normalized, stride, offset)完整代码示例<!DOCTYPE html> <html lang="en"> <head> <meta charset="UTF-8"> <meta http-equiv="X-UA-Compatible" content="IE=edge"> <meta name="viewport" content="width=device-width, initial-scale=1.0"> <title>Document</title> <script src="./lib.js"></script> </head> <body> <canvas id="webglcanvas" width="500" height="500"></canvas> <script> var ctx = document.getElementById('webglcanvas').getContext('webgl') var vertexShaderSource = ` attribute vec4 apos; void main(){ gl_Position = apos; gl_PointSize = 15.0; } ` var fragmentShaderSource = ` void main(){ gl_FragColor = vec4(1.0,0.0,0.0,1.0); } ` var buf = ctx.createBuffer() ctx.bindBuffer(ctx.ARRAY_BUFFER, buf) var program = initShader(ctx,vertexShaderSource,fragmentShaderSource) var aposLocation = ctx.getAttribLocation(program, 'apos') var data = new Float32Array([ 0.6,0.8, 0.2,0.5, -1.0,1.0, 1.0,1.0, -1.0,-1.0, 1.0,-1.0, 0.0,0.0 ]) ctx.bufferData(ctx.ARRAY_BUFFER, data, ctx.STATIC_DRAW) ctx.vertexAttribPointer(aposLocation, 2, ctx.FLOAT, false, 0, 0) ctx.enableVertexAttribArray(aposLocation) ctx.clearColor(0.0,0.0,1.0,1.0) ctx.clear(ctx.COLOR_BUFFER_BIT) // var points = [ // {x:0, y:0}, // {x:0.6, y:0.8}, // {x:0.2, y:0.5} // ] // for(var i = 0; i< points.length; i++) { // ctx.vertexAttrib4f(aposLocation, points[i].x, points[i].y, 1.0, 1.0) // ctx.drawArrays(ctx.POINTS, 0, 3) // } ctx.drawArrays(ctx.POINTS, 0, 7) </script> </body> </html> WebGL 基本图形绘制点的绘制gl.drawArrays(gl.POINTS, 0, 1)线段的绘制绘制线gl.drawArrays(gl.LINES, start, count)var vertexShaderSource = ` attribute vec4 aPos; void main() { gl_Position = aPos; gl_PointSize = 20.5; } ` var fragmentShaderSource = ` void main() { gl_FragColor = vec4(1.0,0.0,0.0,1.0); } ` var gl = document.getElementById('canvas').getContext('webgl') var program = initShader(gl,vertexShaderSource,fragmentShaderSource) var posLocation = gl.getAttribLocation(program, 'aPos') var data = new Float32Array([ 0.0,0.0,0.5,0.5, 0.3,0.6,-0.3,-0.9 ]) var buffer = gl.createBuffer() gl.bindBuffer(gl.ARRAY_BUFFER, buffer) gl.bufferData(gl.ARRAY_BUFFER, data, gl.STATIC_DRAW) gl.vertexAttribPointer(posLocation, 2, gl.FLOAT, false, 0, 0) gl.enableVertexAttribArray(posLocation) gl.clearColor(0.0, 0.0, 0.0, 1.0) gl.clear(gl.COLOR_BUFFER_BIT) gl.drawArrays(gl.LINES, 0, 4)运行效果:绘制多线段gl.drawArray(gl.LINE_STRIP, start, count)绘制Z形线var vertexShaderSource = ` attribute vec4 aPos; void main() { gl_Position = aPos; gl_PointSize = 20.5; } ` var fragmentShaderSource = ` void main() { gl_FragColor = vec4(1.0,0.0,0.0,1.0); } ` var gl = document.getElementById('canvas').getContext('webgl') var program = initShader(gl,vertexShaderSource,fragmentShaderSource) var posLocation = gl.getAttribLocation(program, 'aPos') var data = new Float32Array([ -0.5,0.5, 0.5,0.5, -0.5,-0.5, 0.5,-0.5 ]) var buffer = gl.createBuffer() gl.bindBuffer(gl.ARRAY_BUFFER, buffer) gl.bufferData(gl.ARRAY_BUFFER, data, gl.STATIC_DRAW) gl.vertexAttribPointer(posLocation, 2, gl.FLOAT, false, 0, 0) gl.enableVertexAttribArray(posLocation) gl.clearColor(0.0, 0.0, 0.0, 1.0) gl.clear(gl.COLOR_BUFFER_BIT) gl.drawArrays(gl.LINE_STRIP, 0, 4)绘制矩形框// 绘制矩形框 var vertexShaderSource = ` attribute vec4 aPos; void main() { gl_Position = aPos; gl_PointSize = 20.5; } ` var fragmentShaderSource = ` void main() { gl_FragColor = vec4(1.0,0.0,0.0,1.0); } ` var gl = document.getElementById('canvas').getContext('webgl') var program = initShader(gl,vertexShaderSource,fragmentShaderSource) var posLocation = gl.getAttribLocation(program, 'aPos') var data = new Float32Array([ -0.5,0.5, 0.5,0.5, 0.5,-0.5, -0.5,-0.5, -0.5,0.5 ]) var buffer = gl.createBuffer() gl.bindBuffer(gl.ARRAY_BUFFER, buffer) gl.bufferData(gl.ARRAY_BUFFER, data, gl.STATIC_DRAW) gl.vertexAttribPointer(posLocation, 2, gl.FLOAT, false, 0, 0) gl.enableVertexAttribArray(posLocation) gl.clearColor(0.0, 0.0, 0.0, 1.0) gl.clear(gl.COLOR_BUFFER_BIT) gl.drawArrays(gl.LINE_STRIP, 0, 5)绘制回路线段gl.drawArray(gl.LING_LOOP,start, count)可以把最后一个顶点跟第一个顶点连接在一起// 绘制回路线段 var vertexShaderSource = ` attribute vec4 aPos; void main() { gl_Position = aPos; gl_PointSize = 20.5; } ` var fragmentShaderSource = ` void main() { gl_FragColor = vec4(1.0,0.0,0.0,1.0); } ` var gl = document.getElementById('canvas').getContext('webgl') var program = initShader(gl,vertexShaderSource,fragmentShaderSource) var posLocation = gl.getAttribLocation(program, 'aPos') var data = new Float32Array([ -0.5,0.5, 0.5,0.5, 0.5,-0.5, -0.5,-0.5 ]) var buffer = gl.createBuffer() gl.bindBuffer(gl.ARRAY_BUFFER, buffer) gl.bufferData(gl.ARRAY_BUFFER, data, gl.STATIC_DRAW) gl.vertexAttribPointer(posLocation, 2, gl.FLOAT, false, 0, 0) gl.enableVertexAttribArray(posLocation) gl.clearColor(0.0, 0.0, 0.0, 1.0) gl.clear(gl.COLOR_BUFFER_BIT) gl.drawArrays(gl.LINE_LOOP, 0, 4)多边形的绘制gl.drawArray(gl.TRIANGLES, start, count)// 绘制三角形 var vertexShaderSource = ` attribute vec4 aPos; void main() { gl_Position = aPos; gl_PointSize = 20.5; } ` var fragmentShaderSource = ` void main() { gl_FragColor = vec4(1.0,0.0,0.0,1.0); } ` var gl = document.getElementById('canvas').getContext('webgl') var program = initShader(gl,vertexShaderSource,fragmentShaderSource) var posLocation = gl.getAttribLocation(program, 'aPos') var data = new Float32Array([ 0.0,0.0, -0.5,-0.5, 0.5,-0.5 ]) var buffer = gl.createBuffer() gl.bindBuffer(gl.ARRAY_BUFFER, buffer) gl.bufferData(gl.ARRAY_BUFFER, data, gl.STATIC_DRAW) gl.vertexAttribPointer(posLocation, 2, gl.FLOAT, false, 0, 0) gl.enableVertexAttribArray(posLocation) gl.clearColor(0.0, 0.0, 0.0, 1.0) gl.clear(gl.COLOR_BUFFER_BIT) gl.drawArrays(gl.TRIANGLES, 0, 3)绘制三角带gl.drawArray(gl.TRIANGLE_STRIP,start, count)// 绘制平行四边形 var vertexShaderSource = ` attribute vec4 aPos; void main() { gl_Position = aPos; gl_PointSize = 20.5; } ` var fragmentShaderSource = ` void main() { gl_FragColor = vec4(1.0,0.0,0.0,1.0); } ` var gl = document.getElementById('canvas').getContext('webgl') var program = initShader(gl,vertexShaderSource,fragmentShaderSource) var posLocation = gl.getAttribLocation(program, 'aPos') var data = new Float32Array([ -0.3,0.3, 0.5,0.3, -0.5,-0.3, 0.3, -0.3 ]) var buffer = gl.createBuffer() gl.bindBuffer(gl.ARRAY_BUFFER, buffer) gl.bufferData(gl.ARRAY_BUFFER, data, gl.STATIC_DRAW) gl.vertexAttribPointer(posLocation, 2, gl.FLOAT, false, 0, 0) gl.enableVertexAttribArray(posLocation) gl.clearColor(0.0, 0.0, 0.0, 1.0) gl.clear(gl.COLOR_BUFFER_BIT) gl.drawArrays(gl.TRIANGLE_STRIP, 0, 4)绘制三角扇gl.drawArray(gl.TRIANGLE_FAN, start, count)// 绘制六边形 var vertexShaderSource = ` attribute vec4 aPos; void main() { gl_Position = aPos; gl_PointSize = 20.5; } ` var fragmentShaderSource = ` void main() { gl_FragColor = vec4(1.0,0.0,0.0,1.0); } ` var gl = document.getElementById('canvas').getContext('webgl') var program = initShader(gl,vertexShaderSource,fragmentShaderSource) var posLocation = gl.getAttribLocation(program, 'aPos') var data = new Float32Array([ 0.0,0.0, -0.3,0.5, -0.6,0.0, -0.3,-0.5, 0.3,-0.5, 0.6,0.0, 0.3,0.5, -0.3,0.5 ]) var buffer = gl.createBuffer() gl.bindBuffer(gl.ARRAY_BUFFER, buffer) gl.bufferData(gl.ARRAY_BUFFER, data, gl.STATIC_DRAW) gl.vertexAttribPointer(posLocation, 2, gl.FLOAT, false, 0, 0) gl.enableVertexAttribArray(posLocation) gl.clearColor(0.0, 0.0, 0.0, 1.0) gl.clear(gl.COLOR_BUFFER_BIT) gl.drawArrays(gl.TRIANGLE_FAN, 0, 8)WebGL 图形变换图形的移动原理图形的移动,实际上就是定量改变顶点的位置,在顶点着色器中,顶点修改是逐个进行的,且偏移值一致平移代码示例var main = function() { // 顶点着色器 var vertexShaderSource = ` attribute vec4 pos; uniform float a; uniform float b; void main() { gl_Position.x = pos.x + a; gl_Position.y = pos.y + b; gl_Position.z = 0.0; gl_Position.w = 1.0; } ` // 片元着色器 var fragmentShaderSource = ` void main() { gl_FragColor = vec4(1.0, 0.0, 0.0, 1.0); } ` var gl = document.getElementById('canvas').getContext('webgl') var buffer = gl.createBuffer() gl.bindBuffer(gl.ARRAY_BUFFER, buffer) var data = new Float32Array([ 0.0,0.0, -0.5,-0.5, 0.5,-0.5 ]) gl.bufferData(gl.ARRAY_BUFFER, data, gl.STATIC_DRAW) var program = initShader(gl, vertexShaderSource, fragmentShaderSource) var a = 0.0, b = 0.0 var posLocation = gl.getAttribLocation(program, 'pos') var aLocation = gl.getUniformLocation(program, 'a') var bLocation = gl.getUniformLocation(program, 'b') gl.vertexAttribPointer(posLocation, 2, gl.FLOAT, false, 0, 0) gl.enableVertexAttribArray(posLocation) var run = function() { gl.uniform1f(aLocation, a) gl.uniform1f(bLocation, b) gl.clearColor(0.0, 0.0, 1.0, 1.0) gl.clear(gl.COLOR_BUFFER_BIT) gl.drawArrays(gl.TRIANGLES, 0, 3) a += 0.05 b += 0.05 setTimeout(run, 50) } run() } main()图形的缩放顶点不变的方式缩放var main = function() { // 顶点着色器 var vertexShaderSource = ` attribute vec4 pos; uniform float zoomRadio; void main() { gl_Position.x = pos.x * zoomRadio; gl_Position.y = pos.y * zoomRadio; gl_Position.z = 0.0; gl_Position.w = 1.0; } ` // 片元着色器 var fragmentShaderSource = ` void main() { gl_FragColor = vec4(1.0, 0.0, 0.0, 1.0); } ` var gl = document.getElementById('canvas').getContext('webgl') var buffer = gl.createBuffer() gl.bindBuffer(gl.ARRAY_BUFFER, buffer) var data = new Float32Array([ 0.0,0.0, -0.5,-0.5, 0.5,-0.5 ]) gl.bufferData(gl.ARRAY_BUFFER, data, gl.STATIC_DRAW) var program = initShader(gl, vertexShaderSource, fragmentShaderSource) var zoomRatio = Math.random() var posLocation = gl.getAttribLocation(program, 'pos') var zoomLocation = gl.getUniformLocation(program, 'zoomRadio') gl.vertexAttribPointer(posLocation, 2, gl.FLOAT, false, 0, 0) gl.enableVertexAttribArray(posLocation) var run = function() { gl.uniform1f(zoomLocation, zoomRatio) gl.clearColor(0.0, 0.0, 1.0, 1.0) gl.clear(gl.COLOR_BUFFER_BIT) gl.drawArrays(gl.TRIANGLES, 0, 3) zoomRatio = Math.random() setTimeout(run, 500) } run() } main()图形的旋转var main = function() { // 顶点着色器 var vertexShaderSource = ` attribute vec4 pos; uniform float sinB; uniform float cosB; void main() { gl_Position.x = pos.x * cosB - pos.y * sinB; gl_Position.y = pos.x * sinB + pos.y * cosB; gl_Position.z = 0.0; gl_Position.w = 1.0; } ` // 片元着色器 var fragmentShaderSource = ` void main() { gl_FragColor = vec4(1.0, 0.0, 0.0, 1.0); } ` var gl = document.getElementById('canvas').getContext('webgl') var data = new Float32Array([ 0.0,0.0, -0.5,-0.5 ]) gl.bufferData(gl.ARRAY_BUFFER, data, gl.STATIC_DRAW) var program = initShader(gl, vertexShaderSource, fragmentShaderSource) bindAttribute(gl, 'pos', data, program) var sinB, sinBLocation,cosB, cosBLocation sinBLocation = gl.getUniformLocation(program, 'sinB') cosBLocation = gl.getUniformLocation(program, 'cosB') var angle = -135; setInterval(function() { angle -= 1 var t = Math.PI * angle / 180 sinB = Math.sin(t) cosB = Math.cos(t) gl.uniform1f(sinBLocation, sinB) gl.uniform1f(cosBLocation,cosB) gl.clearColor(0.0, 0.0, 1.0, 1.0) gl.clear(gl.COLOR_BUFFER_BIT) gl.drawArrays(gl.LINES, 0, 2) }, 1000) } main()
-
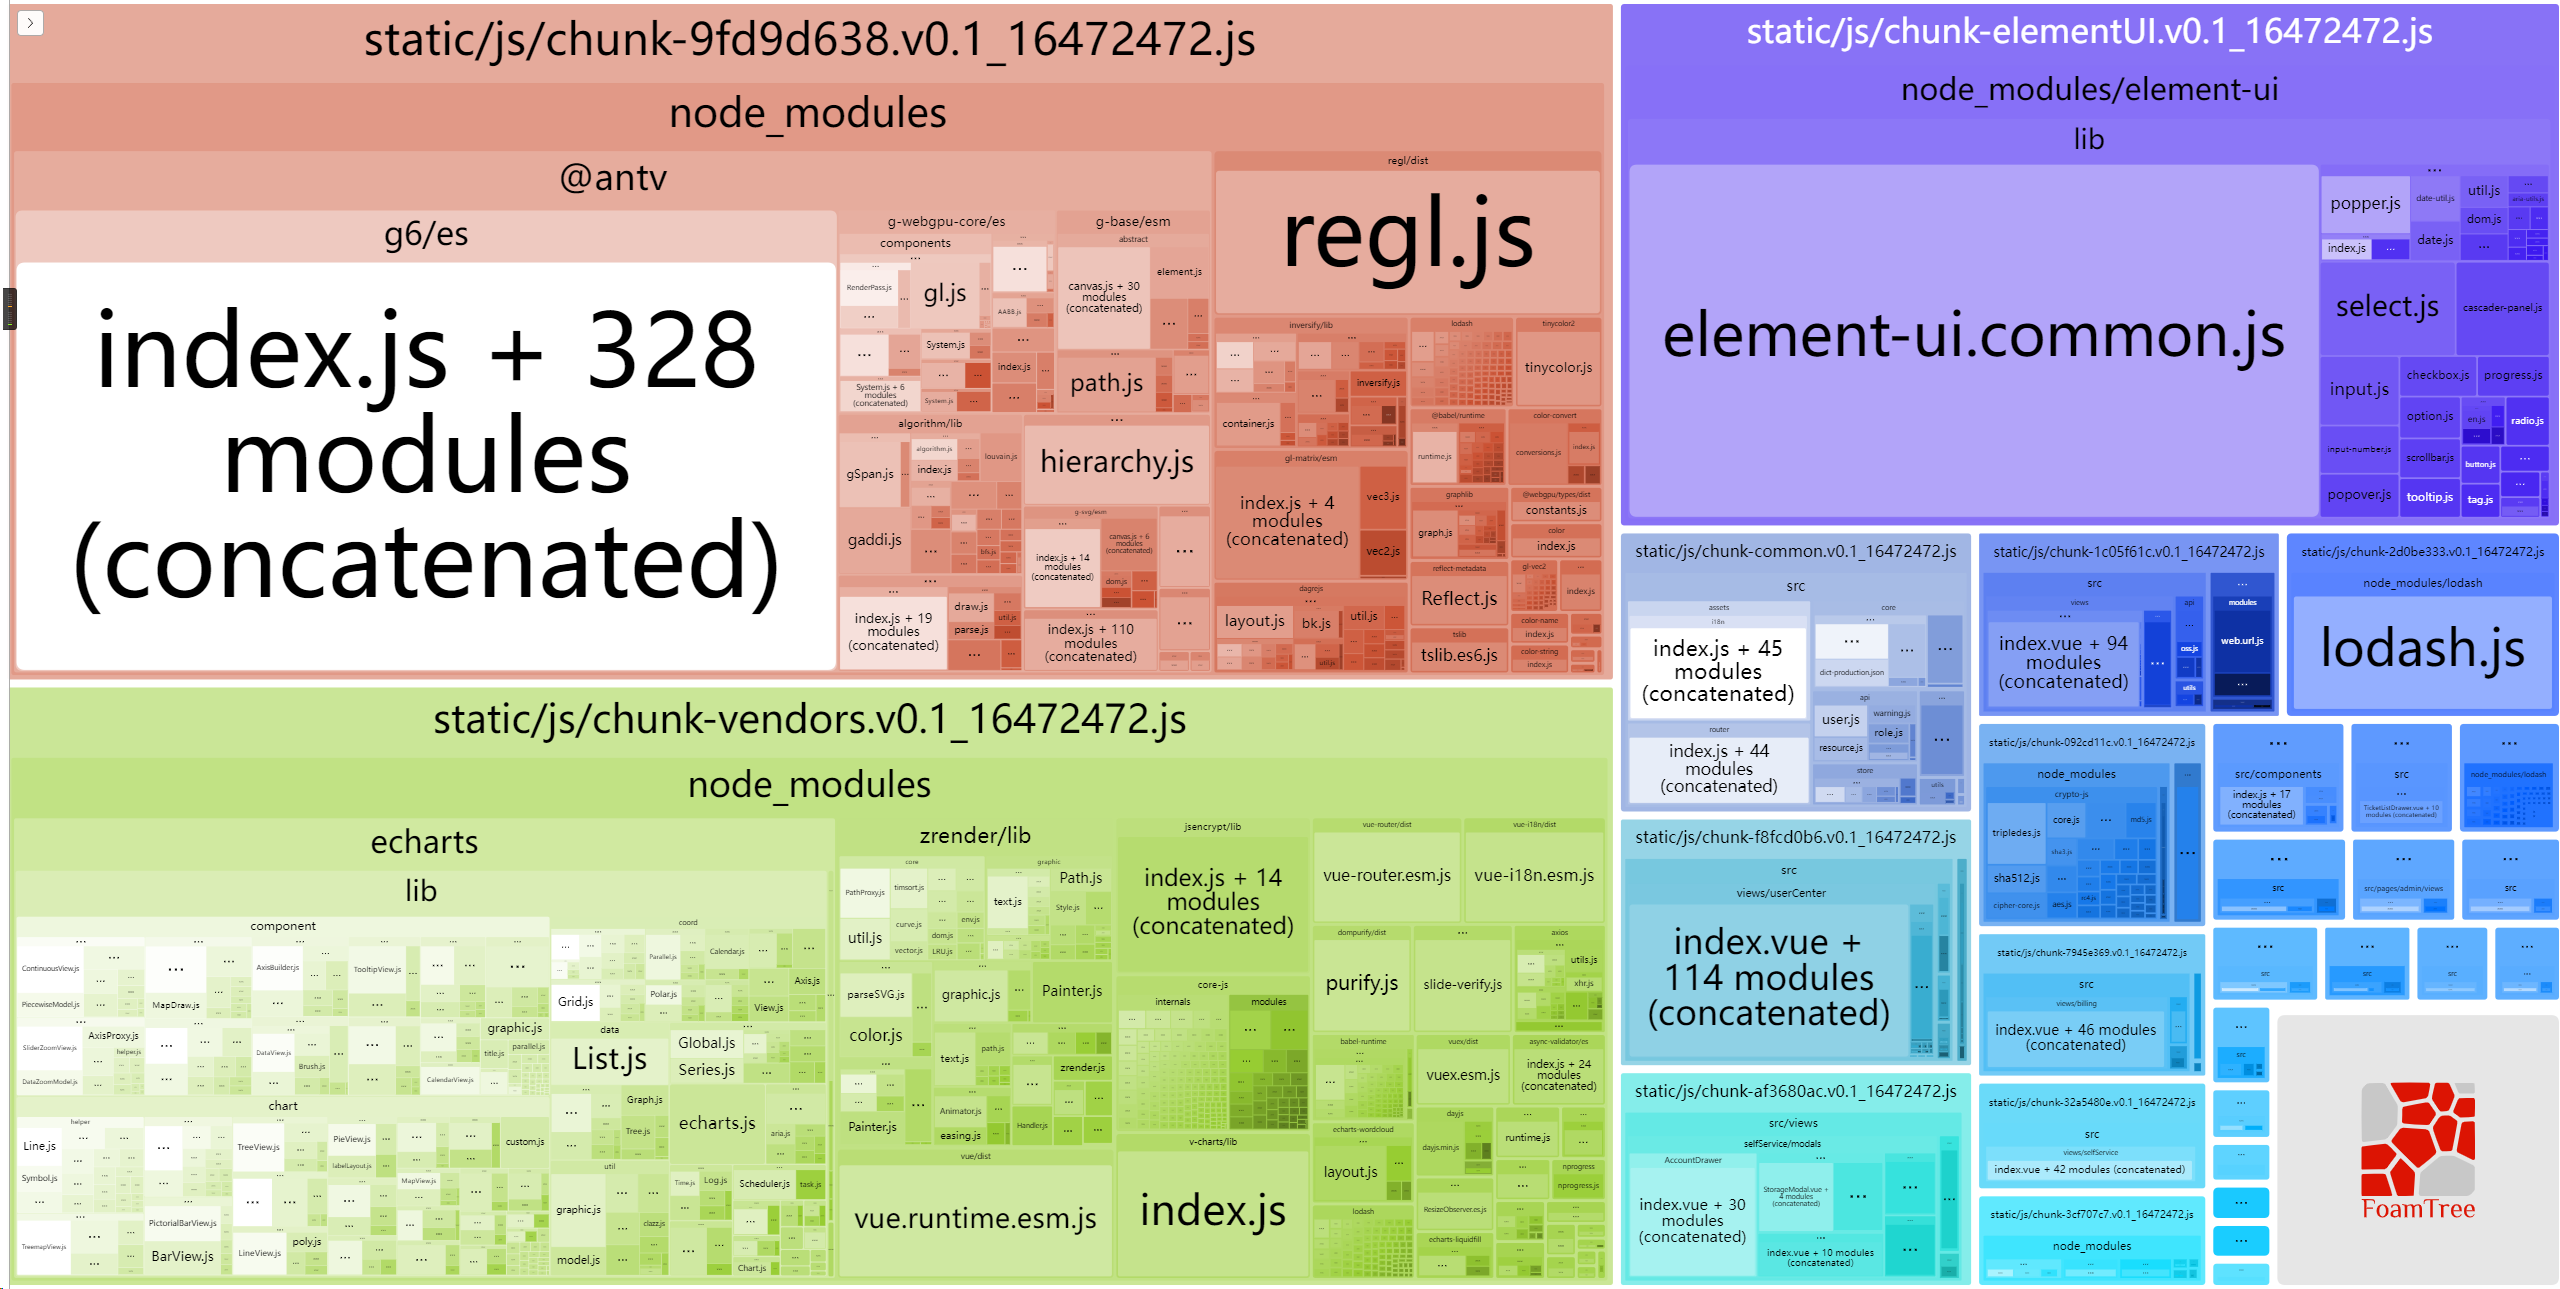
使用「Relation Graph」优化图表展现效果 背景说明近期检查前端工程的打包情况,发现@antv/g6占用了很大的空间:经过前端团队内部了解,这个主要是用于项目内超算中心的关系图展示,关系图这一块也随着业务的需求使用了不同的组件来实现:echarts > Mindelixir > @antv/G6实际使用@antv/G6实现完的效果,我的直观感觉也不是很理想,数据量大的情况下,显示太小,而且看了下相关的代码,感觉实现过程也不够优雅。所以秉承公司精益求精的企业文化,为了减少打包体积及优化使用体验等目的,准备使用「Relation Graph」对这一块进行大刀阔斧的改造。经过三四天的打磨,整体效果得到了运营同事的认可,先看看实现后的效果:本次调整后,打包体积上有较大的缩减:优化前:(原始大小:13.69M;压缩后:4.71M;开启gzip:1.42M)优化后:(原始大小:8.97M;压缩后:3.14M;开启gzip:957.42K)代码实现下面将项目中关系图相关的一些核心代码进行讲解视图代码<relation-graph ref="relationGraph" :options="graphOptions"> <div slot="node" slot-scope="{node}"> <el-popover v-if="node.data.status === 'user'" trigger="hover" placement="right" popper-class="account-graph-popver" > <div slot="reference" class="node-item flex align-center"> <div class="node-icon" :style="{color:node.data.iconColor}"> <em class="node-icon-inner" :class="node.data.nodeIconClassName" /> </div> <span class="node-name margin-left-sm" v-text="node.text" /> </div> <div class="popover-tips"> <p v-if="node.data.realname !== node.data.email && node.data.realname !== ''"> <span>{{ $t('userCenter.name') }}</span>: {{ node.data.realname }} </p> <p><span>{{ $t('common.email') }}</span>: {{ node.data.email }}</p> <p v-if="node.data.phone"> <span>{{ $t('common.mobile') }}</span>: {{ node.data.phone }} </p> <div v-if="belongingType==='use' && stopClick('accountMgmt')"> <el-divider /> <p class="text-center"> <el-button slot="reference" type="text" class="padding-lr-xs" @click="unBind(node)"> <para-lang code="selfService.group.accountUnbinding" /> </el-button> </p> </div> </div> </el-popover> <el-popover v-else-if="node.data.status !== 'accountMessage' && stopClick('accountMgmt')" trigger="hover" placement="right" popper-class="account-graph-popver" > <div slot="reference" class="node-item flex align-center"> <div class="node-icon" :style="{color:node.data.iconColor}"> <em class="node-icon-inner" :class="node.data.nodeIconClassName" /> </div> <span class="node-name margin-left-sm" v-text="node.text" /> </div> <div v-if="node.data.status === 'account'" class="popover-tips"> <p><span>{{ $t('common.SCAccount') }}</span>: {{ node.text }}</p> <div> <el-divider /> <p class="text-center"> <el-button v-if="belongingType==='belonging'" type="text" @click="modifyAccountRelation(node)"> 修改所属关系 </el-button> <el-button v-if="belongingType==='use'" type="text" @click="bindAccount(node)"> <para-lang code="selfService.group.accountBinding" /> </el-button> </p> </div> </div> <div v-if="node.data.status === 'ssc'" class="popover-tips"> <p><span>{{ $t('common.SCCode') }}</span>: {{ node.text }}</p> <el-divider /> <p class="text-center"> <el-button type="text" @click="showAccountApply(node.text)"> <para-lang code="selfService.group.applicationAccount" /> </el-button> </p> </div> </el-popover> <div v-else class="node-item flex align-center"> <div class="node-icon" :style="{color:node.data.iconColor}"> <em class="node-icon-inner" :class="node.data.nodeIconClassName" /> </div> <span class="node-name margin-left-sm" v-text="node.text" /> </div> </div> </relation-graph>图标配置项在Vue 组件的 data 里添加如下信息graphOptions: { 'debug': envName === 'development', // 仅开发或Istio环境下为调试模式 'allowShowMiniView': true, 'allowSwitchLineShape': true, 'defaultFocusRootNode': false, 'layouts': [ { 'label': '树状-横向', 'layoutName': 'tree', 'useLayoutStyleOptions': true, 'layoutClassName': 'member-layout-tree-v', 'defaultLineColor': '#DDDDDD', 'levelDistance': '300,300,300,500', 'min_per_width': 100, 'max_per_width': 300, 'min_per_height': 40, 'max_per_height': 100, 'defaultNodeShape': 1, 'defaultLineShape': 6, 'defaultJunctionPoint': 'lr', 'defaultExpandHolderPosition': 'right', 'from': 'left', 'defaultNodeHeight': '36', 'defaultNodeColor': '#C6E5FF', 'defaultNodeBorderWidth': 1, 'defaultNodeBorderColor': '#CED4D9', 'defaultNodeFontColor': '#666666' }, { 'label': '树状-纵向', 'layoutName': 'tree', 'useLayoutStyleOptions': true, // 'defaultFocusRootNode': false, 'layoutClassName': 'member-layout-tree-h', 'defaultLineColor': '#DDDDDD', // 'levelDistance': '120', 'min_per_width': 100, 'max_per_width': 400, 'min_per_height': 100, 'max_per_height': 500, 'defaultNodeShape': 1, 'defaultLineShape': 6, 'defaultJunctionPoint': 'tb', 'defaultExpandHolderPosition': 'bottom', 'from': 'top', 'defaultNodeHeight': '36', 'defaultNodeColor': '#C6E5FF', 'defaultNodeBorderWidth': 1, 'defaultNodeBorderColor': '#CED4D9', 'defaultNodeFontColor': '#666666' }, { 'label': '中心布局', 'layoutName': 'center', 'useLayoutStyleOptions': true, 'layoutClassName': 'member-layout-center', 'levelDistance': '80', 'defaultNodeShape': 1, 'defaultLineShape': 5, // 'defaultFocusRootNode': true, 'defaultLineColor': '#DDDDDD', 'defaultJunctionPoint': 'border', 'defaultNodeHeight': '36', 'defaultNodeColor': '#C6E5FF', 'defaultNodeBorderWidth': 1, 'defaultNodeBorderColor': '#CED4D9', 'defaultNodeFontColor': '#666666' } ] }将后端响应的数据组织成 Relation Graph 组件所需的数据在 methods 中添加如下方法 // 根据 RelationGraph 图表的数据组织形式,梳理内容 buildGraphData() { const _this = this const graphData = { rootId: '', nodes: [], links: [] } const nodes = graphData.nodes const links = graphData.links // 生成随机ID,针对数据无id属性的情况可生成一个随机ID const buildRandomId = function() { return 'mock-' + Date.now().toString(36) + '-' + Math.random().toString(36).substr(4) } var buildNodeData = function(node) { const nodeData = { 'id': node.id, 'name': node.name, 'data': { ...node } } const nodeClassMap = { 'ssc': { name: '超算中心', color: node.online === 1 ? '#9de173' : '#ccc', icon: 'console-svg svg-sc-center' }, 'user': { name: '用户', color: node.groupId === _this.user.userInfo.groupId ? '#C6E5FF' : '#8aabc1', iconColor: node.userId === _this.user.userInfo.group.payUserId ? '#f7c934' : '', icon: node.userId === _this.user.userInfo.group.payUserId ? 'console-svg svg-main-account' : 'console-svg svg-sub-account' }, 'account': { name: '超算账号', color: node.inSameGroup ? '#da97f9' : '#c7ceff', icon: 'console-svg svg-sc-account-2' }, 'accountMessage': { name: '账号信息', color: '#0f7dfa', icon: 'console-icon icon-sc-account' } } // nodeData.width = node.name.length * 12 nodeData.data.nodeIconClassName = nodeClassMap[node.status].icon nodeData.data.iconColor = nodeClassMap[node.status].iconColor || '#666' nodeData.color = nodeClassMap[node.status].color || '#C6E5FF' if (node.status === 'accountMessage') { nodeData.fontColor = '#fff' } return nodeData } const buildData = function(node) { let parentNodeId = node.id if (!parentNodeId) { node.id = parentNodeId = buildRandomId() } if (nodes.length === 0) { graphData.rootId = parentNodeId const nodeData = buildNodeData(node) nodes.push(nodeData) } if (node.children && node.children.length > 0) { for (const childNode of node.children) { // 若节点没有id,则给一个随机id值 if (!childNode.id) { childNode.id = buildRandomId() } const childNodeData = buildNodeData(childNode) const nodeLink = { from: parentNodeId, to: childNode.id, text: '' } nodes.push(childNodeData) links.push(nodeLink) // 递归添加子节点 if (childNode.children && childNode.children.length > 0) { buildData(childNode) } } } } if (this.drawData && this.drawData.length > 0) { buildData(this.drawData[0]) } return graphData }获取数据并初始化组件在 methods 中添加如下代码initGraph() { this.graphInited = false const graphData = this.buildGraphData() this.$nextTick(_ => { this.$refs.relationGraph.setJsonData(graphData, () => { this.graphInited = true }) }) }其他说明:layoutName 为 force 时存在一些问题,自动时会动态调整各节点的位置,导致一些交互受到影响,所以本工程没有启用自动布局使用纵向树状布局时节点较多的情况,后面的节点容易覆盖在上一个节点上,找了下github里的issue,说可以对各节点进行绝对布局实现,但是工作量会比较大,运营没在这个点上纠结,咱也就不考虑优化了。鼠标悬停在节点上时无法触发el-popover组件的悬停事件,经排查跟节点的 + - 折叠样式有关,该节点的宽度太宽,导致底部的节点内容无法响应鼠标事件,使用如下样式覆盖默认样式完美解决(以下样式代码包含图标组件其他元素的样式调整):.graph-container { ::v-deep .c-mini-graph { position: absolute; top:0; right:0; margin-top:0 } ::v-deep .c-mini-toolbar { margin-left:0; margin-top:0; right:0; bottom:10px; } /* 调整样式,避免出现账号悬停不显示用户信息的情况 */ ::v-deep .c-expand-positon-right{ width: auto; right:0; } ::v-deep .c-expand-positon-bottom { width: auto; left: 50%; margin-left: -10px; } ::v-deep .rel-node-shape-1 { overflow:hidden; padding:0; border-radius: 6px; } ::v-deep .node-item { padding: 0 10px 0 0; line-height:34px; .node-icon { background-color:#fff; width: 36px; text-align: center; line-height: 34px; vertical-align: middle; em { font-size:22px; } } .node-name { white-space:nowrap; display: inline-block; } } // 布局文字定位调整 ::v-deep .c-mb-child-panel .c-mb-button .c-mb-text{ padding-top:3px; display: block; width: 100%; position: relative; margin: 0; } }链接Relation Graph 官网Relation Graph 在Github的开源地址
-
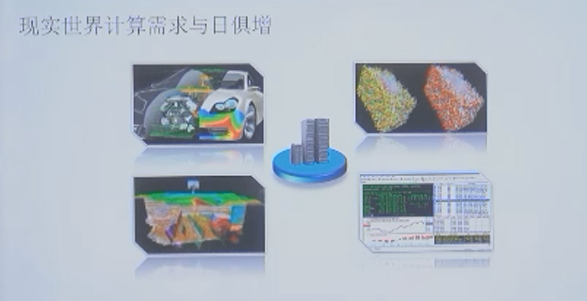
并行计算基础知识-学习笔记 为什么会有并行计算?并行计算的必要性,现实世界计算需求与日俱增,对工期、规模有非常大的要求,并行计算可以非常好的提供计算能力汽车制造。设计制造领域,用于模拟分子模拟。微观领域不好现实观察石油勘探。通过数据推演,大概模拟地下储存情况数学建模。股市预测等处理器发展趋势-并行化功耗墙现代计算机体系架构下的并行化体系架构选择、优化成本(制造与功耗)与性能指令级并行(ILP)流水线(Pipelining)多指令发射乱序执行向量化(SIMD)单条指令执行能够同时处理多个数据片多线程(MIMD)多个程序实例能同时运行多核CPU发展架构的巨大转变并行化线程与进程线程与进程是抽象的概念,对应的物理概念是CPU核心每个线程或进程都至少对应一个CPU物理核心进程是 资源分配 的最小单位线程是 CPU调度 的最小单位线程比进程粒度更小一个进程可以拥有多个线程举例假设要吃完一盆米饭,多进程是每人一个碗 一起吃这盆米饭,多线程相当于多个人共用一个碗起吃这盆米饭,多线程 相当于多个人 共用一个碗 一起吃这盆米饭多进程时,碗(进程)和碗之间是独立的、互不影响的多线程时,每个人共享个碗的资源看起来多进程永远好于多线程但是如果加上这样的条件每个人穿不同颜色的衣服,米饭也分不同的种类,大米、小米、紫米....,规定什么颜色的衣服只能吃什么颜色米,但是盛饭的时候不知道盛到碗里的是什么米需要盛上来之后,各个颜色的人、碗互相沟通归类数据导致:人越多、碗越多,花在沟通上的时间越长,干正事吃饭的时间越短结论:现实情况并不一定多进程是永远好于多线程的,有的时候需要将多进程和多线程结合起来使用。多进程:进程和进程之间是互相独立的多线程:线程和线程之间是共享一个进程的资源多线程程序OpenMP、pthreads、TBB......已被各编译器按收作为基本编程规则,常用编译器都支持多进程程序使用MPI技术编程MPI本身是开放的编程接口,各厂商有自己的版本Intel MPI (白建超算推荐,无论什么程序优先使用,除非明确无法使月)天河MPICH3 (广州/长沙超算推荐)OpenMPI (Intel MPI不可用时备选)MPICH (禁用,无法使用高速网)有些程序只有多进程并行MS、OpenFOAM有些程序只有多线程并行Gaussian有些程序支持多进程和多线程混合并行VASP、 WRF......除只支持多线程的程序及用户特殊要求外,给用户测试交付时默认纯多进程并行CPU利用率运行程序占用的CPU资源的比率操作系统级别统计,分为用户态和内核态直观反映CPU的繁忙程度内存使用率使用的内存超过节点内存,作业会报错退出网络高速网Infiniband/Ominipath/天河自建超算都使用Infiniband高速网,速度相比以太网提升10倍以上编译和安装软件注意MPI环境使用
-
职场人际沟通必备技能-学习笔记 讲师:勾俊伟在职场如鱼得水,你需要两个必备要素:①、技术足够专业。90%②、懂得如何与大多数人相处愉快。10%如何用一张表,从根本上解决不开心工作不爽问题拆解工作问题分类拆解表一味的抱怨从本质上解决不了问题领导沟通术 ● 怎样正确地汇报工作?领导沟通汇报一件事情进行中,还没做完的时候,要多说结果,少说过程请示发生在事情开始之前或事情进行中,征询下一步,在请示前准备多套方案总结一般用于结束的时候,一般多说过程,少说结果,尤其是在项目做得好的时候,总结为什么你这个事情能做得好及为什么做得不好汇报工作注意两点:①、开门见山②、多说结果汇报工作:开门见山,我要沟通以下问题:汇报时多说结果,少说过程领导沟通术 ● 如何向领导做工作总结?准备工作:受众分析:给谁总结?选题拟定:总结什么?横向调研:类似的?受众分析给谁看? 领导风格决定总结风格选题拟定总结的内容主要包括:业绩、计划、心得、建议、分析、调研、资源横向调研领导沟通术 ● 怎样向领导请示工作?{card-describe title="请示工作注意两点"}一、带着方案二、注意句式{/card-describe}解决方案请求句式领导沟通术 ● 怎样向老板提出加薪?奖金:奖金不是福利,不可能人人都有,需要超越公司对你的期待才能获得。加薪:加工资除了是应对物价因素外,重要的是公司对你的岗位有了新的更高要求。红包:公司取得特别成绩的年份才会有的,原则是人人有份,根据你在阿里贡献的年份多久而定。我们鼓励员工在公司里长期发展。谈加薪的步骤如何和平级的同事沟通同事沟通 ● 如何处理同事越级安排工作?方法一(友好型):时间冲突,友好回绝,优先完成领导安排的任务方法二:时间允许,请示领导方法三:事后补救,汇报完成同事沟通 ● 怎样高效地进行跨部门沟通?步骤一:日常沟通。预热步骤二:共赢方案。提前梳理方案,最好以邮件或纸质的方式,清晰说明步骤三:沟通准备。梳理话术,见面扼要,说明重点,让对方便于理解、接受步骤四:工作小组。可以拉工作群组步骤五:留面子效应。算是小技巧,案例:借钱、先难度大,然后降低难度同事沟通 ● 没有太多共同语言,怎么与同事聊天?关系一般,没有共同语言同事太爱装x,怎么相处呢? 同事没营养的碎碎念,越来越受不了肿么办? 公司里领导眼中的红人,不想和他说话但是又得罪不起,怎么办? 没有共同语言的聊天技巧:技巧一:验证而非强加 禁忌: 推荐:技巧二:语言重新定义技巧三:建议顺水推舟技巧四:识别话中的话新工作 ● 如何迅速扮好你在团队中的角色?根据岗位角色定位储备型:人才储备,业务暂时不需要。全面学习、听指挥优化型:人员扩编,业务能力提升。寻求业务超越替代型:刚性需求。迅速掌握专项技能新工作 ● 新人掌握6个细节,迅速融入环境相对于叽叽喳喳一直说、招人烦的类型,大家更加喜欢安静一-点、有能力、贴心的同事。1、说话前准备:①、内容简化,防止别人听不出重点②、语气提前准备。2、就算不发表自己观点,也需要予以语言或表情的回应3、人和小猫一样,喂着喂着就出感情了4、好为人师:适当请教,但注意不是太难也不体现你无知。5、眼神与笑容(注意诚意)6、个人素质(招呼、点头、告别、椅子归位、顺手帮忙)
-
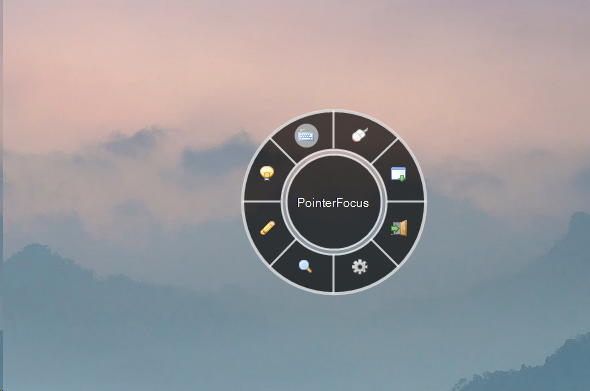
Pointer-Focus:一款功能强大的教学、录屏辅助软件 现在这个时代电脑大家应该都有,你肯定有过给别人展示或者演示自己的操作,尤其是疫情期间会用得很多。例如上网课讲解题、腾讯会议开会、线上答辩什么的。为了表达更清晰,我们就很需要光标高亮、显示按键、聚光灯、画笔、放大镜等功能。Pointer-FocusPointerFocus 是一款非常出名的教学辅助工具,软件功能效果生动,助你讲解更加清晰,一套下来轻松不少。专为想要突出鼠标指针的演示者、培训师和教师而设计。该应用程序提供了一些易于使用的功能,例如高亮光标、鼠标聚光灯、击键可视化、放大镜和屏幕注释。在 PointerFocus 的帮助下,您可以让观众专注于感兴趣的领域,并使您的演示更易于理解。软件官网:https://www.pointerfocus.com/资金允许的情况推荐使用正版,正版官网加个为 $12.5谁需要 PointerFocus?老师演讲者演示制造商培训师PointerFocus 功能用彩色圆圈突出显示鼠标指针当您单击鼠标按钮时,环形动画可以向您的观众展示您的鼠标单击动作。可以高亮显示光标、显示圆圈、显示单击操作文本,还可以自定义大小和颜色。每次点击都会有特效,这样可以让人更加集中鼠标位置。启动热键是 F8,这个可以记一下。击键可视化可以向您的观众展示您刚刚按下了哪些快捷键。此功能可以帮助您使演示更易于理解。有时候你需要进行快捷键时,这个功能就非常恰到好处了!只要按下Ctrl、Shift、Alt、win、insert键开头,显示功能就会自动弹出来。启动热键是 F9,这个可以记一下。鼠标聚光灯当您选择此工具时,它将使屏幕变暗并在鼠标指针周围放置一个“聚光灯”。这可以将听众的注意力集中在感兴趣的领域。这可是个好东西,可以突出某些重要部分进行讲解,可以叫做“高光时刻”。图片启动热键是 F10,这个可以记一下。屏幕注释笔这个是必备的功能了,需要表示什么直接写,直接画。启动热键是F11,这个可以记一下。支持画笔、线条、箭头、矩形、椭圆,还可以更改画笔颜色和大小。屏幕放大镜当您选择此工具时,您可以在屏幕上显示任何部分的观众详细信息。这个和高光有一丁点像,但又不是同一个东西,可以在电脑局部放大。启动热键是F12,这个可以记一下。安卓远程控制您可以使用 Android App 来远程控制鼠标操作和 PointerFocus 功能。安卓客户端软件已打包到本文底部的下载压缩包了。必看安装教程下载地址:PointerFocus v2.4.zip软件安装完成后需要替换补丁和填写注册码直接复制补丁到安装目录下进行替换
-
设计常用图片尺寸 相关图片尺寸来源于凡科快图 和 即时设计移动端iPhone 13 Pro Max 428 x 926iPhone 13 / 13 Pro 390 x 844iPhone 13 mini 375 x 812iPhone 11 Pro Max 414 x 896iPhoneX/ 11 pro 375 x 812iPhone 8 Plus 414 x 736iPhone 8 375 x 667iPhone SE 320 x 568Google Pixel 2 411 x 731Google Pixel 2 XL 411 x 823Android 360 x 640桌面端Desktop 1440 x 1024MacBook 1152 x 700MacBook Pro 1440 x 900Surface Book 1500 x 1000iMac 1280 x 720Web 1920 1920 x 1080Web 1366 1366 x 768Web 1280 1280 x 800公众号公众号封面 900 x 383公众号小图 200 x 200公众号首图 900 x 500公众号超链接配图 600x 200其他手机海报 720 x 1280PC端横幅 1920 x 600手机横版海报 960 x 540淘宝宝贝主图 800 x 800
-
CentOS安装ffmpeg 由于ZCMS在上传视频时会强制对视频进行转码,在网上找了些安装教程发现转码服务不能正常使用。经过跟产品负责人(才哥)沟通后得知,当前ZCMS只能适配FFmpeg 2.8.x版本。后根据提供的一键安装包安装后成功实现。ffmpeg2安装包.zip直接使用编译后的文件wget https://johnvansickle.com/ffmpeg/builds/ffmpeg-git-amd64-static.tar.xz xz -d ffmpeg-git-amd64-static.tar.xz tar -xvf ffmpeg-git-amd64-static.tar cd /usr/bin ln -s /app/ffmpeg-git-20211217-amd64-static/ffmpeg ln -s /soft/ffmpeg_in_docker/qt-faststart一键安装脚本(install_ffmpeg_centos7.sh)#! /bin/bash cur_dir=$(pwd) #target_ffmpeg_lib_dir=$cur_dir/lib #target_ffmpeg_inc_dir=$cur_dir/inc rm -rf ffmpeg-4.3.2* rm -rf nasm* rm -rf yasm* rm -rf x264* yum install git # 由于 asm版本是旧的或者没有asm,因此需要安装或者更新 echo " ===================== 开始安装yasm ===================== " wget http://www.tortall.net/projects/yasm/releases/yasm-1.3.0.tar.gz tar zxvf yasm-1.3.0.tar.gz cd yasm-1.3.0 ./configure make && make install echo " ===================== 开始安装nasm ===================== " wget https://www.nasm.us/pub/nasm/releasebuilds/2.14/nasm-2.14.tar.gz tar -zxvf nasm-2.14.tar.gz cd nasm-2.14 ./configure make -j60 make install echo " ===================== 开始安装x264 ===================== " git clone https://code.videolan.org/videolan/x264.git cd x264 ./configure --includedir=/usr/local/include --libdir=/usr/local/lib --enable-shared make -j60 make install echo " ===================== 开始安装ffmpeg ===================== " wget http://www.ffmpeg.org/releases/ffmpeg-4.3.2.tar.gz tar -zxvf ffmpeg-4.3.2.tar.gz cd ./ffmpeg-4.3.2 # ubuntu 必须添加 --enable-shared https://github.com/lutris/ffmpeg-nvenc/issues/5--prefix=/usr/local/src/ffmpeg ./configure --enable-shared --enable-swscale --enable-gpl --enable-nonfree --enable-pic --enable-version3 --enable-postproc --enable-pthreads --enable-static --enable-libx264 echo " ===================== 开始 make && make install ===================== " make -j60 make install echo "您还需要手动设置环境变量: export LD_LIBRARY_PATH=\$LD_LIBRARY_PATH:/usr/local/lib"参考链接:Docker方式安装FFmpegLinux 下ffmpeg的环境搭建与安装
-
CentOS7 Tomcat自启动 由于演示需要,需将Java应用部署到虚拟机的CentOS环境中,为便于演示,需虚拟机启动时自动启动我们的Java应用。有参考 ZVING-Tomcat安装 相关章节配置自启动,效果是OK的,但是不管怎么配置,重启后始终是以root账号启动,为安全考虑,需使用名为zving的普通权限账号启动应用。经过尝试后达到预期目的,特记录如下。Tomcat目录:/data/javaapps/app-hndcdemo/apache-tomcat-8.5.721、添加启动文件vi /etc/systemd/system/tomcatd.servicetomcatd.service文件内容如下:请根据需要调整tomcat的安装目录[Unit] Description=Tomcat8 for ZCMS Service After=network.target [Service] User=zving Group=zving Type=forking ExecStart=/data/javaapps/app-hndcdemo/apache-tomcat-8.5.72/bin/startup.sh ExecStop=/data/javaapps/app-hndcdemo/apache-tomcat-8.5.72/bin/shutdown.sh PrivateTmp=true [Install] WantedBy=multi-user.target2、添加可执行权限chmod 755 /etc/systemd/system/tomcatd.service3、设置开机自启动systemctl enable tomcatd.service
-
记一次跟时大款的促膝长谈 昨晚跟时大款从10点多到凌晨1点多促膝长谈了差不多3个小时,就所谈事项有感而发,利用工作间隙对所谈内容整理以作备忘。洗完澡出来10点多,看主卧的灯还亮着,以为老婆还在艰难的哄睡中,本想进去平息一点老婆哄睡过程中的暴躁情绪,没想到崽这个点就睡着了,在我哄睡的时候这个点就能入睡那绝对是让人开心无比的事,毕竟崽睡后就是自己的时间啦。就所谈事项整理如下:一、年宝的归宿从年宝快2岁的时候检查说是自闭症儿童之后,找了很多自闭症相关的文章来了解,也给年宝的爷爷奶奶看过一个李永乐老师讲的自闭症人群的视频: 你了解“来自星星的孩子”吗?请关爱身边的自闭症儿童 ,看完后爷爷奶奶都沉默了很久,心情也变得沉甸甸的。前两天在B站刷到个说青年自闭症人群的视频: 最孤独的成长_自闭症,听着视频中孩子的嘶吼,心都是碎的,想着年宝如果没在这个阶段好起来的话,以后的他也会跟他们一样,毕竟现在的社会环境也不会有他们可以去的地方,只能整天地锁在家里,这样也就会逐渐跟社会脱节。考虑到年宝的现状,年宝还是可以考虑送专业的自闭症干预机构去,最好能在学龄前能自理并表述自己的诉求。如果可行的话,也可以考虑到干预机构周边租个房陪着,我们也还是要做好打长期战的身心准备。二、亲人的相处之道以前一直认为亲人之间有些负面情绪的宣泄是很正常的,就像平常上班累了或受了什么委屈,回到家就对家人爱搭不理的甚至一点小事就发脾气。经过跟时大款多年的相处,深深的领悟了这是不对的。作为在外辛苦打拼的家庭一员,在外努力本身就是为了在体现自己价值的同时给家人及身边的亲友们带来更好的生活质量。都说家是温暖的港湾,但是从小我成长的家庭就充满着幸酸、争吵甚至打架,老妈从我记事起就跟爷爷奶奶关系不和,因为家里砌房的事情更是跟一些叔叔婶婶关系也弄的很僵,一直以来都没能跟爸妈像普通家庭那样有一个平和的沟通,但是由于爸妈都是家里的长子长女,从小就没什么机会接受文化的熏陶,也怨不得他们。也正是这样的环境中更能让我更珍惜一个有和睦氛围、能平和沟通的家庭。所以也一直让我羡慕时大款从小的成长氛围,虽然她身在福中不知福。三、朋友的相处之道认识时大款快10多年了,这10多年里,我们都在长沙,基本上我们的朋友都是相互了解的,所以正在这个话题上我们是能够聊得特别深入的。朋友之间应保持适当的距离每个人都是独立的个体,每个人也都有自己的小圈子及小秘密,适当的距离恰恰能让彼此活得更自然。朋友之间应礼尚往来在这一点上,感觉我们身边有很多这样的朋友,像高哥李姐、佳哥、艳敏、姚老师、老大、有的时候朋友之间的相处之道是要适当的多付出一些,但不是凭空的一直付出。朋友之间应尽量减少金钱往来身边很多因为借钱而导致的关系破裂的案例。四、对待金钱的态度由于物业的不给力,近半年确实特别添堵,不只是小区环境的乱遭事,更有物业管理的不作为平添的给心情添堵。所以时大款近几个月说了好几次换房的想法。这么几年下来,在奥园结识的邻居都是非常不错的,由于物业的失职就考虑连业主都不想当了,确实有些过犹不及了。从身边的朋友们来看,只要没有大病大灾的,等到我们四五十岁的时候,有个两三套房子也都很正常。现在住房也够,没必要卖了这套再另买。钱重要,但不是全部。
-
CentOS安装LibreOffice 由于应用需要将Office文件转义,经调研后,选择基于LibreOffice作为转译工具。现记录LibreOffice在CentOS上的安装过程。下载可以从LibreOffice官网使用最新的版本下载,官网下载地址为:https://zh-cn.libreoffice.org/download/libreoffice/wget --no-check-certificate https://download.documentfoundation.org/libreoffice/stable/7.3.0/rpm/x86_64/LibreOffice_7.3.0_Linux_x86-64_rpm.tar.gz执行记录如下:[root@VM-12-15-centos soft]# wget --no-check-certificate https://download.documentfoundation.org/libreoffice/stable/7.3.0/rpm/x86_64/LibreOffice_7.3.0_Linux_x86-64_rpm.tar.gz --2022-02-05 10:28:41-- https://download.documentfoundation.org/libreoffice/stable/7.3.0/rpm/x86_64/LibreOffice_7.3.0_Linux_x86-64_rpm.tar.gz Resolving download.documentfoundation.org (download.documentfoundation.org)... 89.238.68.185, 2a00:1828:a012:185::1 Connecting to download.documentfoundation.org (download.documentfoundation.org)|89.238.68.185|:443... connected. WARNING: cannot verify download.documentfoundation.org's certificate, issued by ‘/C=US/O=Let's Encrypt/CN=R3’: Issued certificate has expired. HTTP request sent, awaiting response... 302 Found Location: https://mirrors.nju.edu.cn/tdf/libreoffice/stable/7.3.0/rpm/x86_64/LibreOffice_7.3.0_Linux_x86-64_rpm.tar.gz [following] --2022-02-05 10:28:43-- https://mirrors.nju.edu.cn/tdf/libreoffice/stable/7.3.0/rpm/x86_64/LibreOffice_7.3.0_Linux_x86-64_rpm.tar.gz Resolving mirrors.nju.edu.cn (mirrors.nju.edu.cn)... 210.28.130.3, 2001:da8:1007:4011::3 Connecting to mirrors.nju.edu.cn (mirrors.nju.edu.cn)|210.28.130.3|:443... connected. HTTP request sent, awaiting response... 200 OK Length: 269246349 (257M) [application/octet-stream] Saving to: ‘LibreOffice_7.3.0_Linux_x86-64_rpm.tar.gz’ 100%[============================>] 269,246,349 11.4MB/s in 21s 2022-02-05 10:29:04 (12.2 MB/s) - ‘LibreOffice_7.3.0_Linux_x86-64_rpm.tar.gz’ saved [269246349/269246349] [root@VM-12-15-centos soft]#安装LibreOffice解压主程序tar -zxvf LibreOffice_7.3.0_Linux_x86-64_rpm.tar.gz执行记录如下:[root@VM-12-15-centos soft]# tar -zxvf LibreOffice_7.3.0_Linux_x86-64_rpm.tar.gz LibreOffice_7.3.0.3_Linux_x86-64_rpm/ LibreOffice_7.3.0.3_Linux_x86-64_rpm/RPMS/ LibreOffice_7.3.0.3_Linux_x86-64_rpm/RPMS/libreoffice7.3-math-7.3.0.3-3.x86_64.rpm LibreOffice_7.3.0.3_Linux_x86-64_rpm/RPMS/libobasis7.3-writer-7.3.0.3-3.x86_64.rpm LibreOffice_7.3.0.3_Linux_x86-64_rpm/RPMS/libreoffice7.3-dict-fr-7.3.0.3-3.x86_64.rpm LibreOffice_7.3.0.3_Linux_x86-64_rpm/RPMS/libobasis7.3-firebird-7.3.0.3-3.x86_64.rpm LibreOffice_7.3.0.3_Linux_x86-64_rpm/RPMS/libobasis7.3-extension-javascript-script-provider-7.3.0.3-3.x86_64.rpm LibreOffice_7.3.0.3_Linux_x86-64_rpm/RPMS/libobasis7.3-draw-7.3.0.3-3.x86_64.rpm LibreOffice_7.3.0.3_Linux_x86-64_rpm/RPMS/libobasis7.3-pyuno-7.3.0.3-3.x86_64.rpm LibreOffice_7.3.0.3_Linux_x86-64_rpm/RPMS/libobasis7.3-en-US-7.3.0.3-3.x86_64.rpm LibreOffice_7.3.0.3_Linux_x86-64_rpm/RPMS/libobasis7.3-librelogo-7.3.0.3-3.x86_64.rpm LibreOffice_7.3.0.3_Linux_x86-64_rpm/RPMS/libobasis7.3-ooolinguistic-7.3.0.3-3.x86_64.rpm LibreOffice_7.3.0.3_Linux_x86-64_rpm/RPMS/libobasis7.3-extension-beanshell-script-provider-7.3.0.3-3.x86_64.rpm LibreOffice_7.3.0.3_Linux_x86-64_rpm/RPMS/libobasis7.3-onlineupdate-7.3.0.3-3.x86_64.rpm LibreOffice_7.3.0.3_Linux_x86-64_rpm/RPMS/libobasis7.3-gnome-integration-7.3.0.3-3.x86_64.rpm LibreOffice_7.3.0.3_Linux_x86-64_rpm/RPMS/libreoffice7.3-ure-7.3.0.3-3.x86_64.rpm LibreOffice_7.3.0.3_Linux_x86-64_rpm/RPMS/libobasis7.3-impress-7.3.0.3-3.x86_64.rpm LibreOffice_7.3.0.3_Linux_x86-64_rpm/RPMS/libreoffice7.3-7.3.0.3-3.x86_64.rpm LibreOffice_7.3.0.3_Linux_x86-64_rpm/RPMS/libobasis7.3-extension-mediawiki-publisher-7.3.0.3-3.x86_64.rpm LibreOffice_7.3.0.3_Linux_x86-64_rpm/RPMS/libreoffice7.3-draw-7.3.0.3-3.x86_64.rpm LibreOffice_7.3.0.3_Linux_x86-64_rpm/RPMS/libobasis7.3-math-7.3.0.3-3.x86_64.rpm LibreOffice_7.3.0.3_Linux_x86-64_rpm/RPMS/libreoffice7.3-freedesktop-menus-7.3.0-3.noarch.rpm LibreOffice_7.3.0.3_Linux_x86-64_rpm/RPMS/libobasis7.3-postgresql-sdbc-7.3.0.3-3.x86_64.rpm LibreOffice_7.3.0.3_Linux_x86-64_rpm/RPMS/libreoffice7.3-impress-7.3.0.3-3.x86_64.rpm LibreOffice_7.3.0.3_Linux_x86-64_rpm/RPMS/libobasis7.3-python-script-provider-7.3.0.3-3.x86_64.rpm LibreOffice_7.3.0.3_Linux_x86-64_rpm/RPMS/libobasis7.3-calc-7.3.0.3-3.x86_64.rpm LibreOffice_7.3.0.3_Linux_x86-64_rpm/RPMS/libobasis7.3-base-7.3.0.3-3.x86_64.rpm LibreOffice_7.3.0.3_Linux_x86-64_rpm/RPMS/libreoffice7.3-dict-es-7.3.0.3-3.x86_64.rpm LibreOffice_7.3.0.3_Linux_x86-64_rpm/RPMS/libobasis7.3-extension-nlpsolver-7.3.0.3-3.x86_64.rpm LibreOffice_7.3.0.3_Linux_x86-64_rpm/RPMS/libobasis7.3-kde-integration-7.3.0.3-3.x86_64.rpm LibreOffice_7.3.0.3_Linux_x86-64_rpm/RPMS/libobasis7.3-ogltrans-7.3.0.3-3.x86_64.rpm LibreOffice_7.3.0.3_Linux_x86-64_rpm/RPMS/libreoffice7.3-en-US-7.3.0.3-3.x86_64.rpm LibreOffice_7.3.0.3_Linux_x86-64_rpm/RPMS/libreoffice7.3-base-7.3.0.3-3.x86_64.rpm LibreOffice_7.3.0.3_Linux_x86-64_rpm/RPMS/libreoffice7.3-writer-7.3.0.3-3.x86_64.rpm LibreOffice_7.3.0.3_Linux_x86-64_rpm/RPMS/libobasis7.3-extension-pdf-import-7.3.0.3-3.x86_64.rpm LibreOffice_7.3.0.3_Linux_x86-64_rpm/RPMS/libreoffice7.3-dict-en-7.3.0.3-3.x86_64.rpm LibreOffice_7.3.0.3_Linux_x86-64_rpm/RPMS/libobasis7.3-core-7.3.0.3-3.x86_64.rpm LibreOffice_7.3.0.3_Linux_x86-64_rpm/RPMS/libobasis7.3-images-7.3.0.3-3.x86_64.rpm LibreOffice_7.3.0.3_Linux_x86-64_rpm/RPMS/libreoffice7.3-calc-7.3.0.3-3.x86_64.rpm LibreOffice_7.3.0.3_Linux_x86-64_rpm/RPMS/libobasis7.3-graphicfilter-7.3.0.3-3.x86_64.rpm LibreOffice_7.3.0.3_Linux_x86-64_rpm/RPMS/libobasis7.3-libreofficekit-data-7.3.0.3-3.x86_64.rpm LibreOffice_7.3.0.3_Linux_x86-64_rpm/RPMS/libobasis7.3-xsltfilter-7.3.0.3-3.x86_64.rpm LibreOffice_7.3.0.3_Linux_x86-64_rpm/RPMS/libobasis7.3-ooofonts-7.3.0.3-3.x86_64.rpm LibreOffice_7.3.0.3_Linux_x86-64_rpm/RPMS/libobasis7.3-extension-report-builder-7.3.0.3-3.x86_64.rpm LibreOffice_7.3.0.3_Linux_x86-64_rpm/install LibreOffice_7.3.0.3_Linux_x86-64_rpm/readmes/ LibreOffice_7.3.0.3_Linux_x86-64_rpm/readmes/README_en-US [root@VM-12-15-centos soft]# 进入安装目录cd LibreOffice_7.3.0.3_Linux_x86-64_rpm/RPMS/执行安装yum install *.rpm执行记录如下:[root@VM-12-15-centos RPMS]# yum install *.rpm Loaded plugins: fastestmirror, langpacks Repository epel is listed more than once in the configuration Examining libobasis7.3-base-7.3.0.3-3.x86_64.rpm: libobasis7.3-base-7.3.0.3-3.x86_64 Marking libobasis7.3-base-7.3.0.3-3.x86_64.rpm to be installed Examining libobasis7.3-calc-7.3.0.3-3.x86_64.rpm: libobasis7.3-calc-7.3.0.3-3.x86_64 Marking libobasis7.3-calc-7.3.0.3-3.x86_64.rpm to be installed Examining libobasis7.3-core-7.3.0.3-3.x86_64.rpm: libobasis7.3-core-7.3.0.3-3.x86_64 Marking libobasis7.3-core-7.3.0.3-3.x86_64.rpm to be installed Examining libobasis7.3-draw-7.3.0.3-3.x86_64.rpm: libobasis7.3-draw-7.3.0.3-3.x86_64 Marking libobasis7.3-draw-7.3.0.3-3.x86_64.rpm to be installed Examining libobasis7.3-en-US-7.3.0.3-3.x86_64.rpm: libobasis7.3-en-US-7.3.0.3-3.x86_64 Marking libobasis7.3-en-US-7.3.0.3-3.x86_64.rpm to be installed Examining libobasis7.3-extension-beanshell-script-provider-7.3.0.3-3.x86_64.rpm: libobasis7.3-extension-beanshell-script-provider-7.3.0.3-3.x86_64 Marking libobasis7.3-extension-beanshell-script-provider-7.3.0.3-3.x86_64.rpm to be installed Examining libobasis7.3-extension-javascript-script-provider-7.3.0.3-3.x86_64.rpm: libobasis7.3-extension-javascript-script-provider-7.3.0.3-3.x86_64 Marking libobasis7.3-extension-javascript-script-provider-7.3.0.3-3.x86_64.rpm to be installed Examining libobasis7.3-extension-mediawiki-publisher-7.3.0.3-3.x86_64.rpm: libobasis7.3-extension-mediawiki-publisher-7.3.0.3-3.x86_64 Marking libobasis7.3-extension-mediawiki-publisher-7.3.0.3-3.x86_64.rpm to be installed Examining libobasis7.3-extension-nlpsolver-7.3.0.3-3.x86_64.rpm: libobasis7.3-extension-nlpsolver-7.3.0.3-3.x86_64 Marking libobasis7.3-extension-nlpsolver-7.3.0.3-3.x86_64.rpm to be installed Examining libobasis7.3-extension-pdf-import-7.3.0.3-3.x86_64.rpm: libobasis7.3-extension-pdf-import-7.3.0.3-3.x86_64 Marking libobasis7.3-extension-pdf-import-7.3.0.3-3.x86_64.rpm to be installed Examining libobasis7.3-extension-report-builder-7.3.0.3-3.x86_64.rpm: libobasis7.3-extension-report-builder-7.3.0.3-3.x86_64 Marking libobasis7.3-extension-report-builder-7.3.0.3-3.x86_64.rpm to be installed Examining libobasis7.3-firebird-7.3.0.3-3.x86_64.rpm: libobasis7.3-firebird-7.3.0.3-3.x86_64 Marking libobasis7.3-firebird-7.3.0.3-3.x86_64.rpm to be installed Examining libobasis7.3-gnome-integration-7.3.0.3-3.x86_64.rpm: libobasis7.3-gnome-integration-7.3.0.3-3.x86_64 Marking libobasis7.3-gnome-integration-7.3.0.3-3.x86_64.rpm to be installed Examining libobasis7.3-graphicfilter-7.3.0.3-3.x86_64.rpm: libobasis7.3-graphicfilter-7.3.0.3-3.x86_64 Marking libobasis7.3-graphicfilter-7.3.0.3-3.x86_64.rpm to be installed Examining libobasis7.3-images-7.3.0.3-3.x86_64.rpm: libobasis7.3-images-7.3.0.3-3.x86_64 Marking libobasis7.3-images-7.3.0.3-3.x86_64.rpm to be installed Examining libobasis7.3-impress-7.3.0.3-3.x86_64.rpm: libobasis7.3-impress-7.3.0.3-3.x86_64 Marking libobasis7.3-impress-7.3.0.3-3.x86_64.rpm to be installed Examining libobasis7.3-kde-integration-7.3.0.3-3.x86_64.rpm: libobasis7.3-kde-integration-7.3.0.3-3.x86_64 Marking libobasis7.3-kde-integration-7.3.0.3-3.x86_64.rpm to be installed Examining libobasis7.3-librelogo-7.3.0.3-3.x86_64.rpm: libobasis7.3-librelogo-7.3.0.3-3.x86_64 Marking libobasis7.3-librelogo-7.3.0.3-3.x86_64.rpm to be installed Examining libobasis7.3-libreofficekit-data-7.3.0.3-3.x86_64.rpm: libobasis7.3-libreofficekit-data-7.3.0.3-3.x86_64 Marking libobasis7.3-libreofficekit-data-7.3.0.3-3.x86_64.rpm to be installed Examining libobasis7.3-math-7.3.0.3-3.x86_64.rpm: libobasis7.3-math-7.3.0.3-3.x86_64 Marking libobasis7.3-math-7.3.0.3-3.x86_64.rpm to be installed Examining libobasis7.3-ogltrans-7.3.0.3-3.x86_64.rpm: libobasis7.3-ogltrans-7.3.0.3-3.x86_64 Marking libobasis7.3-ogltrans-7.3.0.3-3.x86_64.rpm to be installed Examining libobasis7.3-onlineupdate-7.3.0.3-3.x86_64.rpm: libobasis7.3-onlineupdate-7.3.0.3-3.x86_64 Marking libobasis7.3-onlineupdate-7.3.0.3-3.x86_64.rpm to be installed Examining libobasis7.3-ooofonts-7.3.0.3-3.x86_64.rpm: libobasis7.3-ooofonts-7.3.0.3-3.x86_64 Marking libobasis7.3-ooofonts-7.3.0.3-3.x86_64.rpm to be installed Examining libobasis7.3-ooolinguistic-7.3.0.3-3.x86_64.rpm: libobasis7.3-ooolinguistic-7.3.0.3-3.x86_64 Marking libobasis7.3-ooolinguistic-7.3.0.3-3.x86_64.rpm to be installed Examining libobasis7.3-postgresql-sdbc-7.3.0.3-3.x86_64.rpm: libobasis7.3-postgresql-sdbc-7.3.0.3-3.x86_64 Marking libobasis7.3-postgresql-sdbc-7.3.0.3-3.x86_64.rpm to be installed Examining libobasis7.3-python-script-provider-7.3.0.3-3.x86_64.rpm: libobasis7.3-python-script-provider-7.3.0.3-3.x86_64 Marking libobasis7.3-python-script-provider-7.3.0.3-3.x86_64.rpm to be installed Examining libobasis7.3-pyuno-7.3.0.3-3.x86_64.rpm: libobasis7.3-pyuno-7.3.0.3-3.x86_64 Marking libobasis7.3-pyuno-7.3.0.3-3.x86_64.rpm to be installed Examining libobasis7.3-writer-7.3.0.3-3.x86_64.rpm: libobasis7.3-writer-7.3.0.3-3.x86_64 Marking libobasis7.3-writer-7.3.0.3-3.x86_64.rpm to be installed Examining libobasis7.3-xsltfilter-7.3.0.3-3.x86_64.rpm: libobasis7.3-xsltfilter-7.3.0.3-3.x86_64 Marking libobasis7.3-xsltfilter-7.3.0.3-3.x86_64.rpm to be installed Examining libreoffice7.3-7.3.0.3-3.x86_64.rpm: libreoffice7.3-7.3.0.3-3.x86_64 Marking libreoffice7.3-7.3.0.3-3.x86_64.rpm to be installed Examining libreoffice7.3-base-7.3.0.3-3.x86_64.rpm: libreoffice7.3-base-7.3.0.3-3.x86_64 Marking libreoffice7.3-base-7.3.0.3-3.x86_64.rpm to be installed Examining libreoffice7.3-calc-7.3.0.3-3.x86_64.rpm: libreoffice7.3-calc-7.3.0.3-3.x86_64 Marking libreoffice7.3-calc-7.3.0.3-3.x86_64.rpm to be installed Examining libreoffice7.3-dict-en-7.3.0.3-3.x86_64.rpm: libreoffice7.3-dict-en-7.3.0.3-3.x86_64 Marking libreoffice7.3-dict-en-7.3.0.3-3.x86_64.rpm to be installed Examining libreoffice7.3-dict-es-7.3.0.3-3.x86_64.rpm: libreoffice7.3-dict-es-7.3.0.3-3.x86_64 Marking libreoffice7.3-dict-es-7.3.0.3-3.x86_64.rpm to be installed Examining libreoffice7.3-dict-fr-7.3.0.3-3.x86_64.rpm: libreoffice7.3-dict-fr-7.3.0.3-3.x86_64 Marking libreoffice7.3-dict-fr-7.3.0.3-3.x86_64.rpm to be installed Examining libreoffice7.3-draw-7.3.0.3-3.x86_64.rpm: libreoffice7.3-draw-7.3.0.3-3.x86_64 Marking libreoffice7.3-draw-7.3.0.3-3.x86_64.rpm to be installed Examining libreoffice7.3-en-US-7.3.0.3-3.x86_64.rpm: libreoffice7.3-en-US-7.3.0.3-3.x86_64 Marking libreoffice7.3-en-US-7.3.0.3-3.x86_64.rpm to be installed Examining libreoffice7.3-freedesktop-menus-7.3.0-3.noarch.rpm: libreoffice7.3-freedesktop-menus-7.3.0-3.noarch Marking libreoffice7.3-freedesktop-menus-7.3.0-3.noarch.rpm to be installed Examining libreoffice7.3-impress-7.3.0.3-3.x86_64.rpm: libreoffice7.3-impress-7.3.0.3-3.x86_64 Marking libreoffice7.3-impress-7.3.0.3-3.x86_64.rpm to be installed Examining libreoffice7.3-math-7.3.0.3-3.x86_64.rpm: libreoffice7.3-math-7.3.0.3-3.x86_64 Marking libreoffice7.3-math-7.3.0.3-3.x86_64.rpm to be installed Examining libreoffice7.3-ure-7.3.0.3-3.x86_64.rpm: libreoffice7.3-ure-7.3.0.3-3.x86_64 Marking libreoffice7.3-ure-7.3.0.3-3.x86_64.rpm to be installed Examining libreoffice7.3-writer-7.3.0.3-3.x86_64.rpm: libreoffice7.3-writer-7.3.0.3-3.x86_64 Marking libreoffice7.3-writer-7.3.0.3-3.x86_64.rpm to be installed Resolving Dependencies --> Running transaction check ---> Package libobasis7.3-base.x86_64 0:7.3.0.3-3 will be installed ---> Package libobasis7.3-calc.x86_64 0:7.3.0.3-3 will be installed ---> Package libobasis7.3-core.x86_64 0:7.3.0.3-3 will be installed ---> Package libobasis7.3-draw.x86_64 0:7.3.0.3-3 will be installed ---> Package libobasis7.3-en-US.x86_64 0:7.3.0.3-3 will be installed ---> Package libobasis7.3-extension-beanshell-script-provider.x86_64 0:7.3.0.3-3 will be installed ---> Package libobasis7.3-extension-javascript-script-provider.x86_64 0:7.3.0.3-3 will be installed ---> Package libobasis7.3-extension-mediawiki-publisher.x86_64 0:7.3.0.3-3 will be installed ---> Package libobasis7.3-extension-nlpsolver.x86_64 0:7.3.0.3-3 will be installed ---> Package libobasis7.3-extension-pdf-import.x86_64 0:7.3.0.3-3 will be installed ---> Package libobasis7.3-extension-report-builder.x86_64 0:7.3.0.3-3 will be installed ---> Package libobasis7.3-firebird.x86_64 0:7.3.0.3-3 will be installed ---> Package libobasis7.3-gnome-integration.x86_64 0:7.3.0.3-3 will be installed ---> Package libobasis7.3-graphicfilter.x86_64 0:7.3.0.3-3 will be installed ---> Package libobasis7.3-images.x86_64 0:7.3.0.3-3 will be installed ---> Package libobasis7.3-impress.x86_64 0:7.3.0.3-3 will be installed ---> Package libobasis7.3-kde-integration.x86_64 0:7.3.0.3-3 will be installed ---> Package libobasis7.3-librelogo.x86_64 0:7.3.0.3-3 will be installed ---> Package libobasis7.3-libreofficekit-data.x86_64 0:7.3.0.3-3 will be installed ---> Package libobasis7.3-math.x86_64 0:7.3.0.3-3 will be installed ---> Package libobasis7.3-ogltrans.x86_64 0:7.3.0.3-3 will be installed ---> Package libobasis7.3-onlineupdate.x86_64 0:7.3.0.3-3 will be installed ---> Package libobasis7.3-ooofonts.x86_64 0:7.3.0.3-3 will be installed ---> Package libobasis7.3-ooolinguistic.x86_64 0:7.3.0.3-3 will be installed ---> Package libobasis7.3-postgresql-sdbc.x86_64 0:7.3.0.3-3 will be installed ---> Package libobasis7.3-python-script-provider.x86_64 0:7.3.0.3-3 will be installed ---> Package libobasis7.3-pyuno.x86_64 0:7.3.0.3-3 will be installed ---> Package libobasis7.3-writer.x86_64 0:7.3.0.3-3 will be installed ---> Package libobasis7.3-xsltfilter.x86_64 0:7.3.0.3-3 will be installed ---> Package libreoffice7.3.x86_64 0:7.3.0.3-3 will be installed ---> Package libreoffice7.3-base.x86_64 0:7.3.0.3-3 will be installed ---> Package libreoffice7.3-calc.x86_64 0:7.3.0.3-3 will be installed ---> Package libreoffice7.3-dict-en.x86_64 0:7.3.0.3-3 will be installed ---> Package libreoffice7.3-dict-es.x86_64 0:7.3.0.3-3 will be installed ---> Package libreoffice7.3-dict-fr.x86_64 0:7.3.0.3-3 will be installed ---> Package libreoffice7.3-draw.x86_64 0:7.3.0.3-3 will be installed ---> Package libreoffice7.3-en-US.x86_64 0:7.3.0.3-3 will be installed ---> Package libreoffice7.3-freedesktop-menus.noarch 0:7.3.0-3 will be installed ---> Package libreoffice7.3-impress.x86_64 0:7.3.0.3-3 will be installed ---> Package libreoffice7.3-math.x86_64 0:7.3.0.3-3 will be installed ---> Package libreoffice7.3-ure.x86_64 0:7.3.0.3-3 will be installed ---> Package libreoffice7.3-writer.x86_64 0:7.3.0.3-3 will be installed --> Finished Dependency Resolution Dependencies Resolved ========================================================================================================================= Package Arch Version Repository Size ========================================================================================================================= Installing: libobasis7.3-base x86_64 7.3.0.3-3 /libobasis7.3-base-7.3.0.3-3.x86_64 4.2 M libobasis7.3-calc x86_64 7.3.0.3-3 /libobasis7.3-calc-7.3.0.3-3.x86_64 22 M libobasis7.3-core x86_64 7.3.0.3-3 /libobasis7.3-core-7.3.0.3-3.x86_64 267 M libobasis7.3-draw x86_64 7.3.0.3-3 /libobasis7.3-draw-7.3.0.3-3.x86_64 49 k libobasis7.3-en-US x86_64 7.3.0.3-3 /libobasis7.3-en-US-7.3.0.3-3.x86_64 146 k libobasis7.3-extension-beanshell-script-provider x86_64 7.3.0.3-3 /libobasis7.3-extension-beanshell-script-provider-7.3.0.3-3.x86_64 414 k libobasis7.3-extension-javascript-script-provider x86_64 7.3.0.3-3 /libobasis7.3-extension-javascript-script-provider-7.3.0.3-3.x86_64 656 k libobasis7.3-extension-mediawiki-publisher x86_64 7.3.0.3-3 /libobasis7.3-extension-mediawiki-publisher-7.3.0.3-3.x86_64 4.4 M libobasis7.3-extension-nlpsolver x86_64 7.3.0.3-3 /libobasis7.3-extension-nlpsolver-7.3.0.3-3.x86_64 2.2 M libobasis7.3-extension-pdf-import x86_64 7.3.0.3-3 /libobasis7.3-extension-pdf-import-7.3.0.3-3.x86_64 15 M libobasis7.3-extension-report-builder x86_64 7.3.0.3-3 /libobasis7.3-extension-report-builder-7.3.0.3-3.x86_64 5.4 M libobasis7.3-firebird x86_64 7.3.0.3-3 /libobasis7.3-firebird-7.3.0.3-3.x86_64 11 M libobasis7.3-gnome-integration x86_64 7.3.0.3-3 /libobasis7.3-gnome-integration-7.3.0.3-3.x86_64 2.7 M libobasis7.3-graphicfilter x86_64 7.3.0.3-3 /libobasis7.3-graphicfilter-7.3.0.3-3.x86_64 3.6 M libobasis7.3-images x86_64 7.3.0.3-3 /libobasis7.3-images-7.3.0.3-3.x86_64 60 M libobasis7.3-impress x86_64 7.3.0.3-3 /libobasis7.3-impress-7.3.0.3-3.x86_64 2.1 M libobasis7.3-kde-integration x86_64 7.3.0.3-3 /libobasis7.3-kde-integration-7.3.0.3-3.x86_64 5.9 M libobasis7.3-librelogo x86_64 7.3.0.3-3 /libobasis7.3-librelogo-7.3.0.3-3.x86_64 773 k libobasis7.3-libreofficekit-data x86_64 7.3.0.3-3 /libobasis7.3-libreofficekit-data-7.3.0.3-3.x86_64 1.4 k libobasis7.3-math x86_64 7.3.0.3-3 /libobasis7.3-math-7.3.0.3-3.x86_64 1.9 M libobasis7.3-ogltrans x86_64 7.3.0.3-3 /libobasis7.3-ogltrans-7.3.0.3-3.x86_64 410 k libobasis7.3-onlineupdate x86_64 7.3.0.3-3 /libobasis7.3-onlineupdate-7.3.0.3-3.x86_64 484 k libobasis7.3-ooofonts x86_64 7.3.0.3-3 /libobasis7.3-ooofonts-7.3.0.3-3.x86_64 69 M libobasis7.3-ooolinguistic x86_64 7.3.0.3-3 /libobasis7.3-ooolinguistic-7.3.0.3-3.x86_64 1.4 k libobasis7.3-postgresql-sdbc x86_64 7.3.0.3-3 /libobasis7.3-postgresql-sdbc-7.3.0.3-3.x86_64 4.5 M libobasis7.3-python-script-provider x86_64 7.3.0.3-3 /libobasis7.3-python-script-provider-7.3.0.3-3.x86_64 43 k libobasis7.3-pyuno x86_64 7.3.0.3-3 /libobasis7.3-pyuno-7.3.0.3-3.x86_64 29 M libobasis7.3-writer x86_64 7.3.0.3-3 /libobasis7.3-writer-7.3.0.3-3.x86_64 12 M libobasis7.3-xsltfilter x86_64 7.3.0.3-3 /libobasis7.3-xsltfilter-7.3.0.3-3.x86_64 4.3 M libreoffice7.3 x86_64 7.3.0.3-3 /libreoffice7.3-7.3.0.3-3.x86_64 3.4 M libreoffice7.3-base x86_64 7.3.0.3-3 /libreoffice7.3-base-7.3.0.3-3.x86_64 63 libreoffice7.3-calc x86_64 7.3.0.3-3 /libreoffice7.3-calc-7.3.0.3-3.x86_64 63 libreoffice7.3-dict-en x86_64 7.3.0.3-3 /libreoffice7.3-dict-en-7.3.0.3-3.x86_64 25 M libreoffice7.3-dict-es x86_64 7.3.0.3-3 /libreoffice7.3-dict-es-7.3.0.3-3.x86_64 23 M libreoffice7.3-dict-fr x86_64 7.3.0.3-3 /libreoffice7.3-dict-fr-7.3.0.3-3.x86_64 6.5 M libreoffice7.3-draw x86_64 7.3.0.3-3 /libreoffice7.3-draw-7.3.0.3-3.x86_64 63 libreoffice7.3-en-US x86_64 7.3.0.3-3 /libreoffice7.3-en-US-7.3.0.3-3.x86_64 16 k libreoffice7.3-freedesktop-menus noarch 7.3.0-3 /libreoffice7.3-freedesktop-menus-7.3.0-3.noarch 1.4 M libreoffice7.3-impress x86_64 7.3.0.3-3 /libreoffice7.3-impress-7.3.0.3-3.x86_64 66 libreoffice7.3-math x86_64 7.3.0.3-3 /libreoffice7.3-math-7.3.0.3-3.x86_64 63 libreoffice7.3-ure x86_64 7.3.0.3-3 /libreoffice7.3-ure-7.3.0.3-3.x86_64 42 M libreoffice7.3-writer x86_64 7.3.0.3-3 /libreoffice7.3-writer-7.3.0.3-3.x86_64 65 Transaction Summary ========================================================================================================================= Install 42 Packages Total size: 630 M Installed size: 630 M Is this ok [y/d/N]: y Downloading packages: Running transaction check Running transaction test Transaction test succeeded Running transaction Installing : libreoffice7.3-ure-7.3.0.3-3.x86_64 1/42 Installing : libobasis7.3-ooofonts-7.3.0.3-3.x86_64 2/42 Installing : libobasis7.3-core-7.3.0.3-3.x86_64 3/42 Installing : libobasis7.3-base-7.3.0.3-3.x86_64 4/42 Installing : libobasis7.3-writer-7.3.0.3-3.x86_64 5/42 Installing : libobasis7.3-impress-7.3.0.3-3.x86_64 6/42 Installing : libobasis7.3-draw-7.3.0.3-3.x86_64 7/42 Installing : libobasis7.3-images-7.3.0.3-3.x86_64 8/42 Installing : libreoffice7.3-7.3.0.3-3.x86_64 9/42 Installing : libobasis7.3-math-7.3.0.3-3.x86_64 10/42 Installing : libobasis7.3-en-US-7.3.0.3-3.x86_64 11/42 Installing : libobasis7.3-pyuno-7.3.0.3-3.x86_64 12/42 Installing : libobasis7.3-calc-7.3.0.3-3.x86_64 13/42 Installing : libreoffice7.3-calc-7.3.0.3-3.x86_64 14/42 Installing : libobasis7.3-librelogo-7.3.0.3-3.x86_64 15/42 Installing : libreoffice7.3-en-US-7.3.0.3-3.x86_64 16/42 Installing : libreoffice7.3-math-7.3.0.3-3.x86_64 17/42 Installing : libreoffice7.3-dict-en-7.3.0.3-3.x86_64 18/42 Installing : libreoffice7.3-base-7.3.0.3-3.x86_64 19/42 Installing : libreoffice7.3-dict-es-7.3.0.3-3.x86_64 20/42 Installing : libreoffice7.3-dict-fr-7.3.0.3-3.x86_64 21/42 Installing : libreoffice7.3-writer-7.3.0.3-3.x86_64 22/42 Installing : libreoffice7.3-draw-7.3.0.3-3.x86_64 23/42 Installing : libreoffice7.3-impress-7.3.0.3-3.x86_64 24/42 Installing : libobasis7.3-ogltrans-7.3.0.3-3.x86_64 25/42 Installing : libobasis7.3-postgresql-sdbc-7.3.0.3-3.x86_64 26/42 Installing : libobasis7.3-graphicfilter-7.3.0.3-3.x86_64 27/42 Installing : libobasis7.3-ooolinguistic-7.3.0.3-3.x86_64 28/42 Installing : libobasis7.3-extension-pdf-import-7.3.0.3-3.x86_64 29/42 Installing : libobasis7.3-onlineupdate-7.3.0.3-3.x86_64 30/42 Installing : libobasis7.3-extension-nlpsolver-7.3.0.3-3.x86_64 31/42 Installing : libobasis7.3-python-script-provider-7.3.0.3-3.x86_64 32/42 Installing : libobasis7.3-firebird-7.3.0.3-3.x86_64 33/42 Installing : libobasis7.3-extension-report-builder-7.3.0.3-3.x86_64 34/42 Installing : libobasis7.3-extension-javascript-script-provider-7.3.0.3-3.x86_64 35/42 Installing : libobasis7.3-extension-mediawiki-publisher-7.3.0.3-3.x86_64 36/42 Installing : libobasis7.3-gnome-integration-7.3.0.3-3.x86_64 37/42 Installing : libobasis7.3-extension-beanshell-script-provider-7.3.0.3-3.x86_64 38/42 Installing : libobasis7.3-libreofficekit-data-7.3.0.3-3.x86_64 39/42 Installing : libobasis7.3-xsltfilter-7.3.0.3-3.x86_64 40/42 Installing : libobasis7.3-kde-integration-7.3.0.3-3.x86_64 41/42 Installing : libreoffice7.3-freedesktop-menus-7.3.0-3.noarch 42/42 which: no update-desktop-database in (/sbin:/bin:/usr/sbin:/usr/bin:/usr/X11R6/bin) /bin/update-mime-database /bin/gtk-update-icon-cache which: no update-desktop-database in (/sbin:/bin:/usr/sbin:/usr/bin:/usr/X11R6/bin) which: no update-desktop-database in (/sbin:/bin:/usr/sbin:/usr/bin:/usr/X11R6/bin) Verifying : libobasis7.3-graphicfilter-7.3.0.3-3.x86_64 1/42 Verifying : libobasis7.3-ooolinguistic-7.3.0.3-3.x86_64 2/42 Verifying : libreoffice7.3-en-US-7.3.0.3-3.x86_64 3/42 Verifying : libobasis7.3-extension-pdf-import-7.3.0.3-3.x86_64 4/42 Verifying : libobasis7.3-draw-7.3.0.3-3.x86_64 5/42 Verifying : libobasis7.3-core-7.3.0.3-3.x86_64 6/42 Verifying : libobasis7.3-images-7.3.0.3-3.x86_64 7/42 Verifying : libobasis7.3-onlineupdate-7.3.0.3-3.x86_64 8/42 Verifying : libreoffice7.3-ure-7.3.0.3-3.x86_64 9/42 Verifying : libobasis7.3-math-7.3.0.3-3.x86_64 10/42 Verifying : libreoffice7.3-dict-en-7.3.0.3-3.x86_64 11/42 Verifying : libobasis7.3-base-7.3.0.3-3.x86_64 12/42 Verifying : libreoffice7.3-base-7.3.0.3-3.x86_64 13/42 Verifying : libreoffice7.3-dict-es-7.3.0.3-3.x86_64 14/42 Verifying : libobasis7.3-extension-nlpsolver-7.3.0.3-3.x86_64 15/42 Verifying : libobasis7.3-en-US-7.3.0.3-3.x86_64 16/42 Verifying : libobasis7.3-librelogo-7.3.0.3-3.x86_64 17/42 Verifying : libreoffice7.3-calc-7.3.0.3-3.x86_64 18/42 Verifying : libreoffice7.3-dict-fr-7.3.0.3-3.x86_64 19/42 Verifying : libobasis7.3-writer-7.3.0.3-3.x86_64 20/42 Verifying : libobasis7.3-python-script-provider-7.3.0.3-3.x86_64 21/42 Verifying : libobasis7.3-firebird-7.3.0.3-3.x86_64 22/42 Verifying : libobasis7.3-pyuno-7.3.0.3-3.x86_64 23/42 Verifying : libreoffice7.3-writer-7.3.0.3-3.x86_64 24/42 Verifying : libobasis7.3-extension-report-builder-7.3.0.3-3.x86_64 25/42 Verifying : libobasis7.3-extension-javascript-script-provider-7.3.0.3-3.x86_64 26/42 Verifying : libobasis7.3-extension-mediawiki-publisher-7.3.0.3-3.x86_64 27/42 Verifying : libobasis7.3-ogltrans-7.3.0.3-3.x86_64 28/42 Verifying : libobasis7.3-postgresql-sdbc-7.3.0.3-3.x86_64 29/42 Verifying : libobasis7.3-ooofonts-7.3.0.3-3.x86_64 30/42 Verifying : libobasis7.3-gnome-integration-7.3.0.3-3.x86_64 31/42 Verifying : libreoffice7.3-math-7.3.0.3-3.x86_64 32/42 Verifying : libreoffice7.3-draw-7.3.0.3-3.x86_64 33/42 Verifying : libobasis7.3-calc-7.3.0.3-3.x86_64 34/42 Verifying : libreoffice7.3-impress-7.3.0.3-3.x86_64 35/42 Verifying : libobasis7.3-impress-7.3.0.3-3.x86_64 36/42 Verifying : libreoffice7.3-freedesktop-menus-7.3.0-3.noarch 37/42 Verifying : libreoffice7.3-7.3.0.3-3.x86_64 38/42 Verifying : libobasis7.3-extension-beanshell-script-provider-7.3.0.3-3.x86_64 39/42 Verifying : libobasis7.3-libreofficekit-data-7.3.0.3-3.x86_64 40/42 Verifying : libobasis7.3-xsltfilter-7.3.0.3-3.x86_64 41/42 Verifying : libobasis7.3-kde-integration-7.3.0.3-3.x86_64 42/42 Installed: libobasis7.3-base.x86_64 0:7.3.0.3-3 libobasis7.3-calc.x86_64 0:7.3.0.3-3 libobasis7.3-core.x86_64 0:7.3.0.3-3 libobasis7.3-draw.x86_64 0:7.3.0.3-3 libobasis7.3-en-US.x86_64 0:7.3.0.3-3 libobasis7.3-extension-beanshell-script-provider.x86_64 0:7.3.0.3-3 libobasis7.3-extension-javascript-script-provider.x86_64 0:7.3.0.3-3 libobasis7.3-extension-mediawiki-publisher.x86_64 0:7.3.0.3-3 libobasis7.3-extension-nlpsolver.x86_64 0:7.3.0.3-3 libobasis7.3-extension-pdf-import.x86_64 0:7.3.0.3-3 libobasis7.3-extension-report-builder.x86_64 0:7.3.0.3-3 libobasis7.3-firebird.x86_64 0:7.3.0.3-3 libobasis7.3-gnome-integration.x86_64 0:7.3.0.3-3 libobasis7.3-graphicfilter.x86_64 0:7.3.0.3-3 libobasis7.3-images.x86_64 0:7.3.0.3-3 libobasis7.3-impress.x86_64 0:7.3.0.3-3 libobasis7.3-kde-integration.x86_64 0:7.3.0.3-3 libobasis7.3-librelogo.x86_64 0:7.3.0.3-3 libobasis7.3-libreofficekit-data.x86_64 0:7.3.0.3-3 libobasis7.3-math.x86_64 0:7.3.0.3-3 libobasis7.3-ogltrans.x86_64 0:7.3.0.3-3 libobasis7.3-onlineupdate.x86_64 0:7.3.0.3-3 libobasis7.3-ooofonts.x86_64 0:7.3.0.3-3 libobasis7.3-ooolinguistic.x86_64 0:7.3.0.3-3 libobasis7.3-postgresql-sdbc.x86_64 0:7.3.0.3-3 libobasis7.3-python-script-provider.x86_64 0:7.3.0.3-3 libobasis7.3-pyuno.x86_64 0:7.3.0.3-3 libobasis7.3-writer.x86_64 0:7.3.0.3-3 libobasis7.3-xsltfilter.x86_64 0:7.3.0.3-3 libreoffice7.3.x86_64 0:7.3.0.3-3 libreoffice7.3-base.x86_64 0:7.3.0.3-3 libreoffice7.3-calc.x86_64 0:7.3.0.3-3 libreoffice7.3-dict-en.x86_64 0:7.3.0.3-3 libreoffice7.3-dict-es.x86_64 0:7.3.0.3-3 libreoffice7.3-dict-fr.x86_64 0:7.3.0.3-3 libreoffice7.3-draw.x86_64 0:7.3.0.3-3 libreoffice7.3-en-US.x86_64 0:7.3.0.3-3 libreoffice7.3-freedesktop-menus.noarch 0:7.3.0-3 libreoffice7.3-impress.x86_64 0:7.3.0.3-3 libreoffice7.3-math.x86_64 0:7.3.0.3-3 libreoffice7.3-ure.x86_64 0:7.3.0.3-3 libreoffice7.3-writer.x86_64 0:7.3.0.3-3 Complete! [root@VM-12-15-centos RPMS]# 下载中文包wget --no-check-certificate https://mirrors.nju.edu.cn/tdf/libreoffice/stable/7.3.0/rpm/x86_64/LibreOffice_7.3.0_Linux_x86-64_rpm_langpack_zh-CN.tar.gz执行过程记录如下:[root@VM-12-15-centos RPMS]# cd ../../ [root@VM-12-15-centos soft]# wget --no-check-certificate https://mirrors.nju.edu.cn/tdf/libreoffice/stable/7.3.0/rpm/x86_64/LibreOffice_7.3.0_Linux_x86-64_rpm_langpack_zh-CN.tar.gz --2022-02-05 10:42:57-- https://mirrors.nju.edu.cn/tdf/libreoffice/stable/7.3.0/rpm/x86_64/LibreOffice_7.3.0_Linux_x86-64_rpm_langpack_zh-CN.tar.gz Resolving mirrors.nju.edu.cn (mirrors.nju.edu.cn)... 210.28.130.3, 2001:da8:1007:4011::3 Connecting to mirrors.nju.edu.cn (mirrors.nju.edu.cn)|210.28.130.3|:443... connected. HTTP request sent, awaiting response... 200 OK Length: 1090479 (1.0M) [application/octet-stream] Saving to: ‘LibreOffice_7.3.0_Linux_x86-64_rpm_langpack_zh-CN.tar.gz’ 100%[===============================================================================>] 1,090,479 5.40MB/s in 0.2s 2022-02-05 10:42:58 (5.40 MB/s) - ‘LibreOffice_7.3.0_Linux_x86-64_rpm_langpack_zh-CN.tar.gz’ saved [1090479/1090479] [root@VM-12-15-centos soft]# 解压中文包tar -zxvf LibreOffice_7.3.0_Linux_x86-64_rpm_langpack_zh-CN.tar.gz进入中文包安装目录安装中文包yum install -y *.rpm执行过程记录如下:[root@VM-12-15-centos RPMS]# yum install -y *.rpm Loaded plugins: fastestmirror, langpacks Repository epel is listed more than once in the configuration Examining libobasis7.3-zh-CN-7.3.0.3-3.x86_64.rpm: libobasis7.3-zh-CN-7.3.0.3-3.x86_64 Marking libobasis7.3-zh-CN-7.3.0.3-3.x86_64.rpm to be installed Examining libreoffice7.3-zh-CN-7.3.0.3-3.x86_64.rpm: libreoffice7.3-zh-CN-7.3.0.3-3.x86_64 Marking libreoffice7.3-zh-CN-7.3.0.3-3.x86_64.rpm to be installed Resolving Dependencies --> Running transaction check ---> Package libobasis7.3-zh-CN.x86_64 0:7.3.0.3-3 will be installed ---> Package libreoffice7.3-zh-CN.x86_64 0:7.3.0.3-3 will be installed --> Finished Dependency Resolution Dependencies Resolved ========================================================================================================================= Package Arch Version Repository Size ========================================================================================================================= Installing: libobasis7.3-zh-CN x86_64 7.3.0.3-3 /libobasis7.3-zh-CN-7.3.0.3-3.x86_64 3.6 M libreoffice7.3-zh-CN x86_64 7.3.0.3-3 /libreoffice7.3-zh-CN-7.3.0.3-3.x86_64 15 k Transaction Summary ========================================================================================================================= Install 2 Packages Total size: 3.6 M Installed size: 3.6 M Downloading packages: Running transaction check Running transaction test Transaction test succeeded Running transaction Installing : libobasis7.3-zh-CN-7.3.0.3-3.x86_64 1/2 Installing : libreoffice7.3-zh-CN-7.3.0.3-3.x86_64 2/2 Verifying : libobasis7.3-zh-CN-7.3.0.3-3.x86_64 1/2 Verifying : libreoffice7.3-zh-CN-7.3.0.3-3.x86_64 2/2 Installed: libobasis7.3-zh-CN.x86_64 0:7.3.0.3-3 libreoffice7.3-zh-CN.x86_64 0:7.3.0.3-3 Complete! [root@VM-12-15-centos RPMS]# 安装文档转换相关依赖库yum -y install cairo cups-libs libSM执行过程记录如下:[root@VM-12-15-centos RPMS]# yum -y install cairo cups-libs libSM Loaded plugins: fastestmirror, langpacks Repository epel is listed more than once in the configuration Loading mirror speeds from cached hostfile Package cairo-1.15.12-4.el7.x86_64 already installed and latest version Package 1:cups-libs-1.6.3-51.el7.x86_64 already installed and latest version Package libSM-1.2.2-2.el7.x86_64 already installed and latest version Nothing to do [root@VM-12-15-centos RPMS]# 安装中文字体1.创建中文字体目录mkdir -p /usr/share/fonts/chinese2.拷贝字体文件到中文字体目录,拷贝前将相关的字体文件上传到/soft/fonts/目录cp /soft/fonts/*.* /usr/share/fonts/chinese/3. 目录授权chmod -R 755 /usr/share/fonts/chinese4. 安装ttmkfdir来搜索目录中所有的字体信息,并汇总生成fonts.scale文件yum -y install ttmkfdir5. 执行ttmkfdir命令ttmkfdir -e /usr/share/X11/fonts/encodings/encodings.dir6.修改字体配置文件vi /etc/fonts/fonts.conf7. 在其他dir节点下加入如下字体文件索引目录<dir>/usr/share/fonts/chinese</dir>8. 刷新内存中的字体缓存fc-cache